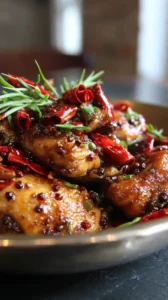
This Japanese Teriyaki Chicken delivers tender, juicy chicken with a glossy, sweet-savory glaze. It’s surprisingly simple to make using common pantry ingredients. You’ll love this versatile dish that brings authentic flavor right to your table.
Craving a delicious Japanese Teriyaki Chicken? You've come to the right spot! From Chicken Recipes favorites to amazing Chicken Breast Recipes recipes, there's something here for everyone.


Why You’ll Love This Japanese Teriyaki Chicken
- Incredibly flavorful: Perfect harmony of salty, sweet, and umami.
- Spot-on texture: Tender chicken with a sticky, glossy glaze.
- Simple to master: Straightforward process with common ingredients.
- Wonderfully versatile: Great over rice, in bento, or on salads.
Ingredients & Tools
- 4 boneless, skinless chicken thighs (about 500-600 g)
- 1 tbsp neutral oil (like vegetable or canola)
- 2 tbsp sake
- 2 tbsp mirin
- 2 tbsp soy sauce (use usukuchi for a lighter color, or regular)
- 1 tbsp sugar
- 1 tsp freshly grated ginger
- 1 small garlic clove, finely minced
- 1 tsp cornstarch (optional, for a thicker glaze)
- 1 tbsp water (if using cornstarch)
- Toasted sesame seeds and sliced green onion for garnish
Tools: A large skillet or frying pan (non-stick is great here), a microplane or fine grater for the ginger, and a small bowl for mixing.
Notes: The quality of your soy sauce and mirin really makes a difference here—they’re the backbone of the flavor. And don’t skip the sake; it adds a subtle complexity that balances the sweetness perfectly.
Nutrition (per serving)
| Calories: | 320 kcal |
| Protein: | 28 g |
| Fat: | 16 g |
| Carbs: | 10 g |
| Fiber: | 0.5 g |
Serves: 2 | Prep Time: 10 minutes | Cook Time: 15 minutes | Total Time: 25 minutes
Before You Start: Tips & Ingredient Notes
- Chicken thighs are your best friend here. They stay incredibly juicy and tender during the cooking process, much more so than breast meat, which can dry out quickly with the reduction method.
- Don’t substitute the mirin or sake with just more sugar. They provide a distinct, rounded sweetness and aroma that plain sugar can’t replicate. If you’re in a real pinch, a dry white wine can sub for sake, but the flavor will be slightly different.
- Grate your ginger fresh, please! The jarred stuff just doesn’t have the same bright, zingy punch. A little goes a long way, and it makes the sauce feel alive.
- Pat your chicken completely dry. This is the secret to getting a nice sear and preventing the chicken from steaming in its own juices. A dry surface equals beautiful browning.
How to Make Japanese Teriyaki Chicken
Step 1: Start by prepping your chicken. Pat the thighs completely dry with paper towels—this is non-negotiable for a good sear. If they are very large or uneven, you can make a few small slits along any thicker edges so they cook evenly. Season lightly with a tiny pinch of salt (remember, the soy sauce is quite salty). In a small bowl, whisk together the sake, mirin, soy sauce, sugar, grated ginger, and minced garlic. This is your teriyaki base, and it should smell amazing already.
Step 2: Heat the oil in your large skillet over medium-high heat. Once the oil is shimmering, carefully add the chicken thighs, presentation-side down. You should hear a confident sizzle. Resist the urge to move them! Let them cook for about 5-7 minutes, until a deep golden-brown crust forms on the first side. You’ll notice the edges starting to turn opaque. Flip them over and cook for another 4-5 minutes on the second side. The chicken doesn’t need to be fully cooked through yet, as it will finish in the sauce.
Step 3: Now, pour off any excess fat from the pan (there shouldn’t be much). Reduce the heat to medium-low. Pour your pre-mixed teriyaki sauce directly over and around the chicken. It will bubble and steam up immediately—that’s the good stuff. As the sauce heats up, you can start spooning it over the top of the chicken pieces, bathing them in that glorious liquid.
Step 4: Continue to cook, frequently spooning the sauce over the chicken, for about 5-7 minutes. You’ll notice the sauce slowly reducing, becoming thicker and glossier. It will start to coat the back of your spoon. The bubbles will also get larger and slower. This is when the magic happens, as the sugars caramelize and the sauce turns into a proper glaze.
Step 5: To check for doneness, pierce the thickest part of a thigh with a knife or skewer; the juices should run clear. If you want an even thicker, more restaurant-style glaze, you can mix the cornstarch with the water to create a slurry. Push the chicken to one side of the pan, pour in the slurry, and stir it quickly into the simmering sauce for 30 seconds until it thickens, then coat the chicken again.
Step 6: Once the chicken is cooked through and the sauce is a beautiful, sticky glaze, remove the pan from the heat. Transfer the chicken to a cutting board and let it rest for a couple of minutes—this keeps all those juices locked in. Slice it against the grain, arrange it on a plate, and pour any remaining glaze from the pan over the top. Finish with a generous sprinkle of toasted sesame seeds and sliced green onions for color and a fresh crunch.
Storage & Freshness Guide
- Fridge: Store in an airtight container for 3-4 days.
- Freezer: Freeze for up to 2 months in a sealed container.
- Reviving: Reheat gently in a skillet with a splash of water to loosen glaze.
Serving Suggestions
Complementary Dishes
- Steamed Japanese short-grain rice — The ultimate partner, its sticky texture is perfect for soaking up every last drop of that glorious teriyaki sauce.
- A simple cucumber sunomono salad — The bright, vinegary crunch provides a refreshing contrast that cuts through the richness of the chicken beautifully.
- Stir-fried vegetables like broccoli or bok choy — They add color, texture, and make the meal feel complete and balanced on the plate.
Drinks
- A cold, dry Japanese lager — The crisp, clean bubbles are a classic pairing that cleanses the palate between each savory-sweet bite.
- Green tea (sencha or genmaicha) — Its slight bitterness and earthy notes complement the umami flavors in the dish without overpowering them.
- Yuzu sparkling water — For a non-alcoholic option, the citrusy zing of yuzu is incredibly refreshing and lifts all the flavors.
Something Sweet
- Matcha ice cream — The bittersweet, creamy finish is a wonderful, traditional way to end a Japanese-inspired meal.
- Mochi ice cream — The chewy, sweet outer layer and cold ice cream center are a fun, textural delight that everyone loves.
- A simple plate of fresh orange segments — Sometimes, the simplest option is the best; the bright citrus is a light and palate-cleansing finale.
Top Mistakes to Avoid
- Moving the chicken too soon. If you don’t let it sear undisturbed, you won’t develop that beautiful, flavorful crust, and the chicken might stick to the pan.
- Cooking over too high heat after adding the sauce. The sugar in the mirin and sugar can burn very easily, leading to a bitter, acrid taste instead of a sweet caramelization. A gentle simmer is key.
- Using old, low-quality soy sauce or mirin. These are the flavor powerhouses of the dish. If your bottles have been in the pantry for years, it’s worth investing in fresh ones for the best result.
- Skipping the resting step. I know it’s tempting to dig right in, but letting the chicken rest for just a few minutes allows the juices to redistribute, ensuring every bite is moist.
Expert Tips
- Tip: For an extra layer of flavor, you can marinate the chicken in half of the teriyaki sauce (without the cornstarch) for 30 minutes before cooking. Just pat it dry again before searing to ensure a good crust.
- Tip: If your sauce is reducing too quickly before the chicken is cooked, add a tablespoon of water to the pan to slow it down and prevent burning. You can always let it reduce again at the end.
- Tip: To get that perfect, glossy restaurant finish, pass the reduced sauce through a fine-mesh sieve after cooking to remove the minced garlic and ginger bits. It creates a super smooth, professional-looking glaze.
- Tip: Double or triple the sauce recipe and keep it in a jar in the fridge. It’s fantastic for quick weeknight meals, as a glaze for salmon, or even as a dressing for grain bowls.
FAQs
Can I use chicken breasts instead of thighs?
You absolutely can, but you’ll need to adjust the cooking time. Breast meat cooks faster and is much leaner, so it can go from juicy to dry in a flash. Use thinner cutlets or pound them to an even thickness. Reduce the initial searing time to about 3-4 minutes per side and be vigilant when finishing them in the sauce—they’ll likely be done in just 2-3 minutes. The result will still be tasty, but thighs really are the superior choice for flavor and texture here.
My sauce isn’t thickening. What did I do wrong?
Don’t worry, this is a common hiccup! The sauce thickens primarily through reduction—the water evaporates, leaving the sugars and other components behind. If it’s not thickening, your heat might be too low, or there might be too much liquid. Crank the heat up to a steady simmer (not a rolling boil) and give it another minute or two. If you’re really in a rush, that’s when the cornstarch slurry (1 tsp cornstarch + 1 tbsp water) becomes your best friend for an instant thickener.
How long does leftover teriyaki chicken keep?
Stored in an airtight container in the refrigerator, it will keep beautifully for 3-4 days. The flavor often deepens and gets even better the next day! Reheat it gently in a skillet with a tiny splash of water to loosen the glaze, or in the microwave at a medium power level to prevent the chicken from becoming tough.
Is this recipe gluten-free?
It can be, easily! Standard soy sauce contains wheat, so simply swap it for a certified gluten-free tamari or coconut aminos. The rest of the ingredients are naturally gluten-free, so with that one simple substitution, you’re all set for a delicious gluten-free meal.
Can I make this sauce ahead of time?
Yes, and it’s a fantastic time-saver! You can mix the sake, mirin, soy sauce, sugar, ginger, and garlic together and store it in a jar in the fridge for up to a week. The flavors will meld and mature, which is a great thing. Just give it a good shake before using it in the recipe.


Japanese Teriyaki Chicken
Make perfect Japanese Teriyaki Chicken with a sticky, glossy glaze. This easy recipe uses simple ingredients for authentic flavor. Get the step-by-step guide now!
Ingredients
For the Ingredients
-
4 boneless, skinless chicken thighs (about 500-600 g)
-
1 tbsp neutral oil (like vegetable or canola)
-
2 tbsp sake
-
2 tbsp mirin
-
2 tbsp soy sauce (use usukuchi for a lighter color, or regular)
-
1 tbsp sugar
-
1 tsp freshly grated ginger
-
1 small clove garlic (finely minced)
-
1 tsp cornstarch (optional, for a thicker glaze)
-
1 tbsp water (if using cornstarch)
-
Toasted sesame seeds and sliced green onion (for garnish)
Instructions
-
Start by prepping your chicken. Pat the thighs completely dry with paper towels—this is non-negotiable for a good sear. If they are very large or uneven, you can make a few small slits along any thicker edges so they cook evenly. Season lightly with a tiny pinch of salt (remember, the soy sauce is quite salty). In a small bowl, whisk together the sake, mirin, soy sauce, sugar, grated ginger, and minced garlic. This is your teriyaki base, and it should smell amazing already.01
-
Heat the oil in your large skillet over medium-high heat. Once the oil is shimmering, carefully add the chicken thighs, presentation-side down. You should hear a confident sizzle. Resist the urge to move them! Let them cook for about 5-7 minutes, until a deep golden-brown crust forms on the first side. You’ll notice the edges starting to turn opaque. Flip them over and cook for another 4-5 minutes on the second side. The chicken doesn’t need to be fully cooked through yet, as it will finish in the sauce.02
-
Now, pour off any excess fat from the pan (there shouldn’t be much). Reduce the heat to medium-low. Pour your pre-mixed teriyaki sauce directly over and around the chicken. It will bubble and steam up immediately—that’s the good stuff. As the sauce heats up, you can start spooning it over the top of the chicken pieces, bathing them in that glorious liquid.03
-
Continue to cook, frequently spooning the sauce over the chicken, for about 5-7 minutes. You’ll notice the sauce slowly reducing, becoming thicker and glossier. It will start to coat the back of your spoon. The bubbles will also get larger and slower. This is when the magic happens, as the sugars caramelize and the sauce turns into a proper glaze.04
-
To check for doneness, pierce the thickest part of a thigh with a knife or skewer; the juices should run clear. If you want an even thicker, more restaurant-style glaze, you can mix the cornstarch with the water to create a slurry. Push the chicken to one side of the pan, pour in the slurry, and stir it quickly into the simmering sauce for 30 seconds until it thickens, then coat the chicken again.05
-
Once the chicken is cooked through and the sauce is a beautiful, sticky glaze, remove the pan from the heat. Transfer the chicken to a cutting board and let it rest for a couple of minutes—this keeps all those juices locked in. Slice it against the grain, arrange it on a plate, and pour any remaining glaze from the pan over the top. Finish with a generous sprinkle of toasted sesame seeds and sliced green onions for color and a fresh crunch.06
Not what you're looking for?


