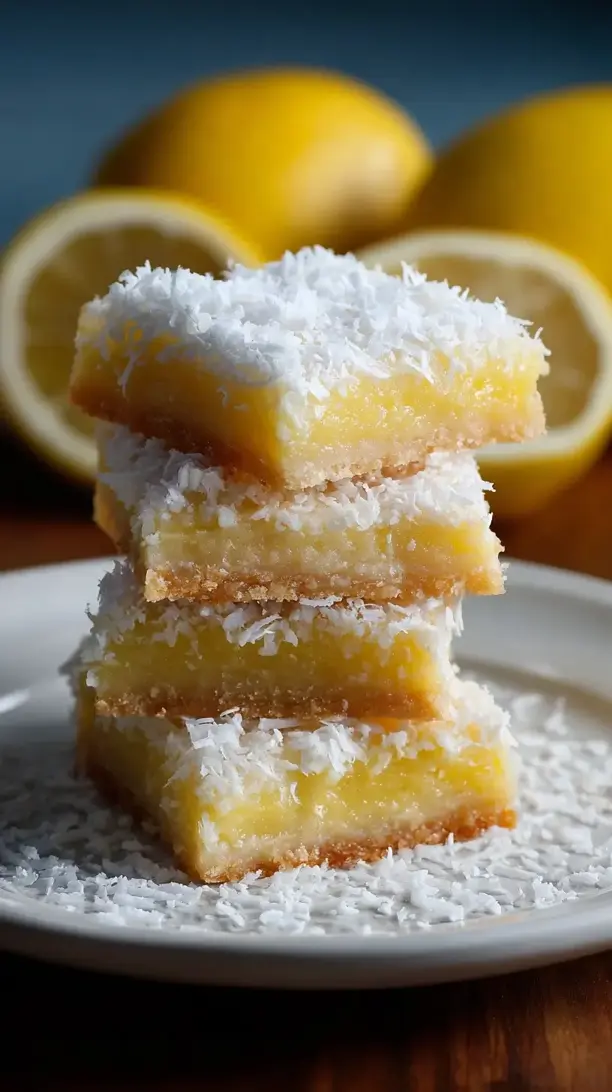
These Lemon Coconut Bars combine a buttery shortbread crust with a vibrant lemon filling and toasted coconut topping. They deliver a perfect balance of tart and sweet in every bite. This easy dessert feels both elegant and comforting.
Love Lemon Coconut Bars? So do we! If you're into Snacks or curious about Burgers, you'll find plenty of inspiration below.


Why You’ll Love This Lemon Coconut Bars
- Balanced flavor: Zesty lemon cuts through the sweet coconut and buttery crust.
- Texture contrast: Crumbly base, creamy lemon layer, and chewy coconut topping.
- Simple to make: No fancy techniques—just zest, stir, and bake.
- Crowd-pleasing: Perfect for any occasion, from picnics to parties.
Ingredients & Tools
For the Crust:
- 200 g all-purpose flour
- 100 g granulated sugar
- 1/4 tsp salt
- 170 g unsalted butter, cold and cubed
For the Filling:
- 4 large eggs
- 300 g granulated sugar
- Zest of 2 lemons
- 120 ml fresh lemon juice (about 3-4 lemons)
- 60 g all-purpose flour
- 1/2 tsp baking powder
- 150 g sweetened shredded coconut, plus extra for topping
Tools: 8×8 inch (20×20 cm) baking pan, parchment paper, mixing bowls, zester or microplane, whisk, and a spatula.
Notes: Use fresh lemon juice for the best flavor. Don’t skimp on the coconut for that essential chewy texture.
Nutrition (per serving)
| Calories: | 280 kcal |
| Protein: | 3 g |
| Fat: | 12 g |
| Carbs: | 42 g |
| Fiber: | 1 g |
Serves: 16 | Prep Time: 20 minutes | Cook Time: 35 minutes | Total Time: 55 minutes (plus cooling)
Before You Start: Tips & Ingredient Notes
- Why cold butter for the crust? Cold butter is the secret to a flaky, crumbly shortbread texture. When it melts in the oven, it creates little steam pockets, which gives you that perfect melt-in-your-mouth base.
- Can I use bottled lemon juice? Honestly, I wouldn’t recommend it. Freshly squeezed lemon juice has a brighter, more complex flavor without any bitter or metallic aftertaste. It truly makes all the difference in the filling.
- What’s the deal with toasting the coconut? Toasting the coconut before sprinkling it on top deepens its flavor immensely, adding a nutty, aromatic quality that raw coconut just doesn’t have. It only takes a few minutes but elevates the entire bar.
- How do I know when the bars are perfectly set? The center should have a slight, gentle jiggle—like set jelly—not a liquid wobble. It will continue to firm up as it cools, so don’t overbake it, or you’ll lose that lovely creamy texture.
How to Make Lemon Coconut Bars
Step 1: First, preheat your oven to 350°F (175°C). Line your 8×8 inch baking pan with parchment paper, leaving some overhang on two opposite sides. This creates “handles” that will make it incredibly easy to lift the entire slab of bars out later for clean cutting. A little preparation here saves a lot of frustration later!
Step 2: Now, let’s make the crust. In a medium bowl, whisk together the 200g of flour, 100g of sugar, and the salt. Add your cold, cubed butter. Using a pastry cutter, your fingertips, or even a fork, work the butter into the dry ingredients until the mixture resembles coarse, wet sand with some pea-sized butter pieces remaining. This uneven texture is what gives you a wonderfully tender and flaky crust.
Step 3: Dump the crust mixture into your prepared pan and press it down firmly and evenly into one compact layer. I like to use the bottom of a flat measuring cup to really get it packed in. Bake this for about 15-18 minutes, or until the edges are just starting to turn a very light golden brown. You’ll notice a lovely, buttery aroma filling your kitchen. This pre-baking, or “blind baking,” ensures your crust stays crisp and doesn’t get soggy from the wet filling.
Step 4: While the crust is baking, whisk together the filling. In a large bowl, whisk the eggs and 300g of sugar until they’re well combined and look a bit paler in color. Then, whisk in the fresh lemon juice and zest. The trick is to add the zest first and really rub it into the sugar with your fingers before adding the other ingredients—this helps release the citrus oils for maximum flavor.
Step 5: Sift the 60g of flour and baking powder directly into the wet ingredients. This prevents little lumps of flour in your smooth filling. Whisk it gently until just combined—you don’t want to over-mix and incorporate too much air. Finally, fold in the 150g of shredded coconut with a spatula. The batter will be thin, but that’s exactly what you want.
Step 6: Once the crust is out of the oven, immediately pour the lemon-coconut filling over the hot crust. It will sizzle a little, which is a good sign! Tilt the pan gently to spread the filling evenly. Sprinkle a little extra shredded coconut over the top for added texture and visual appeal.
Step 7: Carefully return the pan to the oven and bake for another 20-25 minutes. You’re looking for the edges to be fully set and just beginning to brown, while the center still has a slight, gentle jiggle when you nudge the pan. The top should be a beautiful golden yellow. Over-baking is the enemy of a creamy texture, so when in doubt, pull it out a minute early.
Step 8: This is the hardest part: let the pan cool completely on a wire rack. I mean it—completely. This can take a couple of hours. The filling needs this time to set up properly. Once it’s at room temperature, you can transfer it to the refrigerator to chill for at least another hour. This final chill makes the bars firm and incredibly easy to slice cleanly.
Step 9: Time for the grand finale! Use the parchment paper handles to lift the entire block of bars out of the pan and onto a cutting board. Use a long, sharp knife to slice them into 16 squares. For the cleanest cuts, wipe the knife blade clean between each slice. Now, admire your beautiful, layered creation before serving.
Storage & Freshness Guide
- Fridge: Store in an airtight container for up to 4 days.
- Freezer: Layer between parchment in a freezer-safe container for up to 3 months.
- Reviving: Thaw frozen bars in the fridge overnight; serve chilled.
Serving Suggestions
Complementary Dishes
- A simple fruit platter with berries and mint — The fresh, slightly tart berries provide a lovely, light counterpoint to the rich, sweet bars, cleansing the palate between bites.
- A scoop of vanilla bean ice cream — The creamy, cold ice cream melting into the slightly warm bar is a classic dessert combination that feels indulgent and celebratory.
- A dollop of lightly sweetened whipped cream — It adds a cloud-like, airy texture that complements the dense, chewy bar without overpowering the starring lemon and coconut flavors.
Drinks
- Iced Earl Grey tea — The bergamot in the tea harmonizes beautifully with the citrus notes in the bar, creating a sophisticated and refreshing pairing.
- A crisp Prosecco or sparkling wine — The bubbles and acidity cut through the sweetness perfectly, making each bite of the bar feel light and effervescent.
- A hot cup of coffee with a touch of cream — The bitterness of the coffee provides a wonderful balance to the sweet and tangy flavors, making for a perfect afternoon pick-me-up.
Something Sweet
- Dark chocolate-dipped strawberries — They continue the fruit-and-cream theme but with a different, richer chocolate note that doesn’t compete with the lemon and coconut.
- Mini almond biscotti — Their crunchy, nutty character offers a textural contrast and a less sweet option for those who want to nibble on something alongside their bar.
- Lemon sorbet — Doubling down on the citrus theme makes for an incredibly refreshing and palate-cleansing end to a meal, especially after something rich and savory.
Top Mistakes to Avoid
- Mistake: Using a different pan size. An 8×8 pan is ideal for the right bar thickness. A larger pan will make the crust too thin and the filling will bake too quickly, resulting in a dry, rubbery texture.
- Mistake: Over-mixing the filling. Whisking the filling vigorously after adding the flour can incorporate too much air and lead to a puffy, almost cake-like texture instead of the desired smooth and creamy custard.
- Mistake: Skipping the chilling step. I’ve messed this up before too, thinking I could slice them while slightly warm. The result is a gooey, messy presentation. Patience is key for those perfect, clean squares.
- Mistake: Over-baking the filling. The center should still jiggle slightly when you take it out. It continues to cook from residual heat as it cools. A fully firm center in the oven means it will be overdone and rubbery once cooled.
Expert Tips
- Tip: Zest your lemons before juicing them. It is infinitely easier to zest a whole, firm lemon than a floppy, juiced one. This simple workflow hack saves time and frustration.
- Tip: Toast your coconut topping separately. Spread the extra coconut for the topping on a baking sheet and toast it at 350°F for 5-7 minutes before sprinkling it on the bars. This gives you a deeper, nuttier flavor and a more consistent color than toasting it on the bar itself.
- Tip: Use a glass or metal measuring cup for the lemon juice. The acid in lemon juice can react with certain metals and plastics, potentially giving an off-flavor. Glass is always a safe bet.
- Tip: For super clean cuts, run your knife under hot water. Wipe it dry and then slice. The warm blade glides through the chilled bars smoothly, preventing the topping from tearing and giving you that professional, bakery-style edge.
FAQs
Can I make these bars ahead of time?
Absolutely, and they might even be better the next day! Once completely cooled, store them in an airtight container in the refrigerator for up to 4 days. The flavors have more time to meld, and the texture becomes even more cohesive. You can also freeze them for up to 3 months; just layer them between parchment paper in a freezer-safe container.
My crust shrank a lot in the pan. What happened?
This usually happens if the crust was overworked or pressed too thinly up the sides of the pan. When you press the crust in, focus on a firm, even layer on the bottom. It’s okay if it doesn’t go all the way up the sides. Also, make sure your butter was cold—warm butter can cause more shrinkage during baking.
Can I use lime juice instead of lemon?
You can, and it will be delicious—think Key Lime Coconut Bars! The process is identical. Just be aware that lime juice can be slightly more astringent than lemon, so you might want to taste the filling before baking and add a tiny bit more sugar if you find it too tart for your liking.
Why is my filling grainy?
A grainy texture often comes from the sugar not fully dissolving in the egg mixture. Make sure you whisk the eggs and sugar thoroughly until the mixture looks smooth and has lightened in color slightly. Another culprit could be undissolved flour; sifting it in helps prevent this.
Can I use desiccated coconut instead of sweetened shredded?
You can, but the result will be less sweet and less moist. Sweetened shredded coconut has more moisture and sugar, which contributes to the bar’s classic chewy texture and flavor. If you use desiccated, you may want to add an extra tablespoon of sugar to the filling to compensate.


Lemon Coconut Bars
Make the perfect Lemon Coconut Bars with this easy recipe! A buttery crust, tangy lemon filling, and toasted coconut topping. Get the recipe and bake a batch today!
Ingredients
For the Crust:
-
200 g all-purpose flour
-
100 g granulated sugar
-
1/4 tsp salt
-
170 g unsalted butter (cold and cubed)
For the Filling:
-
4 large eggs
-
300 g granulated sugar
-
Zest of 2 lemons
-
120 ml fresh lemon juice (about 3-4 lemons)
-
60 g all-purpose flour
-
1/2 tsp baking powder
-
150 g sweetened shredded coconut (plus extra for topping)
Instructions
-
First, preheat your oven to 350°F (175°C). Line your 8x8 inch baking pan with parchment paper, leaving some overhang on two opposite sides.01
-
Now, let's make the crust. In a medium bowl, whisk together the 200g of flour, 100g of sugar, and the salt. Add your cold, cubed butter. Using a pastry cutter, your fingertips, or even a fork, work the butter into the dry ingredients until the mixture resembles coarse, wet sand with some pea-sized butter pieces remaining.02
-
Dump the crust mixture into your prepared pan and press it down firmly and evenly into one compact layer. Bake this for about 15-18 minutes, or until the edges are just starting to turn a very light golden brown.03
-
While the crust is baking, whisk together the filling. In a large bowl, whisk the eggs and 300g of sugar until they're well combined and look a bit paler in color. Then, whisk in the fresh lemon juice and zest.04
-
Sift the 60g of flour and baking powder directly into the wet ingredients. Whisk it gently until just combined. Finally, fold in the 150g of shredded coconut with a spatula.05
-
Once the crust is out of the oven, immediately pour the lemon-coconut filling over the hot crust. Tilt the pan gently to spread the filling evenly. Sprinkle a little extra shredded coconut over the top for added texture and visual appeal.06
-
Carefully return the pan to the oven and bake for another 20-25 minutes. You're looking for the edges to be fully set and just beginning to brown, while the center still has a slight, gentle jiggle when you nudge the pan.07
-
Let the pan cool completely on a wire rack. Once it's at room temperature, you can transfer it to the refrigerator to chill for at least another hour.08
-
Use the parchment paper handles to lift the entire block of bars out of the pan and onto a cutting board. Use a long, sharp knife to slice them into 16 squares.09
Not what you're looking for?


