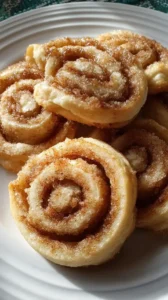
There’s something magical about pulling a tray of M&M holiday cookies from the oven. I love how they fill the kitchen with a warm, buttery scent and promise a burst of festive cheer in every bite. For me, this is the heart of holiday baking—creating simple, joyful moments. With their chewy centers, crisp edges, and colorful candy coating, they’ve become my go-to for easy Christmas treats and a beloved entry in my collection of Christmas cookie recipes.
I think you’ll find these are the perfect place to start when brainstorming Christmas dessert ideas. They come together so quickly yet always feel special. Among more traditional offerings, these cheerful cookies stand out as wonderfully unique Christmas cookies. Honestly, they’re some of my favorite holiday treats to share, delighting both kids and adults with their playful look and delicious taste.
So if you’re dreaming of holiday cookies, Christmas-style, this comfort food recipe is your answer. It’s more than just baking; it’s about creating edible happiness. I hope you’ll gather your ingredients and make these a part of your own holiday traditions.
Looking for M&M Holiday Cookies inspiration? You'll love what we have! Explore more Christmas Cookie recipes or discover our Burgers favorites.


Why You’ll Love This M&M Holiday Cookies
- Festive & colorful: Red and green M&Ms make them holiday-ready.
- Perfect texture: Chewy inside with a slightly crisp edge.
- Easy to make: Simple one-bowl dough, no fancy skills needed.
- Year-round versatile: Swap M&M colors for any occasion.
Ingredients & Tools
- 225 g (1 cup) unsalted butter, softened to room temperature
- 200 g (1 cup) light brown sugar, packed
- 100 g (1/2 cup) granulated sugar
- 2 large eggs, at room temperature
- 2 tsp pure vanilla extract
- 315 g (2 1/2 cups) all-purpose flour
- 1 tsp baking soda
- 1/2 tsp baking powder
- 1 tsp cornstarch
- 1/2 tsp fine sea salt
- 280 g (1 1/2 cups) holiday M&Ms, plus extra for pressing on top
Tools: A stand mixer or electric hand mixer, baking sheets, parchment paper or silicone baking mats, a medium cookie scoop (about 1.5 tablespoons), and a wire cooling rack.
Notes: Use room temperature butter and eggs for best texture. Cornstarch keeps cookies extra soft.
Nutrition (per serving)
| Calories: | 210 kcal |
| Protein: | 2 g |
| Fat: | 9 g |
| Carbs: | 31 g |
| Fiber: | 0.5 g |
Serves: 24 | Prep Time: 15 minutes | Cook Time: 10-12 minutes | Total Time: 27 minutes (plus chilling)
Before You Start: Tips & Ingredient Notes
- Why room temperature matters so much. If your butter and eggs are cold, your creamed mixture will look curdled and won’t hold as much air. This can lead to cookies that spread too much and end up flat. True room temperature butter should yield slightly to a gentle press but not be greasy or melted.
- The power of the chill. I know it’s tempting to skip this step, but chilling the dough is what prevents a cookie pancake. It allows the flour to fully hydrate and the butter to firm up, resulting in a thicker, chewier cookie with a beautiful, crinkled top.
- Don’t mix all the M&Ms in. Reserve a small handful of M&Ms to press onto the tops of the dough balls right before baking. This ensures every cookie looks bakery-perfect, with those colorful candies prominently displayed instead of hidden inside.
- Measure your flour correctly. The most common mistake in cookie-making is using too much flour. For the most accurate results, spoon your flour into the measuring cup and level it off with a knife. Or, even better, use a kitchen scale!
How to Make M&M Holiday Cookies
Step 1: Cream the Butter and Sugars. In the bowl of your stand mixer fitted with the paddle attachment, combine the softened butter, brown sugar, and granulated sugar. Beat on medium-high speed for a full 2-3 minutes. You’ll notice the mixture becomes noticeably lighter in color and fluffy—this is key for introducing air into the dough, which helps with the perfect cookie texture. Scrape down the sides of the bowl with a spatula to make sure everything is incorporated.
Step 2: Add the Wet Ingredients. With the mixer on low, add the eggs one at a time, mixing until each is fully blended in before adding the next. Then, pour in the vanilla extract and mix just to combine. The mixture might look a little separated at this point, but that’s perfectly normal. Again, scrape down the sides and bottom of the bowl to ensure a homogeneous mixture.
Step 3: Combine the Dry Ingredients. In a separate medium bowl, whisk together the flour, baking soda, baking powder, cornstarch, and salt. Whisking them first ensures the leavening agents and salt are evenly distributed throughout the flour, so you get a consistent rise and flavor in every single cookie.
Step 4: Bring the Dough Together. With your mixer on low speed, gradually add the dry ingredients to the wet ingredients. Mix only until the flour streaks have just disappeared—be careful not to overmix! A little bit of flour visible is okay, as we’ll finish mixing in the next step. Overmixing develops gluten, which can make cookies tough.
Step 5: Fold in the M&Ms. Take the bowl off the mixer. Add about 1 1/4 cups of the holiday M&Ms. Use a sturdy spatula to fold them gently into the dough until they’re evenly distributed. This final mixing by hand prevents overworking the dough and keeps those M&Ms from getting crushed by the mixer paddle.
Step 6: Chill the Dough. Cover the bowl with plastic wrap and chill the dough in the refrigerator for at least 1 hour, or up to 48 hours. Chilling is non-negotiable for flavor and texture development. The dough will firm up, making it easier to scoop, and the cookies will bake up thicker and chewier.
Step 7: Preheat and Scoop. When you’re ready to bake, preheat your oven to 350°F (175°C). Line baking sheets with parchment paper or silicone mats. Using a medium cookie scoop (about 1.5 tablespoons), portion the dough onto the prepared sheets, placing them about 2 inches apart to allow for spreading.
Step 8: The Final Decorative Touch. Take the reserved M&Ms and press 3-4 extra candies onto the top of each dough ball. This is what gives them that professional, colorful look straight from the oven. Don’t skip this—it makes all the difference!
Step 9: Bake to Perfection. Bake for 10-12 minutes. The cookies are done when the edges are set and lightly golden, but the centers still look soft and slightly underdone. They will continue to cook on the hot baking sheet. For a perfectly round cookie, you can take a large round cookie cutter or a glass and gently swirl it around the edge of the warm cookie to nudge it into a perfect circle.
Step 10: Cool and Enjoy! Let the cookies cool on the baking sheet for 5 minutes before transferring them to a wire rack to cool completely. This resting time on the sheet is crucial for them to set up properly. Then, pour a glass of milk and enjoy the chewy, buttery, festive goodness.
Storage & Freshness Guide
- Fridge: Store dough (covered) up to 3 days; baked cookies in airtight container 1 week.
- Freezer: Freeze dough balls or baked cookies in airtight bags up to 3 months.
- Reviving: Warm baked cookies 10 seconds in microwave; bake frozen dough +1–2 minutes.
Serving Suggestions
Complementary Dishes
- A scoop of vanilla bean ice cream — Sandwich a slightly warm cookie with a scoop of ice cream for the most incredible holiday ice cream sandwich you’ve ever had. The contrast of temperatures and textures is pure magic.
- A festive cheese board — The sweet and salty combination is a classic for a reason. Pair these cookies with a sharp cheddar or a creamy brie to balance the sweetness and create a sophisticated holiday platter.
- Peppermint hot chocolate — The rich chocolate and cool mint are a classic holiday pairing that complements the buttery vanilla notes of the cookie beautifully. It’s a cozy, comforting duo.
Drinks
- A cold glass of milk — It’s the timeless pairing for a reason. The creaminess of the milk cuts through the sweetness and just feels like a warm, nostalgic hug with every bite.
- Hot coffee with a dash of cinnamon — The bitterness of the coffee provides a wonderful contrast to the sweet cookie, and the hint of spice from the cinnamon just feels extra festive.
- Sparkling apple cider — For a non-alcoholic option that still feels celebratory, the crisp, effervescent apple flavor is a fantastic palate cleanser between bites of rich cookie.
Something Sweet
- Classic fudge — A small square of rich, creamy fudge alongside a cookie creates a decadent dessert duo. The intense chocolate flavor pairs wonderfully with the M&Ms.
- Candy cane bark — The cool, crisp peppermint and white chocolate provide a different texture and flavor profile that makes the whole dessert spread more dynamic and fun.
- Gingerbread cupcakes — The warm spices of gingerbread are a classic holiday flavor that complements the simple, buttery base of the M&M cookie without competing with it.
Top Mistakes to Avoid
- Mistake: Using melted butter. Melted butter will cause your cookies to spread excessively in the oven, resulting in thin, greasy cookies instead of soft, puffy ones. Softened, room-temperature butter is the goal.
- Mistake: Skipping the chill time. I’ve messed this up before too, in a hurry, and ended up with cookie puddles. Chilling the dough solidifies the fat, which slows the spread in the oven, giving you that perfect thick and chewy texture.
- Mistake: Overbaking the cookies. They might not look “done” when you take them out, but they are! They continue to cook on the hot tray. Overbaking is the fastest way to turn a soft cookie into a crunchy one.
- Mistake: Using a different type of M&M. Stick with the standard milk chocolate M&Ms for this recipe. The mini ones can bleed color, and the peanut or other varieties will alter the texture and flavor profile significantly.
Expert Tips
- Tip: Weigh your ingredients. For truly consistent, bakery-quality results every single time, a kitchen scale is your best friend. Cup measurements can vary wildly, but grams are always precise.
- Tip: Make the dough ahead. This dough actually gets better with time! You can chill it for up to 48 hours, which allows the flavors to deepen and meld together for an even more delicious cookie.
- Tip: Bake one test cookie first. If you’re unsure about your oven’s true temperature or your dough consistency, bake a single cookie. You can then adjust the baking time or add a minute or two of extra chill time for the rest of the batch if it spreads too much.
- Tip: Freeze dough balls for fresh cookies anytime. After scooping the dough, flash-freeze the balls on a parchment-lined tray until solid, then transfer to a freezer bag. You can bake them straight from frozen, just adding 1-2 minutes to the bake time for instant, warm cookies.
FAQs
Can I use a different type of M&M?
You can, but the results will be different. I highly recommend sticking with standard milk chocolate holiday M&Ms. Mini M&Ms can cause the color coating to bleed into the dough, and peanut or pretzel M&Ms will introduce different textures and salt levels that change the character of the cookie. If you do swap, just be prepared for a slightly different look and taste!
Why did my cookies come out flat?
Flat cookies are almost always due to butter that was too warm or dough that wasn’t chilled long enough. If your butter was melty or your kitchen is very warm, the fat will spread rapidly in the oven. The fix for next time is to ensure your butter is just softened (not warm) and to never skip the chilling step. If it happens, you can sometimes rescue the dough by chilling it for another 30-60 minutes.
Can I freeze the baked cookies?
Absolutely! These cookies freeze beautifully. Once they are completely cooled, layer them between sheets of parchment paper in an airtight container or freezer bag. They’ll keep for up to 3 months. Thaw at room temperature, or pop a frozen cookie in the microwave for 10-15 seconds for a warm, just-baked treat.
My dough is really crumbly and dry—what happened?
This usually means there’s too much flour in the dough. The most common cause is scooping the flour directly from the bag with the measuring cup, which packs it in. Always spoon and level your flour for accuracy. If your dough is already dry, you can try adding a teaspoon of milk at a time and mixing until it just comes together, but be careful not to overmix.
How do I keep my cookies soft for days?
The key to soft cookies is storage! As soon as they are completely cool, store them in an airtight container at room temperature. For extra softness, you can add a piece of bread to the container. The cookies will absorb the moisture from the bread, staying soft and chewy for longer (just replace the bread if it gets hard).


M&M Holiday Cookies: An Easy Christmas Cookie Recipe
Make your holiday baking joyful with these M&M Holiday Cookies. This easy holiday cookie recipe yields chewy, colorful treats perfect for your Christmas cookie tin.
Ingredients
For the Ingredients
-
225 g unsalted butter (softened to room temperature)
-
200 g light brown sugar (packed)
-
100 g granulated sugar
-
2 large eggs (at room temperature)
-
2 tsp pure vanilla extract
-
315 g all-purpose flour
-
1 tsp baking soda
-
0.5 tsp baking powder
-
1 tsp cornstarch
-
0.5 tsp fine sea salt
-
280 g holiday M&Ms (plus extra for pressing on top)
Instructions
-
In the bowl of your stand mixer fitted with the paddle attachment, combine the softened butter, brown sugar, and granulated sugar. Beat on medium-high speed for a full 2-3 minutes. You’ll notice the mixture becomes noticeably lighter in color and fluffy—this is key for introducing air into the dough, which helps with the perfect cookie texture. Scrape down the sides of the bowl with a spatula to make sure everything is incorporated.01
-
With the mixer on low, add the eggs one at a time, mixing until each is fully blended in before adding the next. Then, pour in the vanilla extract and mix just to combine. The mixture might look a little separated at this point, but that’s perfectly normal. Again, scrape down the sides and bottom of the bowl to ensure a homogeneous mixture.02
-
In a separate medium bowl, whisk together the flour, baking soda, baking powder, cornstarch, and salt. Whisking them first ensures the leavening agents and salt are evenly distributed throughout the flour, so you get a consistent rise and flavor in every single cookie.03
-
With your mixer on low speed, gradually add the dry ingredients to the wet ingredients. Mix only until the flour streaks have just disappeared—be careful not to overmix! A little bit of flour visible is okay, as we’ll finish mixing in the next step. Overmixing develops gluten, which can make cookies tough.04
-
Take the bowl off the mixer. Add about 1 1/4 cups of the holiday M&Ms. Use a sturdy spatula to fold them gently into the dough until they’re evenly distributed. This final mixing by hand prevents overworking the dough and keeps those M&Ms from getting crushed by the mixer paddle.05
-
Cover the bowl with plastic wrap and chill the dough in the refrigerator for at least 1 hour, or up to 48 hours. Chilling is non-negotiable for flavor and texture development. The dough will firm up, making it easier to scoop, and the cookies will bake up thicker and chewier.06
-
When you’re ready to bake, preheat your oven to 350°F (175°C). Line baking sheets with parchment paper or silicone mats. Using a medium cookie scoop (about 1.5 tablespoons), portion the dough onto the prepared sheets, placing them about 2 inches apart to allow for spreading.07
-
Take the reserved M&Ms and press 3-4 extra candies onto the top of each dough ball. This is what gives them that professional, colorful look straight from the oven. Don't skip this—it makes all the difference!08
-
Bake for 10-12 minutes. The cookies are done when the edges are set and lightly golden, but the centers still look soft and slightly underdone. They will continue to cook on the hot baking sheet. For a perfectly round cookie, you can take a large round cookie cutter or a glass and gently swirl it around the edge of the warm cookie to nudge it into a perfect circle.09
-
Let the cookies cool on the baking sheet for 5 minutes before transferring them to a wire rack to cool completely. This resting time on the sheet is crucial for them to set up properly. Then, pour a glass of milk and enjoy the chewy, buttery, festive goodness.10
Not what you're looking for?


