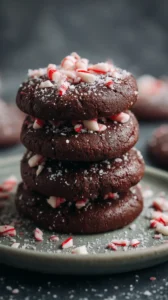
There’s something magical about pulling a batch of cookies from the oven—the warmth, the aroma, the promise of a cozy treat. For me, that feeling is perfectly captured in these Mexican Hot Chocolate Cookies. They’re like a spiced hug in dessert form, with a deeply fudgy, chewy texture and a gentle kick of chili that makes every bite exciting. I love adding them to my holiday baking lineup because they offer such a delicious twist on traditional christmas cookies recipes.
If you’re looking for standout christmas dessert ideas, these unique christmas cookies are sure to become a favorite. They transform the beloved flavors of a spiced Mexican hot chocolate into a handheld holiday treat. Whether you’re brainstorming christmas baking ideas or searching for special galletas navideñas to share with loved ones, this easy recipe is a joy to make. I often prepare the dough ahead and freeze it, which makes festive preparations so simple.
To me, these cookies are the ultimate comfort food recipe. They embody the spirit of the season—warm, welcoming, and wonderfully spiced. I hope they bring as much joy to your kitchen as they do to mine.
Craving a delicious Mexican Hot Chocolate Cookies? You've come to the right spot! From Christmas Cookie favorites to amazing Appetizer Recipes recipes, there's something here for everyone.

Why You’ll Love This Mexican Hot Chocolate Cookies
- Sensory delight: The aroma of cinnamon and chocolate baking is intoxicating.
- Perfect texture: Crisp, sugary exterior with a soft, fudgy, chewy center.
- Sophisticated flavor: Warm cinnamon and subtle chili elevate the chocolate.
- Surprisingly simple: Approachable recipe with a fun sugar-rolling step.
Ingredients & Tools
- 225 g unsalted butter, softened
- 200 g granulated sugar
- 220 g light brown sugar, packed
- 2 large eggs, at room temperature
- 2 tsp pure vanilla extract
- 280 g all-purpose flour
- 80 g unsweetened cocoa powder
- 1 tsp baking soda
- 1/2 tsp baking powder
- 1 tsp salt
- 2 tsp ground cinnamon
- 1/2 – 1 tsp chili powder (adjust to your heat preference)
- 200 g semi-sweet chocolate chunks or chips
For the Spiced Sugar Coating
- 100 g granulated sugar
- 1 tsp ground cinnamon
Tools: Stand mixer or hand mixer, baking sheets, parchment paper, medium and small mixing bowls, whisk, cookie scoop (optional but helpful).
Notes: Using high-quality cocoa powder and real vanilla extract really makes a difference here—they’re the backbone of that deep chocolate flavor. And don’t be shy with the spices; they’re what make these cookies authentically “Mexican hot chocolate.”
Nutrition (per serving)
| Calories: | 220 kcal |
| Protein: | 3 g |
| Fat: | 10 g |
| Carbs: | 32 g |
| Fiber: | 2 g |
Serves: 24 | Prep Time: 20 minutes | Cook Time: 10-12 minutes | Total Time: 35 minutes (plus chilling)
Before You Start: Tips & Ingredient Notes
- Your butter temperature is crucial. “Softened” means it should yield to gentle pressure but still hold its shape. If it’s melted or greasy, your cookies will spread too much. Leave it on the counter for about 45-60 minutes before you begin.
- Don’t skip the chili powder. I know it might sound unusual, but trust me, it’s the secret weapon. It doesn’t make the cookies “spicy” in a hot sense, but adds a wonderful warmth that enhances the chocolate. You can start with 1/2 tsp if you’re nervous.
- Room temperature eggs are non-negotiable. Cold eggs can cause the creamed butter and sugar to seize up, resulting in a less aerated, denser cookie. To quickly bring eggs to room temp, place them in a bowl of warm water for 5-10 minutes.
- Weigh your flour for accuracy. This is the single best way to ensure consistent results. If you must use cups, fluff your flour with a spoon, spoon it into the measuring cup, and level it off. Don’t scoop directly from the bag!
How to Make Mexican Hot Chocolate Cookies
Step 1: Cream the Butter and Sugars. In the bowl of your stand mixer fitted with the paddle attachment, beat the softened butter, granulated sugar, and brown sugar together on medium-high speed for a full 2-3 minutes. You’re looking for the mixture to become light, pale, and fluffy. This step is key for creating those lovely air pockets that give the cookies their perfect texture. Scrape down the sides of the bowl halfway through to ensure everything is perfectly combined.
Step 2: Incorporate the Wet Ingredients. Add the room-temperature eggs one at a time, mixing well on medium speed after each addition until fully incorporated. Then, mix in the vanilla extract. The mixture might look a little curdled at this point—that’s totally normal, so don’t panic! Just let it mix for another 30 seconds and it should smooth right out.
Step 3: Combine the Dry Ingredients. In a separate medium bowl, whisk together the flour, cocoa powder, baking soda, baking powder, salt, cinnamon, and your chosen amount of chili powder. Whisking is important here to evenly distribute the leavening agents and spices throughout the flour, preventing any bitter pockets in your finished cookies.
Step 4: Bring the Dough Together. With the mixer on low speed, gradually add the dry ingredients to the wet ingredients. Mix only until the flour streaks have just disappeared—be careful not to overmix! You’ll notice the dough is quite thick and fudgy. Finally, switch to a spatula and gently fold in the chocolate chunks until they’re evenly distributed.
Step 5: Chill the Dough. Cover the bowl with plastic wrap and chill the dough for at least 30 minutes, or up to 2 hours. This is a non-negotiable rest period—it allows the flour to hydrate and the butter to firm up, which prevents the cookies from spreading into thin puddles in the oven. The dough will be much easier to handle when chilled.
Step 6: Preheat and Prepare the Coating. While the dough chills, preheat your oven to 175°C (350°F) and line your baking sheets with parchment paper. In a small bowl, whisk together the 100g of granulated sugar and 1 tsp of cinnamon for the coating. This creates that beautiful, sparkly, spiced crust.
Step 7: Scoop, Roll, and Bake. Using a cookie scoop or a tablespoon, portion the chilled dough into balls roughly 1.5 inches in size. Roll each ball between your palms to smooth it, then roll it generously in the cinnamon-sugar mixture until fully coated. Place the dough balls about 2 inches apart on the prepared baking sheets.
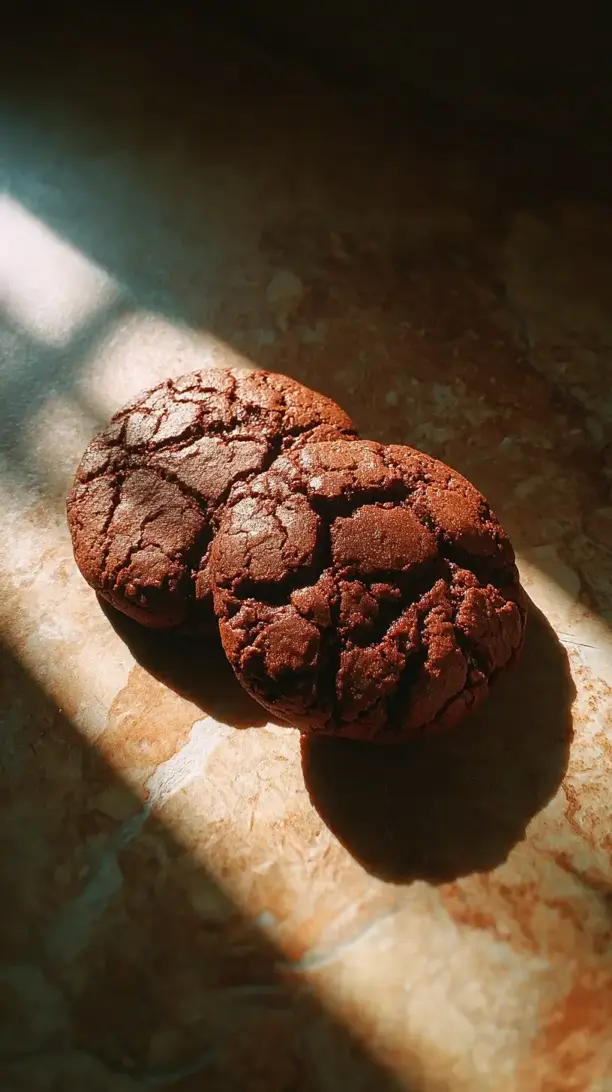
Step 8: Bake to Perfection. Bake for 10-12 minutes. The trick is to pull them out when the edges look set but the centers still appear soft and slightly underdone. They will continue to cook on the hot baking sheet as they cool. For a truly perfect texture, let them cool on the baking sheet for at least 5-10 minutes before transferring them to a wire rack to cool completely.
Storage & Freshness Guide
- Fridge: Not recommended; store at room temperature in an airtight container.
- Freezer: Freeze baked cookies or shaped dough balls in a single layer, then transfer to a bag for up to 3 months.
- Reviving: Refresh cookies in a 300°F oven for 3–5 minutes, or add a piece of bread to the storage container to soften.
Serving Suggestions
Complementary Dishes
- Vanilla Bean Ice Cream — The cool, creamy vanilla is a dreamy contrast to the warm, spiced chocolate cookie, especially if you serve the cookie slightly warm.
- A Cheese Plate with Manchego and Membrillo — The salty, nutty cheese and sweet quince paste create a sophisticated flavor pairing that complements the cookies’ complexity beautifully.
Drinks
- A Glass of Cold Milk — It’s a classic for a reason. The cold milk perfectly cuts through the richness of the chocolate and soothes any lingering warmth from the chili.
- Spiced Coffee or a Mexican Mocha — Double down on the cozy spices! A hot drink with similar flavor notes makes the whole experience feel incredibly indulgent and thematic.
Something Sweet
- Dulce de Leche Dip — Serve a small bowl of warm dulce de leche for dipping. The caramel notes intertwine with the chocolate and cinnamon in the most heavenly way.
- Fresh Orange Segments — The bright, citrusy burst of orange provides a refreshing and palate-cleansing finish that keeps the cookies from feeling too heavy.
Top Mistakes to Avoid
- Mistake: Using melted butter. This is the number one reason cookies spread too much. Your dough will be too soft, resulting in flat, greasy cookies instead of thick and chewy ones.
- Mistake: Skipping the chill time. I’ve messed this up before too, thinking I could save time. Chilling the dough solidifies the butter, which controls spread and allows the flavors to meld for a better-tasting cookie.
- Mistake: Overbaking. It’s so tempting to leave them in until they look “done,” but that will give you a dry, crunchy cookie. Remember, they continue to cook on the hot tray! The centers should look soft when you take them out.
- Mistake: Measuring flour incorrectly. Scooping with the measuring cup packs in too much flour, leading to a dry, cakey texture. Always spoon and level for the best results, or better yet, use a scale.
Expert Tips
- Tip: Brown your butter for a nutty twist. Gently cook the butter until it turns a golden amber color and smells nutty. Let it cool completely before using. This adds an incredible depth of flavor that pairs wonderfully with the chocolate and spice.
- Tip: Use a mix of chocolate chips and chunks. The chips ensure chocolate in every bite, while the chunks create those lovely, gooey pockets of melted chocolate. It’s the best of both worlds for texture.
- Tip: Sprinkle with flaky sea salt right after baking. A tiny pinch of flaky sea salt on top of each cookie right when they come out of the oven enhances all the flavors and creates a sublime sweet-and-salty situation.
- Tip: Make the dough ahead. You can portion and roll the dough balls, then freeze them on a tray before transferring to a zip-top bag. Bake straight from frozen, adding 1-2 minutes to the bake time for fresh cookies anytime.
FAQs
Can I make these cookies without a mixer?
Absolutely! You can definitely make them by hand. It will just take a bit more elbow grease. Use a sturdy wooden spoon and really put your back into creaming the butter and sugars together until the mixture lightens in color. For the dry ingredients, switch to a spatula and fold gently to avoid overworking the dough. It’s a great arm workout, and the results are just as delicious.
My cookies didn’t spread much and are very puffy. What happened?
This usually points to either too much flour or your baking powder/soda might be old. Always spoon and level your flour (or weigh it!) to avoid packing in extra. And test your leavening agents—if you don’t bake often, they can lose their potency over time. If they don’t fizz vigorously when added to hot water or vinegar, it’s time for a new box.
Can I use Dutch-process cocoa instead of natural cocoa?
This is a tricky one. Natural cocoa powder is acidic and reacts with the alkaline baking soda in this recipe to help the cookies rise. Dutch-process cocoa is neutralized, so that reaction doesn’t happen. Substituting it can result in a denser, flatter cookie. I’d recommend sticking with natural, unsweetened cocoa powder for the best and most reliable result.
How should I store these cookies to keep them soft?
The key to keeping them soft and chewy is an airtight container. Once completely cool, store them in a container with a tight-fitting lid at room temperature. If they start to dry out after a few days, you can add a piece of bread to the container—the cookies will draw moisture from the bread, softening up again (just remember to change the bread if it gets moldy).
Can I omit the chili powder entirely?
You can, and you’ll still have a lovely spiced chocolate cookie thanks to the cinnamon. But you’ll be missing that signature “Mexican hot chocolate” warmth. If you’re sensitive to spice, just use the smaller amount (1/2 tsp)—it really provides more warmth than outright heat. But if you must leave it out, the cookies will still be delicious, just a bit more one-dimensional in flavor.


Mexican Hot Chocolate Cookies: An Easy Holiday Baking Recipe
Mexican Hot Chocolate Cookies are the ultimate holiday treat—chewy, fudgy spiced chocolate cookies with a hint of chili warmth. Perfect for your Christmas baking list!
Ingredients
For the Cookies:
-
225 g unsalted butter (softened)
-
200 g granulated sugar
-
220 g light brown sugar (packed)
-
2 large eggs (at room temperature)
-
2 tsp pure vanilla extract
-
280 g all-purpose flour
-
80 g unsweetened cocoa powder
-
1 tsp baking soda
-
0.5 tsp baking powder
-
1 tsp salt
-
2 tsp ground cinnamon
-
0.5 - 1 tsp chili powder (adjust to your heat preference)
-
200 g semi-sweet chocolate chunks or chips
For the Spiced Sugar Coating:
-
100 g granulated sugar
-
1 tsp ground cinnamon
Instructions
-
In the bowl of your stand mixer fitted with the paddle attachment, beat the softened butter, granulated sugar, and brown sugar together on medium-high speed for a full 2-3 minutes. You’re looking for the mixture to become light, pale, and fluffy. This step is key for creating those lovely air pockets that give the cookies their perfect texture. Scrape down the sides of the bowl halfway through to ensure everything is perfectly combined.01
-
Add the room-temperature eggs one at a time, mixing well on medium speed after each addition until fully incorporated. Then, mix in the vanilla extract. The mixture might look a little curdled at this point—that’s totally normal, so don’t panic! Just let it mix for another 30 seconds and it should smooth right out.02
-
In a separate medium bowl, whisk together the flour, cocoa powder, baking soda, baking powder, salt, cinnamon, and your chosen amount of chili powder. Whisking is important here to evenly distribute the leavening agents and spices throughout the flour, preventing any bitter pockets in your finished cookies.03
-
With the mixer on low speed, gradually add the dry ingredients to the wet ingredients. Mix only until the flour streaks have just disappeared—be careful not to overmix! You’ll notice the dough is quite thick and fudgy. Finally, switch to a spatula and gently fold in the chocolate chunks until they’re evenly distributed.04
-
Cover the bowl with plastic wrap and chill the dough for at least 30 minutes, or up to 2 hours. This is a non-negotiable rest period—it allows the flour to hydrate and the butter to firm up, which prevents the cookies from spreading into thin puddles in the oven. The dough will be much easier to handle when chilled.05
-
While the dough chills, preheat your oven to 175°C (350°F) and line your baking sheets with parchment paper. In a small bowl, whisk together the 100g of granulated sugar and 1 tsp of cinnamon for the coating. This creates that beautiful, sparkly, spiced crust.06
-
Using a cookie scoop or a tablespoon, portion the chilled dough into balls roughly 1.5 inches in size. Roll each ball between your palms to smooth it, then roll it generously in the cinnamon-sugar mixture until fully coated. Place the dough balls about 2 inches apart on the prepared baking sheets.07
-
Bake for 10-12 minutes. The trick is to pull them out when the edges look set but the centers still appear soft and slightly underdone. They will continue to cook on the hot baking sheet as they cool. For a truly perfect texture, let them cool on the baking sheet for at least 5-10 minutes before transferring them to a wire rack to cool completely.08
Not what you're looking for?


