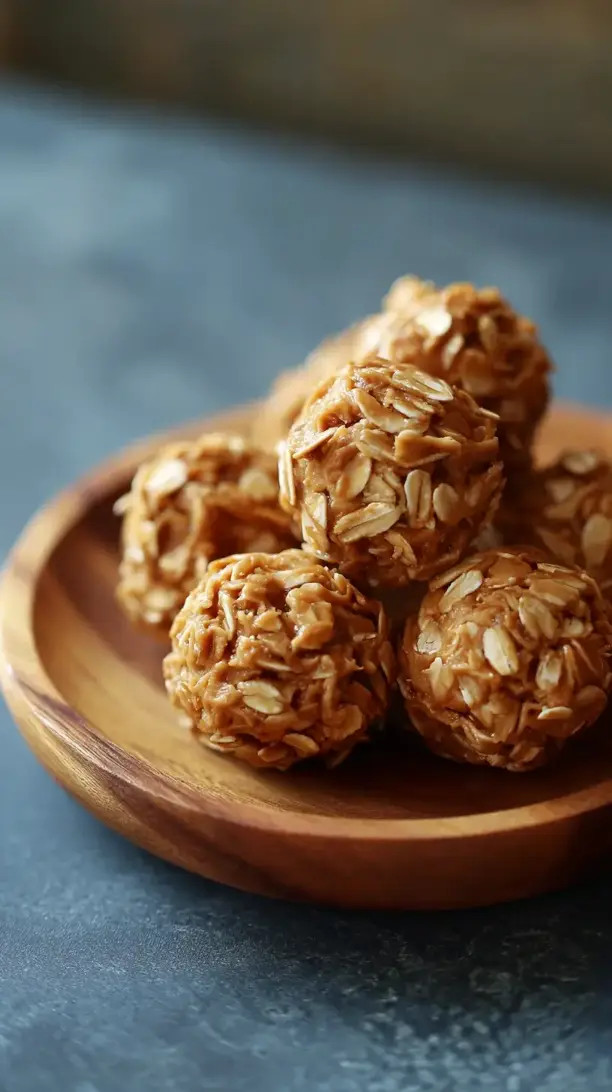
These No Bake Peanut Butter Balls are a quick, wholesome treat that requires zero oven time. They combine creamy peanut butter, honey, and oats for a perfectly chewy, satisfying bite. Whip up a batch in minutes for an easy snack or gift.
Nothing beats a great No Bake Peanut Butter Balls. Whether you're a fan of Snacks or want to try something from our Chicken Thigh Recipes selection, keep scrolling!


Why You’ll Love This No Bake Peanut Butter Balls
- Quick & Simple: Ready in 20 minutes with just a bowl and spoon.
- No-Bake Convenience: Keep your kitchen cool—no oven needed.
- Totally Customizable: Easily adapt with mix-ins like chocolate chips or flax.
- Meal Prep Friendly: Stores beautifully in the fridge or freezer.
Ingredients & Tools
- 1 cup creamy peanut butter (see note below!)
- 1/3 cup honey or maple syrup
- 1 teaspoon pure vanilla extract
- 1 cup old-fashioned rolled oats
- 1/2 cup ground flaxseed
- 1/4 cup unsweetened shredded coconut
- 2-3 tablespoons mini chocolate chips (optional)
- A pinch of fine sea salt
Tools: A medium mixing bowl, a sturdy spatula or spoon, a baking sheet, parchment paper
Notes: The quality of your peanut butter really makes a difference here—I find that natural, drippy peanut butter works best for binding everything together smoothly. And don’t skip the salt! It might seem like a tiny detail, but it truly makes the peanut butter flavor pop and balances the sweetness from the honey.
Nutrition (per serving)
| Calories: | 120 kcal |
| Protein: | 4 g |
| Fat: | 7 g |
| Carbs: | 11 g |
| Fiber: | 2 g |
Serves: 20-24 balls | Prep Time: 20 minutes | Chill Time: 30 minutes | Total Time: 50 minutes
Before You Start: Tips & Ingredient Notes
- Which peanut butter is best? For the perfect texture, use a natural peanut butter that’s stir-able and doesn’t contain hydrogenated oils. The kind that separates is ideal! Avoid the super-stiff, shelf-stable kinds, as they can make the mixture too dry and difficult to roll.
- Can I make these without honey? Absolutely. Maple syrup is a fantastic one-to-one substitute and will give you a lovely, deep flavor. If you need a sugar-free option, a sticky sugar-free syrup can work, but the texture might be slightly less firm.
- What if my mixture is too sticky or too dry? This is the most common hurdle, and it’s easily fixed! If it’s too sticky, add a bit more oats or ground flaxseed, a tablespoon at a time. If it’s too dry and crumbly, add another drizzle of peanut butter or honey until it holds together when you squeeze it.
- Don’t skip the chilling time. I know it’s tempting to dig in right away, but giving the balls 20-30 minutes in the fridge firms them up perfectly, making them easier to handle and giving them that satisfying, firm-yet-chewy texture we’re after.
How to Make No Bake Peanut Butter Balls
Step 1: Combine your wet ingredients. In your medium mixing bowl, add the creamy peanut butter, honey (or maple syrup), and vanilla extract. Stir everything together with your spatula until it’s completely smooth and well-blended. You’ll notice the mixture will be quite loose and glossy at this stage—that’s exactly what you want! This is your “glue” that will hold all the dry ingredients together.
Step 2: Add the dry ingredients. Now, dump in the rolled oats, ground flaxseed, shredded coconut, and that all-important pinch of salt. If you’re using the optional mini chocolate chips, add them now too. Use your spatula to fold everything together. It might take a minute of good, sturdy mixing to get it fully incorporated. The mixture should look uniform and will start to pull away from the sides of the bowl, forming a thick, malleable “dough.”
Step 3: Check the consistency. This is the most important step for success! Grab a small handful of the mixture and squeeze it tightly in your palm. It should hold its shape without crumbling apart. If it falls apart, it’s too dry—add another tablespoon of peanut butter or honey. If it’s overly sticky and clings to your hands, mix in another tablespoon of oats or flaxseed. Getting this right makes the rolling process a breeze.
Step 4: Roll the balls. Line a baking sheet with parchment paper. Using a tablespoon or a small cookie scoop, portion out the mixture. Roll each portion between your palms to form a smooth, round ball. You’ll get about 20 to 24 balls, each about one inch in diameter. If the mixture starts sticking to your hands, a quick rinse and dry can help, or you can very lightly dampen your palms with water.
Step 5: Chill to set. Arrange all the rolled balls on your prepared baking sheet, making sure they aren’t touching. Pop the entire sheet into the refrigerator for at least 30 minutes. This chilling time allows the fats in the peanut butter to firm up, giving the balls their signature firm texture and making them much less messy to eat.
Step 6: Serve and store. Once they’re firm to the touch, your No Bake Peanut Butter Balls are ready to enjoy! Transfer them to an airtight container. They’ll keep in the fridge for up to two weeks, or you can freeze them for up to three months for a fantastic grab-and-go frozen treat.
Storage & Freshness Guide
- Fridge: Store in an airtight container for up to 2 weeks.
- Freezer: Freeze in a single layer, then transfer to a container for up to 3 months.
- Reviving: If too soft, chill longer; if too hard, let sit at room temp for 5 minutes.
Serving Suggestions
Complementary Dishes
- A fresh fruit platter — The natural sweetness and juiciness of apple slices, banana chips, or berries provide a lovely, refreshing contrast to the rich, dense texture of the peanut butter balls.
- A simple yogurt parfait — Crumble one or two balls over a bowl of Greek yogurt with a drizzle of honey for a protein-packed breakfast or a more substantial snack that feels truly decadent.
Drinks
- A cold glass of milk — It’s a classic pairing for a reason! The creaminess of the milk complements the nutty flavor perfectly, making for a comforting and nostalgic snack-time experience.
- Iced coffee or a latte — The roasted notes of coffee are a fantastic friend to peanut butter. Enjoying a ball with your afternoon pick-me-up turns a simple coffee break into a mini dessert moment.
Something Sweet
- Dark chocolate-dipped strawberries — If you’re serving these at a gathering, these elegant strawberries continue the no-bake theme and offer a different, more luxurious kind of sweetness that pairs beautifully.
- A small scoop of vanilla bean ice cream — For the ultimate indulgence, place one or two slightly chilled peanut butter balls on top of a scoop of ice cream. The combination of temperatures and textures is absolutely divine.
Top Mistakes to Avoid
- Mistake: Using the wrong peanut butter. I’ve messed this up before too… using a very thick, commercial brand can result in a dough that’s too stiff and difficult to mix, and it often lacks the deep peanut flavor you get from a natural variety.
- Mistake: Not measuring the oats correctly. If you pack the oats into the measuring cup, you’ll end up with more than the recipe calls for, leading to a dry, crumbly mixture that won’t hold its shape. Always spoon your oats into the cup and level it off.
- Mistake: Skipping the chill time. It’s


No Bake Peanut Butter Balls
Make these easy No Bake Peanut Butter Balls in 20 minutes! A healthy, protein-packed snack with peanut butter, oats, and honey. Get the simple recipe here!
Ingredients
For the Ingredients
-
1 cup creamy peanut butter
-
1/3 cup honey or maple syrup
-
1 teaspoon pure vanilla extract
-
1 cup old-fashioned rolled oats
-
1/2 cup ground flaxseed
-
1/4 cup unsweetened shredded coconut
-
2-3 tablespoons mini chocolate chips (optional)
-
A pinch fine sea salt
Instructions
-
Combine your wet ingredients. In your medium mixing bowl, add the creamy peanut butter, honey (or maple syrup), and vanilla extract. Stir everything together with your spatula until it’s completely smooth and well-blended. You’ll notice the mixture will be quite loose and glossy at this stage—that’s exactly what you want! This is your “glue” that will hold all the dry ingredients together.01
-
Add the dry ingredients. Now, dump in the rolled oats, ground flaxseed, shredded coconut, and that all-important pinch of salt. If you’re using the optional mini chocolate chips, add them now too. Use your spatula to fold everything together. It might take a minute of good, sturdy mixing to get it fully incorporated. The mixture should look uniform and will start to pull away from the sides of the bowl, forming a thick, malleable “dough.”02
-
Check the consistency. This is the most important step for success! Grab a small handful of the mixture and squeeze it tightly in your palm. It should hold its shape without crumbling apart. If it falls apart, it’s too dry—add another tablespoon of peanut butter or honey. If it’s overly sticky and clings to your hands, mix in another tablespoon of oats or flaxseed. Getting this right makes the rolling process a breeze.03
-
Roll the balls. Line a baking sheet with parchment paper. Using a tablespoon or a small cookie scoop, portion out the mixture. Roll each portion between your palms to form a smooth, round ball. You’ll get about 20 to 24 balls, each about one inch in diameter. If the mixture starts sticking to your hands, a quick rinse and dry can help, or you can very lightly dampen your palms with water.04
-
Chill to set. Arrange all the rolled balls on your prepared baking sheet, making sure they aren’t touching. Pop the entire sheet into the refrigerator for at least 30 minutes. This chilling time allows the fats in the peanut butter to firm up, giving the balls their signature firm texture and making them much less messy to eat.05
-
Serve and store. Once they’re firm to the touch, your No Bake Peanut Butter Balls are ready to enjoy! Transfer them to an airtight container. They’ll keep in the fridge for up to two weeks, or you can freeze them for up to three months for a fantastic grab-and-go frozen treat.06
Not what you're looking for?


