This One-Pan Lemon Chicken and Rice is a complete, comforting meal made entirely in one skillet. Juicy chicken thighs and aromatic rice cook together, absorbing lemony, herby flavors for a creamy, satisfying dish. It’s perfect for busy weeknights with minimal cleanup.
Craving a delicious One-Pan Lemon Chicken and Rice? You've come to the right spot! From Dinner Ideas favorites to amazing Crockpot Recipes recipes, there's something here for everyone.


Why You’ll Love This One-Pan Lemon Chicken and Rice
- Effortless cleanup: Only one pan from start to finish.
- Layered flavour: Golden chicken and toasted rice create a deep, aromatic base.
- Perfect texture: Rice becomes creamy and tender, not mushy.
- Complete meal: Protein, starch, and veggies in one dish.
Ingredients & Tools
- 4 bone-in, skin-on chicken thighs
- 1 tbsp olive oil
- 1 medium yellow onion, finely chopped
- 3 cloves garlic, minced
- 1 ½ cups long-grain white rice (like jasmine or basmati)
- 3 cups chicken broth
- 1 large lemon (juice and zest)
- 1 tsp dried thyme (or 1 tbsp fresh)
- ½ tsp smoked paprika
- 1 cup frozen peas
- Salt and freshly ground black pepper, to taste
- Fresh parsley, chopped (for garnish)
Tools: A large, oven-safe skillet or braiser (at least 12 inches in diameter).
Notes: Using bone-in, skin-on chicken thighs is key here—they stay incredibly juicy during the longer cooking time and the rendered fat adds so much flavour to the rice. And don’t skip toasting the rice with the aromatics; it’s a simple step that gives the final dish a much deeper, nuttier base flavour.
Nutrition (per serving)
| Calories: | 520 kcal |
| Protein: | 28 g |
| Fat: | 18 g |
| Carbs: | 58 g |
| Fiber: | 3 g |
Serves: 4 | Prep Time: 15 minutes | Cook Time: 45 minutes | Total Time: 1 hour
Before You Start: Tips & Ingredient Notes
- Why bone-in, skin-on chicken thighs? They are far more forgiving than chicken breasts and won’t dry out. The skin gets wonderfully crispy, and the bones add a rich, gelatinous quality to the cooking liquid that makes the rice incredibly flavourful.
- Can I use a different type of rice? Long-grain white rice is ideal here. Avoid short-grain or risotto rice as they become too starchy and sticky. Brown rice would require a much longer cooking time and more liquid, so it’s not a direct substitute for this recipe.
- Don’t skip toasting the rice. Sautéing the raw rice with the onions and garlic for a couple of minutes before adding the liquid is a game-changer. It gives the grains a slightly nutty flavour and helps them stay separate and fluffy as they cook.
- Is the lemon zest really necessary? Honestly, yes! The zest is packed with aromatic citrus oils that the juice alone doesn’t provide. It lifts the entire dish and gives it that vibrant, fresh lemon flavour without being overly sour.
How to Make One-Pan Lemon Chicken and Rice
Step 1: Preheat your oven to 375°F (190°C). Pat the chicken thighs completely dry with paper towels—this is the secret to getting that skin really crispy. Season them generously on both sides with salt, pepper, and the smoked paprika.
Step 2: Heat the olive oil in your large oven-safe skillet over medium-high heat. Once the oil is shimmering, place the chicken thighs in the pan skin-side down. You’ll hear a good sizzle. Sear them without moving for 6-8 minutes, until the skin is a deep golden brown and crispy. Flip and cook for another 2 minutes just to colour the other side. Transfer the chicken to a plate; it won’t be cooked through yet.
Step 3: Reduce the heat to medium. In the same skillet, with all those beautiful chicken drippings, add the chopped onion. Sauté for about 4-5 minutes until it’s softened and translucent. Now add the garlic and cook for just 30 seconds until fragrant—you don’t want it to burn.
Step 4: Add the rice and dried thyme to the skillet. Stir constantly for about 2 minutes to toast the rice. You’ll notice the grains will become a little more opaque and smell slightly nutty. This step is crucial for flavour and texture.
Step 5: Pour in the chicken broth and the juice of your large lemon, scraping the bottom of the pan with your spoon to lift up all those tasty browned bits (that’s flavour!). Stir in the lemon zest and a good pinch of salt and pepper. Bring the liquid to a gentle simmer.
Step 6: Carefully nestle the seared chicken thighs back into the skillet, skin-side up, resting on top of the rice. The liquid should come about halfway up the chicken. Immediately transfer the entire skillet to the preheated oven.
Step 7: Bake, uncovered, for 30-35 minutes. The rice will have absorbed most of the liquid, the grains will be tender, and the chicken should be cooked through with an internal temperature of 165°F (74°C).
Step 8: Remove the skillet from the oven (be careful, the handle is hot!). Scatter the frozen peas over the top. The residual heat will thaw and warm them through perfectly. Let the pan rest for 5-10 minutes off the heat. This allows the rice to settle and absorb any remaining liquid, making it even creamier.
Step 9: Just before serving, fluff the rice around the edges with a fork. Garnish everything with a generous handful of fresh parsley for a pop of colour and freshness. Serve directly from the pan for maximum comfort and minimal cleanup.
Storage & Freshness Guide
- Fridge: Cool completely, store in an airtight container up to 3 days.
- Freezer: Freeze in a sealed container for up to 1 month. Thaw in fridge before reheating.
- Reviving: Reheat gently in a skillet with a splash of broth to restore creaminess.
Serving Suggestions
Complementary Dishes
- A simple arugula salad — The peppery bite of arugula dressed with just a squeeze of lemon and a drizzle of olive oil cuts through the richness of the chicken and rice beautifully.
- Garlic sautéed green beans — Their crisp-tender texture and strong garlic flavour provide a wonderful contrast to the creamy, lemony rice.
- Crusty, warm bread — Perfect for mopping up every last bit of the delicious, lemony sauce left in the pan. You won’t want to waste a drop.
Drinks
- A crisp Sauvignon Blanc — Its citrusy and herbal notes are a fantastic match for the lemon and thyme in the dish, cleansing the palate between bites.
- A light, citrusy pale ale — The beer’s bitterness and carbonation help balance the meal’s richness, while its citrus undertones harmonize with the lemon.
- Sparkling water with lemon slices — A non-alcoholic option that echoes the main flavours of the meal and keeps everything feeling fresh and light.
Something Sweet
- Lemon sorbet — It’s a refreshing, palate-cleansing finish that continues the bright, citrus theme in a cool and delightful way.
- Almond biscotti — Their nutty, crunchy texture is lovely for dipping into a cup of coffee or tea after the meal, without being too heavy.
- Vanilla panna cotta with a berry compote — The creamy, smooth panna cotta provides a simple, elegant, and not-too-sweet ending that complements the savoury main.
Top Mistakes to Avoid
- Mistake: Not patting the chicken dry. Moisture is the enemy of crispy skin. If the skin is wet, it will steam instead of sear, leaving you with rubbery, pale skin.
- Mistake: Moving the chicken too soon. When you first place the chicken in the hot pan, let it be! If you try to move it or peek too early, the skin will tear and stick, and it won’t get that perfect, golden sear.
- Mistake: Skipping the rice toasting step. I’ve messed this up before too, thinking it was an unnecessary extra step. But untoasted rice can become gummy and lacks the deep, nutty flavour that makes this dish so special.
- Mistake: Using cold broth. Adding cold liquid to a hot pan significantly drops the temperature and can pause the cooking process. Using warm or room-temperature broth helps maintain a steady simmer when it goes into the oven.
Expert Tips
- Tip: Use a kitchen thermometer for the chicken. It takes the guesswork out completely. You’re aiming for 165°F (74°C) in the thickest part, not touching the bone. This guarantees juicy, perfectly cooked chicken every single time.
- Tip: Let it rest before serving. This is non-negotiable for the best texture. Allowing the pan to sit for 5-10 minutes after baking lets the rice finish absorbing the liquid gently, resulting in a creamier, more cohesive dish rather than a soupy one.
- Tip: Brighten it up at the end. For an extra burst of freshness, add an extra squeeze of fresh lemon juice and another sprinkle of fresh herbs right before serving. It really wakes up all the flavours.
- Tip: Customize your veggies. Feel free to swap the peas for other quick-cooking vegetables like chopped asparagus (added for the last 10 minutes of baking) or a handful of fresh spinach (stirred in at the end to wilt).
FAQs
Can I use chicken breasts instead of thighs?
You can, but I really don’t recommend it for this recipe. Chicken breasts are much leaner and cook faster than thighs. By the time the rice is perfectly tender, the breasts will be overcooked, dry, and tough. Bone-in, skin-on thighs provide fat and flavour that breasts simply can’t, and they stay wonderfully juicy through the longer cooking process. If you must use breasts, consider searing them and then adding them to the pan only for the last 15-20 minutes of baking to prevent them from drying out.
My rice is still a bit hard after the cooking time. What happened?
This usually means your skillet was a bit too crowded or your oven runs a little cool. All ovens have their own personalities! If the rice is still too firm, just add a splash more warm broth (about 1/4 cup), cover the skillet loosely with foil, and return it to the oven for another 5-10 minutes. This will trap steam and help the rice finish cooking without drying out the chicken.
Can I make this dish ahead of time?
It’s best enjoyed fresh, but you can do some prep to make it quicker. You can chop your onion and garlic ahead of time and measure out your rice and broth. I wouldn’t recommend fully cooking and reheating it, as the rice can become mushy and the chicken skin will lose its crispness. The texture is really at its peak straight from the oven after its brief rest.
What can I use if I don’t have an oven-safe skillet?
No problem! Simply follow the stovetop steps in any large skillet. When you get to the point of transferring to the oven, carefully pour the rice and broth mixture into a greased 9×13 inch baking dish. Nestle the seared chicken on top, cover the dish tightly with foil, and bake as directed. The results will be very similar.
Is it okay to use bottled lemon juice?
For the best, brightest flavour, fresh lemon juice is always the winner. Bottled juice often has a slightly flat or metallic taste because of preservatives. Since lemon is a star ingredient here, using fresh really makes a noticeable difference. That said, in a pinch, bottled juice will work—just be prepared for a less vibrant final flavour.


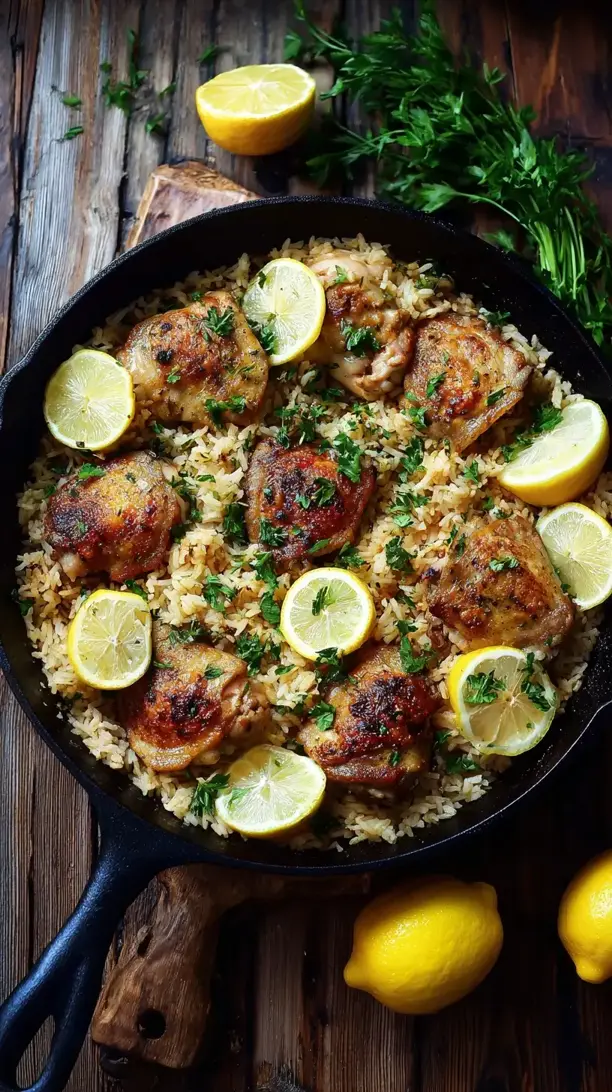
One Pan Lemon Chicken And Rice
Make this easy One-Pan Lemon Chicken and Rice for a complete, flavorful weeknight dinner with minimal cleanup. Get the simple, foolproof recipe now!
Ingredients
For the Ingredients
-
4 bone-in, skin-on chicken thighs
-
1 tbsp olive oil
-
1 medium yellow onion (finely chopped)
-
3 cloves garlic (minced)
-
1 ½ cups long-grain white rice (like jasmine or basmati)
-
3 cups chicken broth
-
1 large lemon (juice and zest)
-
1 tsp dried thyme (or 1 tbsp fresh)
-
½ tsp smoked paprika
-
1 cup frozen peas
-
Salt and freshly ground black pepper (to taste)
-
Fresh parsley (chopped, for garnish)
Instructions
-
Preheat your oven to 375°F (190°C). Pat the chicken thighs completely dry with paper towels—this is the secret to getting that skin really crispy. Season them generously on both sides with salt, pepper, and the smoked paprika.01
-
Heat the olive oil in your large oven-safe skillet over medium-high heat. Once the oil is shimmering, place the chicken thighs in the pan skin-side down. You’ll hear a good sizzle. Sear them without moving for 6-8 minutes, until the skin is a deep golden brown and crispy. Flip and cook for another 2 minutes just to colour the other side. Transfer the chicken to a plate; it won’t be cooked through yet.02
-
Reduce the heat to medium. In the same skillet, with all those beautiful chicken drippings, add the chopped onion. Sauté for about 4-5 minutes until it’s softened and translucent. Now add the garlic and cook for just 30 seconds until fragrant—you don’t want it to burn.03
-
Add the rice and dried thyme to the skillet. Stir constantly for about 2 minutes to toast the rice. You’ll notice the grains will become a little more opaque and smell slightly nutty. This step is crucial for flavour and texture.04
-
Pour in the chicken broth and the juice of your large lemon, scraping the bottom of the pan with your spoon to lift up all those tasty browned bits (that’s flavour!). Stir in the lemon zest and a good pinch of salt and pepper. Bring the liquid to a gentle simmer.05
-
Carefully nestle the seared chicken thighs back into the skillet, skin-side up, resting on top of the rice. The liquid should come about halfway up the chicken. Immediately transfer the entire skillet to the preheated oven.06
-
Bake, uncovered, for 30-35 minutes. The rice will have absorbed most of the liquid, the grains will be tender, and the chicken should be cooked through with an internal temperature of 165°F (74°C).07
-
Remove the skillet from the oven (be careful, the handle is hot!). Scatter the frozen peas over the top. The residual heat will thaw and warm them through perfectly. Let the pan rest for 5-10 minutes off the heat. This allows the rice to settle and absorb any remaining liquid, making it even creamier.08
-
Just before serving, fluff the rice around the edges with a fork. Garnish everything with a generous handful of fresh parsley for a pop of colour and freshness. Serve directly from the pan for maximum comfort and minimal cleanup.09
Not what you're looking for?


