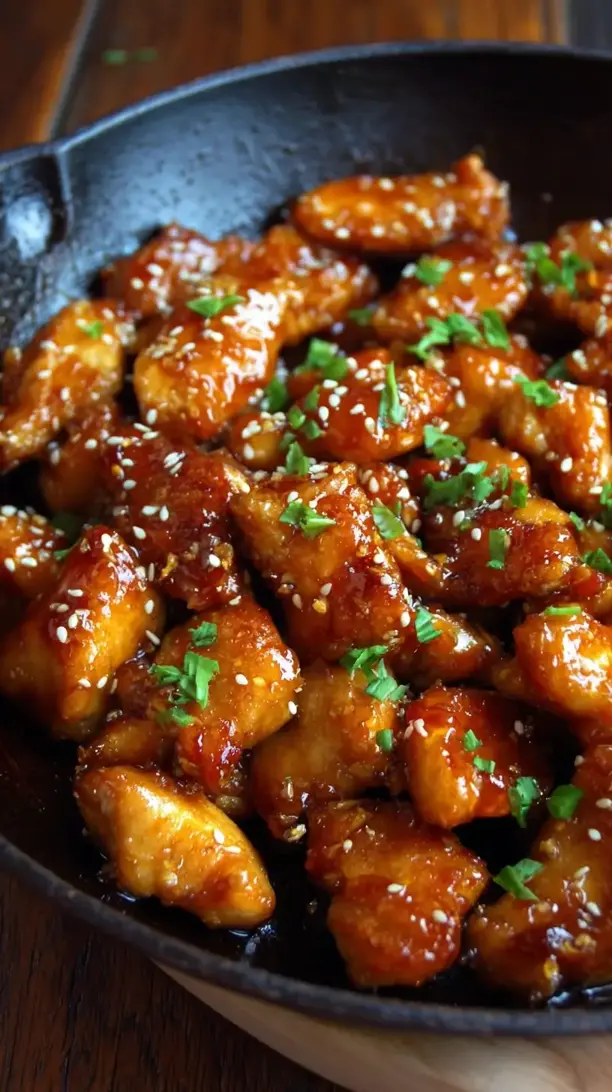
This Orange Chicken delivers crispy, golden-brown pieces coated in a sticky, sweet, and tangy glaze. Making it at home gives you control over ingredients and crispiness for a fresher, more vibrant dish. It’s a rewarding project with a restaurant-quality payoff.
Craving a delicious Orange Chicken? You've come to the right spot! From Chicken Recipes favorites to amazing Appetizers & Snacks recipes, there's something here for everyone.


Why You’ll Love This Orange Chicken
- Better than takeout: Ultimate control over ingredients and crisp-to-sauce ratio.
- Perfectly balanced sauce: Fresh orange juice and zest with ginger and garlic create a complex glaze.
- Incredibly crispy chicken: Double-frying or baking powder ensures a shatteringly crisp exterior.
- Crowd-pleasing masterpiece: Universally loved and built on simple, approachable techniques.
Ingredients & Tools
For the Chicken:
- 1.5 lbs boneless, skinless chicken thighs or breasts, cut into 1-inch pieces
- 1 cup cornstarch
- 2 large eggs, lightly beaten
- 1/2 cup all-purpose flour
- 1 tsp baking powder (for extra crispiness!)
- 1/2 tsp salt
- 1/4 tsp white pepper
- Vegetable or peanut oil, for frying
For the Orange Sauce:
- 1 cup fresh orange juice (from about 3-4 oranges)
- 1 tbsp finely grated orange zest
- 1/3 cup light brown sugar, packed
- 1/4 cup rice vinegar
- 3 tbsp soy sauce
- 2 cloves garlic, minced
- 1 tbsp fresh ginger, grated
- 1 tsp sesame oil
- 1 tbsp cornstarch mixed with 2 tbsp cold water (slurry)
- Optional Garnish: sliced green onions, sesame seeds, fresh orange slices
Tools: A large, heavy-bottomed pot or Dutch oven for frying, a wire rack set over a baking sheet, a citrus zester, and a whisk.
Notes: Don’t skip the fresh orange juice and zest—they are the soul of this dish. Using chicken thighs is my personal preference as they stay juicier, but breasts work perfectly well, too.
Nutrition (per serving)
| Calories: | 480 kcal |
| Protein: | 32 g |
| Fat: | 18 g |
| Carbs: | 48 g |
| Fiber: | 1 g |
Serves: 4 | Prep Time: 25 minutes | Cook Time: 20 minutes | Total Time: 45 minutes
Before You Start: Tips & Ingredient Notes
- Chicken Thighs vs. Breast? Thighs are more forgiving and stay incredibly moist during the frying process, but chicken breast is leaner and works great if that’s your preference. Just be careful not to overcook it.
- Is fresh orange juice really necessary? Honestly, yes. The flavor difference is night and day. The bottled stuff often has preservatives and lacks the vibrant, fresh acidity that makes this sauce so special. Plus, you need the zest!
- What’s the deal with double-frying? It’s the secret to supremely crispy chicken that doesn’t get soggy. The first fry cooks the chicken through, and the second fry at a slightly higher temperature creates an unbelievably crunchy, blistered exterior.
- Can I make this without deep-frying? Absolutely! For a baked version, toss the coated chicken in a tablespoon of oil and bake at 425°F (220°C) on a wire rack until crispy. The texture will be different but still delicious.
How to Make Orange Chicken
Step 1: Prepare the Chicken Coating Station. In a medium bowl, whisk together the flour, cornstarch, baking powder, salt, and white pepper. In a separate shallow bowl, lightly beat the two eggs. Pat your chicken pieces completely dry with paper towels—this is crucial for the coating to stick properly. You’ll have a neat little assembly line: chicken, then egg wash, then flour/cornstarch mixture.
Step 2: Coat the Chicken. Working in batches, dredge the chicken pieces first in the egg, letting any excess drip off, and then toss them thoroughly in the flour and cornstarch mixture. Press the coating onto the chicken to ensure it’s well-adhered. You’re looking for a dry, shaggy-looking coating on each piece. Place the coated chicken on a clean plate or wire rack while you heat the oil.
Step 3: Heat the Oil and First Fry. Pour about 1.5 to 2 inches of oil into your heavy-bottomed pot. Heat it over medium-high heat until it reaches 325°F (165°C). If you don’t have a thermometer, test it by dropping a small cube of bread in; it should sizzle actively and turn golden in about 30 seconds. Carefully lower the chicken pieces in batches, making sure not to overcrowd the pot. Fry for 3-4 minutes, just until cooked through and a very light golden color. Remove with a slotted spoon and drain on a wire rack. This first fry is all about cooking the inside.
Step 4: The Second Fry for Ultimate Crisp. Now, increase the heat to bring the oil temperature up to 375°F (190°C). Working in batches again, return the par-cooked chicken to the hot oil and fry for a second time, about 1-2 minutes, until deeply golden brown and incredibly crispy. You’ll hear the sizzle change to a more intense, crackling sound. Drain again on the wire rack. This double-fry method is the game-changer for texture.
Step 5: Create the Signature Orange Sauce. While the chicken is frying for the second time, you can multitask and make the sauce. In a saucepan, combine the fresh orange juice, zest, brown sugar, rice vinegar, soy sauce, garlic, and ginger. Bring it to a simmer over medium heat, stirring until the sugar dissolves. Let it bubble gently for 2-3 minutes to let the flavors meld.
Step 6: Thicken the Sauce to a Glossy Glaze. Give your cornstarch and water slurry a quick stir (it separates quickly) and then drizzle it into the simmering sauce while whisking constantly. The sauce will transform from thin and watery to thick and glossy right before your eyes. Let it cook for another minute to get rid of the raw cornstarch taste, then remove from heat and stir in the sesame oil.
Step 7: The Grand Finale – Toss and Serve! In a large bowl, gently toss the hot, crispy chicken with the glossy orange sauce. Be swift and confident—you want to coat every piece without letting the chicken sit in the sauce for too long and lose its crunch. Transfer to a serving platter and garnish immediately with sliced green onions and a sprinkle of sesame seeds for that final professional touch.
Storage & Freshness Guide
- Fridge: Store sauced chicken and leftover sauce separately in airtight containers for up to 3 days.
- Freezer: Freeze unsauced, cooked chicken for up to 2 months; sauce separately for 1 month.
- Reviving: Reheat chicken on a baking sheet at 375°F (190°C) for 10–15 minutes to re-crisp before adding fresh sauce.
Serving Suggestions
Complementary Dishes
- Steamed Jasmine Rice — The fluffy, slightly sticky grains are the perfect neutral canvas to soak up every last drop of that incredible orange sauce.
- Simple Stir-Fried Bok Choy — Its mild, slightly bitter flavor and crisp texture provide a refreshing, light contrast to the rich and sweet chicken.
- Vegetable Spring Rolls — They add a different, lighter crunch and a savory element that complements the main dish without stealing the show.
Drinks
- Iced Jasmine Green Tea — Its floral, slightly sweet notes cleanse the palate beautifully between bites and cut through the richness of the fried chicken.
- A Crisp Lager or Pale Ale — The beer’s carbonation and mild bitterness are a classic pairing that helps balance the sweetness and grease perfectly.
- Gewürztraminer or a Riesling — A slightly off-dry white wine with stone fruit flavors echoes the citrus in the dish and handles the sweetness with grace.
Something Sweet
- Mango Sticky Rice — The creamy, tropical coconut and mango flavors are a dreamy, refreshing follow-up that continues the Asian-inspired theme.
- Fortune Cookies and Green Tea Ice Cream — A playful, classic finish. The slightly bitter, earthy ice cream is a sophisticated counterpoint to the meal’s sweetness.
- Lychee Sorbet — Incredibly light and floral, it acts as a palate-cleansing finale that feels refreshing and not too heavy.
Top Mistakes to Avoid
- Mistake: Overcrowding the frying pot. This is the number one reason for soggy chicken. Adding too many pieces at once drops the oil temperature drastically, causing the chicken to steam and absorb oil instead of frying up crisp.
- Mistake: Adding the cornstarch slurry to a boiling sauce without whisking. It will instantly form unappealing, rubbery clumps. Always whisk constantly as you drizzle it in for a smooth, glossy finish.
- Mistake: Tossing the chicken in the sauce too far in advance. Do it right before serving! Letting it sit for even five minutes will soften that beautiful, hard-won crispy coating. Serve it immediately for the best texture.
- Mistake: Skipping the zest. The zest holds powerful citrus oils that provide the true, fragrant orange essence. The juice alone makes a flat sauce; the zest makes it sing.
Expert Tips
- Tip: Use a wire rack for draining. Instead of draining on paper towels, which can trap steam and make the bottom soggy, a wire rack allows air to circulate around the chicken, keeping every surface crisp.
- Tip: Zest your oranges before juicing. It’s infinitely easier to zest a whole, firm orange than a floppy, juiced one. This is a tiny step that makes the prep process much smoother.
- Tip: Add a pinch of red pepper flakes to the sauce. If you like a little heat, this is the way to go. It creates a subtle, warm background spice that elevates the sweet and sour flavors beautifully.
- Tip: For a super-crispy baked version, use baking powder in the coating. The baking powder reacts during baking to create tiny air bubbles, resulting in a much crispier, more textured crust without deep-frying.
FAQs
Can I make Orange Chicken ahead of time?
You can prep the components, but I don’t recommend assembling it ahead. The coated, uncooked chicken can be kept in the fridge for a few hours before frying. The sauce can be made a day ahead and reheated. But for the love of crispiness, only toss the hot chicken with the hot sauce right before you serve. Reheating already-sauced chicken will always result in a softer texture.
What can I use instead of rice vinegar?
Apple cider vinegar is your best bet—it has a similar mild fruity acidity. White wine vinegar will also work in a pinch. I’d avoid distilled white vinegar as it can be too harsh and overpower the delicate orange flavor. The goal is a balanced tang, not a sharp punch.
Why is my sauce not thickening?
The most common culprit is that the sauce wasn’t at a simmer when you added the cornstarch slurry. Cornstarch only activates and thickens in the presence of heat. If it’s still thin, mix another half-tablespoon of cornstarch with a tablespoon of cold water and whisk it in, letting the sauce bubble for another minute.
Can I use an air fryer for the chicken?
Absolutely! For an air fryer method, toss the coated chicken pieces in a little oil and air fry at 400°F (200°C) for about 12-15 minutes, shaking the basket halfway through. The texture will be less shatteringly crisp than deep-fried but still very good and much lighter.
How do I store and reheat leftovers?
Store the sauced chicken and any leftover sauce separately in airtight containers in the fridge for up to 3 days. To reheat, spread the chicken on a baking sheet and warm it in a 375°F (190°C) oven for 10-15 minutes to help re-crisp it a bit before adding a little fresh sauce. The microwave will make it soft.


Orange Chicken
Make the best crispy Orange Chicken at home with this easy recipe. A sweet, tangy glaze coats perfectly fried chicken. Get the restaurant-quality recipe now!
Ingredients
For the Chicken:
-
1.5 lbs boneless, skinless chicken thighs or breasts (cut into 1-inch pieces)
-
1 cup cornstarch
-
2 large eggs (lightly beaten)
-
0.5 cup all-purpose flour
-
1 tsp baking powder (for extra crispiness!)
-
0.5 tsp salt
-
0.25 tsp white pepper
-
Vegetable or peanut oil (for frying)
For the Orange Sauce:
-
1 cup fresh orange juice (from about 3-4 oranges)
-
1 tbsp finely grated orange zest
-
0.333 cup light brown sugar (packed)
-
0.25 cup rice vinegar
-
3 tbsp soy sauce
-
2 cloves garlic (minced)
-
1 tbsp fresh ginger (grated)
-
1 tsp sesame oil
-
1 tbsp cornstarch mixed with 2 tbsp cold water (slurry)
-
Optional Garnish (sliced green onions, sesame seeds, fresh orange slices)
Instructions
-
Prepare the Chicken Coating Station. In a medium bowl, whisk together the flour, cornstarch, baking powder, salt, and white pepper. In a separate shallow bowl, lightly beat the two eggs. Pat your chicken pieces completely dry with paper towels—this is crucial for the coating to stick properly. You’ll have a neat little assembly line: chicken, then egg wash, then flour/cornstarch mixture.01
-
Coat the Chicken. Working in batches, dredge the chicken pieces first in the egg, letting any excess drip off, and then toss them thoroughly in the flour and cornstarch mixture. Press the coating onto the chicken to ensure it’s well-adhered. You’re looking for a dry, shaggy-looking coating on each piece. Place the coated chicken on a clean plate or wire rack while you heat the oil.02
-
Heat the Oil and First Fry. Pour about 1.5 to 2 inches of oil into your heavy-bottomed pot. Heat it over medium-high heat until it reaches 325°F (165°C). If you don’t have a thermometer, test it by dropping a small cube of bread in; it should sizzle actively and turn golden in about 30 seconds. Carefully lower the chicken pieces in batches, making sure not to overcrowd the pot. Fry for 3-4 minutes, just until cooked through and a very light golden color. Remove with a slotted spoon and drain on a wire rack. This first fry is all about cooking the inside.03
-
The Second Fry for Ultimate Crisp. Now, increase the heat to bring the oil temperature up to 375°F (190°C). Working in batches again, return the par-cooked chicken to the hot oil and fry for a second time, about 1-2 minutes, until deeply golden brown and incredibly crispy. You’ll hear the sizzle change to a more intense, crackling sound. Drain again on the wire rack. This double-fry method is the game-changer for texture.04
-
Create the Signature Orange Sauce. While the chicken is frying for the second time, you can multitask and make the sauce. In a saucepan, combine the fresh orange juice, zest, brown sugar, rice vinegar, soy sauce, garlic, and ginger. Bring it to a simmer over medium heat, stirring until the sugar dissolves. Let it bubble gently for 2-3 minutes to let the flavors meld.05
-
Thicken the Sauce to a Glossy Glaze. Give your cornstarch and water slurry a quick stir (it separates quickly) and then drizzle it into the simmering sauce while whisking constantly. The sauce will transform from thin and watery to thick and glossy right before your eyes. Let it cook for another minute to get rid of the raw cornstarch taste, then remove from heat and stir in the sesame oil.06
-
The Grand Finale – Toss and Serve! In a large bowl, gently toss the hot, crispy chicken with the glossy orange sauce. Be swift and confident—you want to coat every piece without letting the chicken sit in the sauce for too long and lose its crunch. Transfer to a serving platter and garnish immediately with sliced green onions and a sprinkle of sesame seeds for that final professional touch.07
Not what you're looking for?


