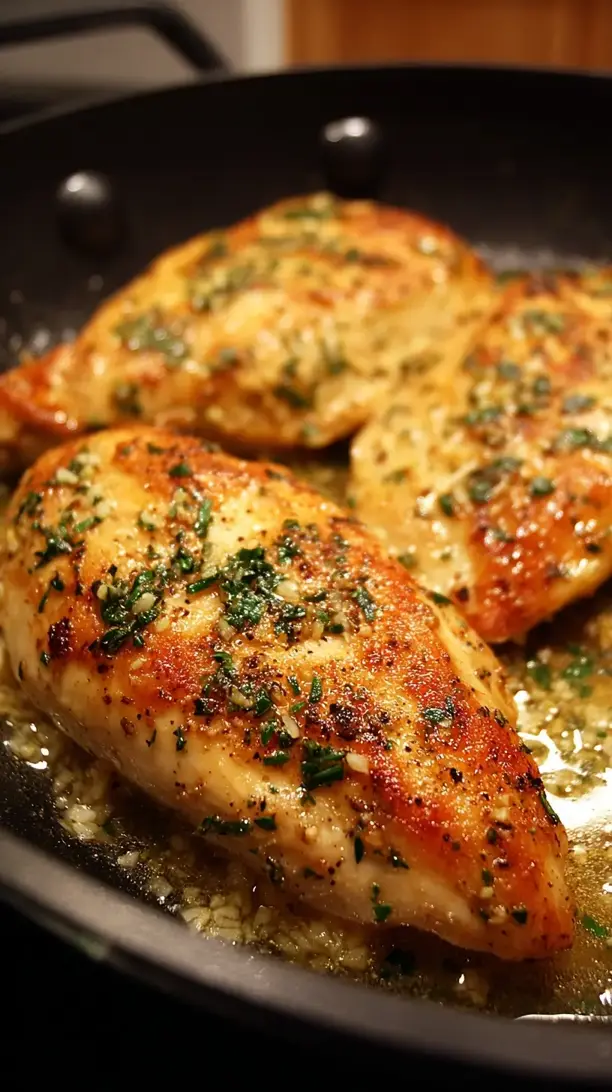
Perfectly cooked pan seared chicken delivers crispy, golden-brown skin and juicy, tender meat. This straightforward technique creates restaurant-quality results with minimal fuss. Trust a hot pan and a little patience for a dinner hero you’ll make again and again.
Craving a delicious Pan Seared Chicken? You've come to the right spot! From Chicken Recipes favorites to amazing Chicken Breast Recipes recipes, there's something here for everyone.


Why You’ll Love This Pan Seared Chicken
- Crispy skin: Achieve a shatteringly crisp exterior that locks in juices.
- Versatile base: Adapts easily to salads, tacos, or elegant dinners.
- Game-changing technique: Builds kitchen confidence for other proteins.
- Deceptively simple: Looks fancy but requires no special equipment.
Ingredients & Tools
- 2 boneless, skin-on chicken breasts (or 4 thighs)
- 1 ½ tbsp olive oil or avocado oil
- 1 tbsp unsalted butter
- 2 cloves garlic, lightly smashed
- 2 sprigs fresh thyme or rosemary (optional but recommended)
- ¾ tsp kosher salt, plus more to taste
- ½ tsp freshly ground black pepper
- ¼ cup chicken broth or white wine (for deglazing, optional)
Tools: A heavy-bottomed skillet (cast iron or stainless steel is ideal), tongs, instant-read thermometer.
Notes: Quality, plump, evenly-sized chicken breasts make a difference. Skin-on is non-negotiable for crispiness. The butter, garlic, and herbs create a fragrant pan sauce.
Nutrition (per serving)
| Calories: | 285 kcal |
| Protein: | 35 g |
| Fat: | 14 g |
| Carbs: | 1 g |
| Fiber: | 0 g |
Serves: 2 | Prep Time: 5 minutes | Cook Time: 15 minutes | Total Time: 20 minutes
Before You Start: Tips & Ingredient Notes
- Bring your chicken to room temperature. This is a small step with a huge impact. Taking the chill off the meat for 15-20 minutes before cooking ensures it cooks evenly from edge to center, preventing a raw middle and an overcooked exterior.
- Pat that skin DRY. Use paper towels to thoroughly dry the chicken skin. Any surface moisture will create steam, which is the enemy of crispiness. You want it as dry as possible for that perfect sear.
- Don’t be shy with the salt. Season your chicken generously and just before it goes into the pan. Salting too early can draw out moisture, so timing is key for a beautifully seasoned, juicy result.
- Choose your fat wisely. We use a combination of a high-smoke-point oil (like avocado or olive oil) for the initial sear and butter for finishing. The butter adds incredible flavor and helps with browning, but it burns easily, which is why we add it later.
How to Make Pan Seared Chicken
Step 1: Start by prepping your chicken. If you’re using breasts, you might find they are unevenly thick. Place them on a cutting board, cover with plastic wrap, and gently pound the thicker end with a rolling pin or heavy pan until they are a relatively even thickness throughout. This is the secret to perfectly even cooking. Now, take your paper towels and pat the chicken completely dry, paying special attention to the skin side. This is non-negotiable for crispiness.
Step 2: Season the chicken. Just before cooking, season both sides of the chicken generously with kosher salt and black pepper. Don’t do this too far in advance, as the salt will start to pull moisture to the surface. You want that skin dry and ready for a hot pan.
Step 3: Heat your pan. Place your heavy-bottomed skillet over medium-high heat and let it get properly hot for a minute or two. Add the olive oil and swirl it around. You’ll know the pan is ready when the oil shimmers and looks fluid. A properly preheated pan is what gives you that instant sizzle and prevents the chicken from sticking.
Step 4: Time to sear. Carefully place the chicken in the pan, skin-side down. It should sizzle loudly the moment it touches the surface. Now, this is the hardest part: resist the urge to move it! Let it cook, undisturbed, for 6-8 minutes. You’ll notice the edges turning opaque and the skin becoming golden brown and crispy. If the chicken sticks, it’s not ready to flip—it will release naturally when a crust has formed.
Step 5: Flip and add flavor. Once the skin is deeply golden and releases easily, flip the chicken. Immediately reduce the heat to medium. Now, add the butter, smashed garlic cloves, and herb sprigs to the pan. As the butter melts, tilt the pan and use a spoon to baste the chicken continuously with the fragrant, foaming butter for the next 4-6 minutes. This cooks the other side and infuses the meat with incredible flavor.
Step 6: Check for doneness. The best way to know if your chicken is perfectly cooked is with an instant-read thermometer. Insert it into the thickest part of the meat—you’re looking for an internal temperature of 155-160°F (68-71°C). Remember, the temperature will continue to rise another 5 degrees or so as it rests (carryover cooking), taking it to the safe and juicy final temperature of 165°F (74°C).
Step 7: Rest is best. Transfer the chicken to a clean cutting board or plate to rest for at least 5-7 minutes. Do not skip this! Resting allows the muscle fibers to relax and reabsorb all the juices. If you cut into it right away, those precious juices will run out all over your cutting board, leaving you with drier meat.
Step 8: Optional pan sauce. While the chicken rests, you can make a quick pan sauce. With the pan still on medium heat, pour in the chicken broth or white wine. Use a wooden spoon to scrape up all the delicious browned bits (the fond) from the bottom of the pan. Let it simmer and reduce for a minute or two until slightly thickened. Pour this simple, flavor-packed sauce over your rested chicken before serving.
Storage & Freshness Guide
- Fridge: Store in an airtight container for up to 3 days.
- Freezer: Freeze for up to 3 months; thaw in fridge before reheating.
- Reviving: Reheat in a 350°F oven for 10–15 minutes or re-crisp skin in a dry skillet.
Serving Suggestions
Complementary Dishes
- Creamy Garlic Mashed Potatoes — The ultimate comfort food pairing. The fluffy, rich potatoes are a perfect vehicle for that simple pan sauce.
- A Simple Arugula Salad with Lemon Vinaigrette — The peppery arugula and bright, acidic dressing cut through the richness of the chicken beautifully.
- Roasted Asparagus or Green Beans — Their slightly charred, earthy flavor provides a wonderful textural and flavor contrast to the crispy-skinned chicken.
Drinks
- A Crisp, Unoaked Chardonnay — Its bright acidity and citrus notes complement the savory, buttery notes of the chicken without overpowering it.
- A Light Pale Ale or Lager — The carbonation and mild bitterness cleanse the palate between bites, making each mouthful of chicken taste as good as the first.
Something Sweet
- Lemon Sorbet — A scoop of this bright, palate-cleansing sorbet is the perfect, refreshing end to a rich meal.
- Classic Crème Brûlée — The contrast between the cool, creamy custard and the crackly caramelized sugar top is a decadent finish.
Top Mistakes to Avoid
- Mistake: Using a cold pan or cold chicken. This is the number one reason for sticking and steaming instead of searing. A hot pan meeting room-temp chicken creates an instant crust.
- Mistake: Moving the chicken too soon. I’ve messed this up before too—the impatience is real! But you must let the crust form. If it sticks, it’s not ready. It will release on its own when it’s good and ready.
- Mistake: Overcrowding the pan. If you’re cooking for a crowd, cook in batches. Crowding the pan drops the temperature drastically, causing the chicken to steam and boil in its own juices instead of searing.
- Mistake: Skipping the rest. Slicing into the chicken straight from the pan seems tempting, but all the hard-earned juices will spill out. Letting it rest is what ensures a moist, tender bite.
Expert Tips
- Tip: Use a weight. For ultimate skin-to-pan contact, place a smaller, heavy skillet or a foil-wrapped brick directly on top of the chicken as it sears. This presses it down evenly for an all-over crispy crust.
- Tip: Finish in the oven for thick cuts. If your chicken breasts are very large, you can sear the skin side until golden, then flip and transfer the entire oven-safe skillet to a 400°F (200°C) oven to finish cooking through. This prevents the skin from burning.
- Tip: Score the skin. Take a very sharp knife and make a few shallow slashes through the chicken skin (not into the meat) before seasoning. This helps render the fat more effectively and prevents the skin from curling up.
- Tip: Let the fat do the work. When basting, you’re not just adding flavor. You’re also using the hot butter and oil to cook the top side of the chicken, ensuring it’s perfectly done without needing to flip it multiple times.
FAQs
Can I use skinless chicken breasts?
You absolutely can, but you’ll miss out on that incredible crispy texture that makes this recipe so special. The skin acts as a protective layer, basting the meat in its own fat as it cooks, which results in a juicier final product. If you do use skinless, reduce the initial cook time by a minute or two per side, as it will cook a bit faster without the insulating skin layer.
Why is my chicken sticking to the pan?
Sticking usually means one of three things: your pan wasn’t hot enough before adding the chicken, you moved the chicken too early before a crust formed, or the chicken skin wasn’t thoroughly dried. Be patient, ensure your pan is properly preheated, and trust that the chicken will release on its own when it’s ready. A well-seasoned cast iron or a good stainless steel pan makes a world of difference.
How do I know when it’s done without a thermometer?
While a thermometer is the most reliable method, you can press the chicken with your finger. Properly cooked chicken should feel firm but still have a little give, similar to the fleshy part of your palm below your thumb. Alternatively, you can make a small cut into the thickest part—the juices should run clear, not pink. But honestly, a $10 instant-read thermometer is a game-changing kitchen investment.
Can I make this with chicken thighs?
Yes, and they are wonderfully forgiving! Chicken thighs have more fat, which makes them incredibly hard to overcook. Follow the same method, but you may need to cook them for a minute or two longer on the skin side to really crisp up that fat. Their richer flavor pairs beautifully with the garlic and herb butter baste.
How should I store and reheat leftovers?
Store any leftover chicken in an airtight container in the refrigerator for up to 3 days. To reheat while preserving the crispiness, avoid the microwave. Instead, warm it in a 350°F (175°C) oven for about 10-15 minutes, or until heated through. You can also re-crisp the skin in a dry skillet over medium heat for a few minutes. It won’t be *quite* as perfect as fresh, but it’s a close second.


Pan Seared Chicken
Learn how to make perfect Pan Seared Chicken with crispy skin and juicy meat every time. This easy 20-minute recipe delivers restaurant results at home. Get cooking now!
Ingredients
For the Ingredients & Tools
-
2 boneless, skin-on chicken breasts (or 4 thighs)
-
1 ½ tbsp olive oil or avocado oil
-
1 tbsp unsalted butter
-
2 cloves garlic (lightly smashed)
-
2 sprigs fresh thyme or rosemary (optional but recommended)
-
¾ tsp kosher salt (plus more to taste)
-
½ tsp freshly ground black pepper
-
¼ cup chicken broth or white wine (for deglazing, optional)
Instructions
-
Start by prepping your chicken. If you’re using breasts, you might find they are unevenly thick. Place them on a cutting board, cover with plastic wrap, and gently pound the thicker end with a rolling pin or heavy pan until they are a relatively even thickness throughout. This is the secret to perfectly even cooking. Now, take your paper towels and pat the chicken completely dry, paying special attention to the skin side. This is non-negotiable for crispiness.01
-
Season the chicken. Just before cooking, season both sides of the chicken generously with kosher salt and black pepper. Don’t do this too far in advance, as the salt will start to pull moisture to the surface. You want that skin dry and ready for a hot pan.02
-
Heat your pan. Place your heavy-bottomed skillet over medium-high heat and let it get properly hot for a minute or two. Add the olive oil and swirl it around. You’ll know the pan is ready when the oil shimmers and looks fluid. A properly preheated pan is what gives you that instant sizzle and prevents the chicken from sticking.03
-
Time to sear. Carefully place the chicken in the pan, skin-side down. It should sizzle loudly the moment it touches the surface. Now, this is the hardest part: resist the urge to move it! Let it cook, undisturbed, for 6-8 minutes. You’ll notice the edges turning opaque and the skin becoming golden brown and crispy. If the chicken sticks, it’s not ready to flip—it will release naturally when a crust has formed.04
-
Flip and add flavor. Once the skin is deeply golden and releases easily, flip the chicken. Immediately reduce the heat to medium. Now, add the butter, smashed garlic cloves, and herb sprigs to the pan. As the butter melts, tilt the pan and use a spoon to baste the chicken continuously with the fragrant, foaming butter for the next 4-6 minutes. This cooks the other side and infuses the meat with incredible flavor.05
-
Check for doneness. The best way to know if your chicken is perfectly cooked is with an instant-read thermometer. Insert it into the thickest part of the meat—you’re looking for an internal temperature of 155-160°F (68-71°C). Remember, the temperature will continue to rise another 5 degrees or so as it rests (carryover cooking), taking it to the safe and juicy final temperature of 165°F (74°C).06
-
Rest is best. Transfer the chicken to a clean cutting board or plate to rest for at least 5-7 minutes. Do not skip this! Resting allows the muscle fibers to relax and reabsorb all the juices. If you cut into it right away, those precious juices will run out all over your cutting board, leaving you with drier meat.07
-
Optional pan sauce. While the chicken rests, you can make a quick pan sauce. With the pan still on medium heat, pour in the chicken broth or white wine. Use a wooden spoon to scrape up all the delicious browned bits (the fond) from the bottom of the pan. Let it simmer and reduce for a minute or two until slightly thickened. Pour this simple, flavor-packed sauce over your rested chicken before serving.08
Not what you're looking for?


