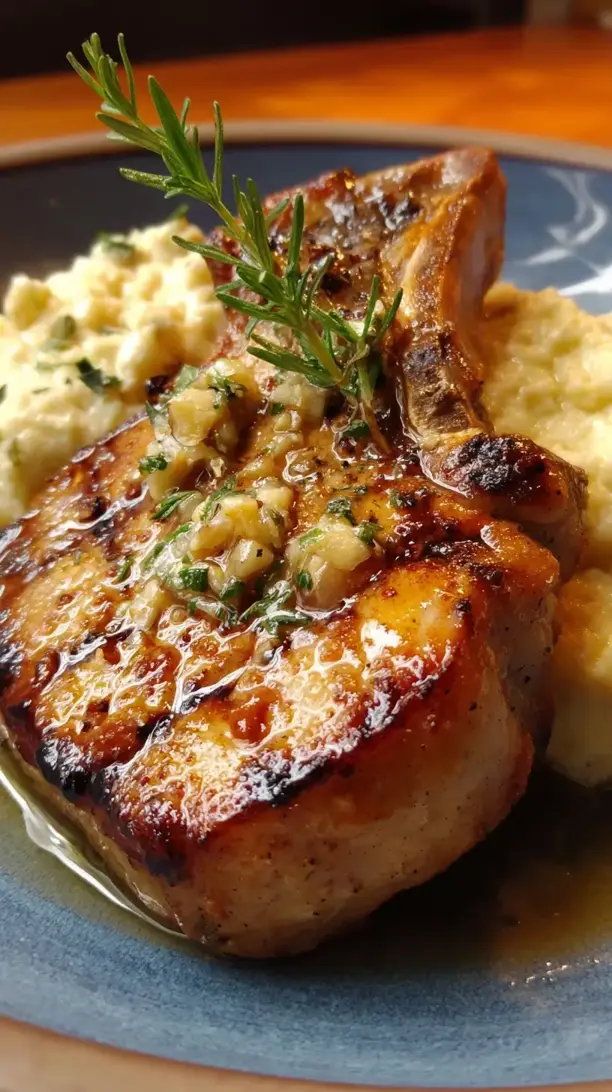
Perfectly cooked pan seared pork chops deliver a juicy interior and golden-brown crust with minimal effort. This method guarantees a flavorful, tender result every time. Follow these steps for restaurant-quality pork chops at home.
If you're looking for the perfect Pan Seared Pork Chops, you're in the right place. Whether you love Dinner Ideas or want to explore our Chicken collection, we've got you covered.


Why You’ll Love This Pan Seared Pork Chops
Unbeatable crust: Deeply flavorful, crisp exterior with a tender interior.
Simple & fast: Active cooking time under 15 minutes with straightforward technique.
Endlessly adaptable: Perfect canvas for spices, herbs, or pan sauces.
Foolproof juiciness: Brining and sear-and-rest method prevent dryness.
Ingredients & Tools
- 2 bone-in pork chops, about 1 to 1 ½ inches thick
- 1 tablespoon kosher salt, plus more for seasoning
- 1 teaspoon freshly ground black pepper
- 2 tablespoons high-smoke-point oil (like avocado, grapeseed, or canola)
- 2 tablespoons unsalted butter
- 3 garlic cloves, lightly smashed
- 2 sprigs fresh thyme or rosemary (optional, but highly recommended)
Tools: A heavy-bottomed oven-safe skillet (cast iron is ideal), instant-read thermometer, tongs.
Notes: Thicker chops give a bigger window for perfect sear without overcooking. Butter, garlic, and herbs create an aromatic base for basting.
Nutrition (per serving)
| Calories: | 380 kcal |
| Protein: | 35 g |
| Fat: | 26 g |
| Carbs: | 1 g |
| Fiber: | 0 g |
Serves: 2 | Prep Time: 5 minutes (plus optional brining time) | Cook Time: 12 minutes | Total Time: 17 minutes
Before You Start: Tips & Ingredient Notes
- Choose the right chop. For pan-searing, you want a chop that’s at least 1-inch thick. Bone-in chops are fantastic as the bone helps conduct heat evenly and adds flavor, but a thick boneless chop will work beautifully, too.
- To brine or not to brine? A quick brine (soaking in a saltwater solution for 30 minutes to 2 hours) is a game-changer for guaranteeing juiciness. If you’re short on time, just pat the chops dry and season them generously with salt at least 30 minutes before cooking.
- Get your pan screaming hot. A proper sear requires a properly preheated pan. You should see a light shimmer in the oil, and when you add the chop, it should sizzle aggressively the moment it touches the surface. No wimpy sizzles allowed.
- Trust your thermometer. The single best way to avoid overcooked pork is to use an instant-read thermometer. Pull the chops off the heat at 140°F (60°C)—they’ll carry over to a perfect, safe, and juicy 145°F (63°C) as they rest.
How to Make Pan Seared Pork Chops
Step 1: Prepare the pork chops. If you have time, brine the chops for 30 minutes to 2 hours in a solution of 4 cups water and 2 tablespoons kosher salt. Otherwise, pat the chops completely dry with paper towels—this is non-negotiable for a good crust. Season both sides very generously with salt and pepper, and let them sit at room temperature for about 30 minutes. You’ll notice the salt begins to dissolve on the surface; this is a good sign it’s seasoning deep into the meat.
Step 2: Preheat your pan. Place your heavy-bottomed skillet (cast iron is my absolute favorite for this) over medium-high heat. Let it get properly hot for a good 3-4 minutes. Add the high-smoke-point oil and swirl it around. The oil should shimmer and look thin—if it starts smoking immediately, your pan is too hot, so reduce the heat slightly. The ideal temperature is just below the smoke point.
Step 3: Sear the first side. Carefully lay the pork chops away from you in the hot oil. You should hear an immediate, vigorous sizzle. Now, this is crucial: do not move them! Resist the urge to poke, peek, or shift them around. Let them cook undisturbed for 4-5 minutes. You’re developing that gorgeous, caramelized crust. You’ll know it’s ready to flip when the edges look cooked about halfway up the side and the chop releases easily from the pan.
Step 4: Flip and add the aromatics. Use your tongs to flip the chops onto the second side. They should have a deep, golden-brown color. Immediately reduce the heat to medium. Now, add the butter, smashed garlic cloves, and herb sprigs to the pan. The butter will melt and foam almost instantly.
Step 5: Baste, baste, baste! As soon as the butter is melted, tilt the pan slightly towards you. Use a spoon to continuously scoop up the bubbling, fragrant butter and pour it over the top of the pork chops. Do this for the entire 3-4 minutes they cook on the second side. You’re essentially frying the top of the chop with that flavored butter, which cooks it more evenly and infuses it with the garlic and herb essence. The aroma at this stage is just… incredible.
Step 6: Check for doneness and rest. After about 4 minutes on the second side, start checking the internal temperature with your instant-read thermometer. Insert it horizontally into the thickest part of the chop, avoiding the bone. The moment it reads 140°F (60°C), immediately transfer the chops to a clean plate or cutting board. Let them rest for at least 5-7 minutes. This allows the juices, which have been driven to the center by the heat, to redistribute throughout the entire chop. If you cut in too early, all those precious juices will just run out onto the plate.
Storage & Freshness Guide
- Fridge: Store in an airtight container up to 3 days.
- Freezer: Wrap tightly and freeze up to 3 months.
- Reviving: Reheat gently in a 275°F oven with broth, covered, until warm.
Serving Suggestions
Complementary Dishes
- Garlic Mashed Potatoes — The ultimate comfort food pairing. The creamy, fluffy potatoes are the perfect vehicle for sopping up any pan juices or a simple sauce you might make.
- Sautéed Apples and Onions — A slightly sweet and savory side that complements the pork’s richness beautifully. The soft, caramelized flavors are a classic for a reason.
- Simple Arugula Salad with Lemon Vinaigrette — The peppery arugula and bright, acidic dressing cut through the richness of the pork, balancing the whole plate and making it feel a bit lighter.
Drinks
- A medium-bodied Red Wine — Think Pinot Noir or a Grenache. They have enough structure to stand up to the meat but won’t overpower its subtle sweetness.
- A Crisp Hard Cider — The apple notes are a natural friend to pork, and the carbonation cleanses the palate beautifully between each savory bite.
- Sparkling Water with Lemon — For a non-alcoholic option, the bubbles and citrus are refreshing and help reset your taste buds, making every bite of the chop taste like the first.
Something Sweet
- Warm Apple Crumble — You’re already on an apple kick with the pork, so why not lean in? The warm, spiced fruit and buttery topping feel like a natural, cozy progression after the savory main.
- Dark Chocolate Pots de Crème — For a more elegant finish, these rich, silky chocolate custards offer a deep, bittersweet contrast that doesn’t feel too heavy.
- Vanilla Bean Panna Cotta — Its cool, creamy simplicity is the perfect light and smooth ending to a meal centered around a robust, seared protein.
Top Mistakes to Avoid
- Using chops that are too thin. Thin chops (under ¾-inch) cook in a flash and are nearly impossible to sear properly without turning them into hockey pucks. You need that thickness to create a crust while keeping the center pink and juicy.
- Not patting the chops dry. Any moisture on the surface of the meat will steam instead of sear. You’ll end up with a pale, grey chop instead of that beautiful, flavorful brown crust we’re after. Paper towels are your best friend here.
- Moving the chops too soon. I’ve messed this up before too… the second you lay that chop in the pan, it will want to stick. But if you leave it alone, the crust will form and it will release naturally. Prying it up early will tear the crust and leave it stuck to the pan.
- Skipping the rest. I know it’s tempting to dig right in, but resting is not an optional step. It’s the final stage of cooking that ensures every single bite is as moist as possible. Cutting in too early lets all the hard-earned juices escape.
Expert Tips
- Tip: Use the “thumb test” as a backup. While a thermometer is king, you can press on the meat. A raw chop feels like the fleshy part of your palm below your thumb. A medium-rare to medium chop (what we want) feels like the base of your thumb when you touch it to your tip of your middle finger. It should have a little give.
- Tip: Make a quick pan sauce. After removing the chops, your pan is full of browned, flavorful bits (the “fond”). Add a splash of white wine or chicken broth to deglaze, scraping up those bits. Let it reduce by half, swirl in a cold knob of butter off the heat, and you have a restaurant-worthy sauce in minutes.
- Tip: Try a coffee-chili rub. For something different, mix finely ground coffee, brown sugar, chili powder, salt, and pepper. Rub it on the chops before searing. The coffee adds an incredible depth and helps form an even darker, more robust crust.
- Tip: Finish with a flaky salt. Just before serving, sprinkle a tiny pinch of a high-quality flaky sea salt (like Maldon) over the rested chops. It adds a delightful textural crunch and a final pop of pure saltiness that elevates every single flavor.
FAQs
Can I use boneless pork chops for this recipe?
Absolutely, you can! The method is exactly the same. Just be extra vigilant with your cooking time, as boneless chops can cook a minute or two faster than their bone-in counterparts. The key, as always, is to rely on your instant-read thermometer. Pull them at 140°F, and you’ll be golden. The bone does add flavor and helps with even heating, but a well-seared boneless chop is still a fantastic meal.
Why did my pork chops turn out tough?
Tough pork chops are almost always a result of overcooking. Pork is very lean, and without a good amount of intramuscular fat, it has a narrow window between perfectly cooked and dry. Using a thermometer is the single best way to prevent this. Also, ensure you’re starting with a quality chop—look for ones with a rosy pink color and some marbling if possible, as this intramuscular fat translates to more tenderness.
Do I really need to let the meat come to room temperature before cooking?
It’s a best practice that makes a noticeable difference. A cold chop straight from the fridge will cause the pan temperature to drop significantly, hindering your sear. It can also lead to an overcooked exterior and an undercooked center as the heat struggles to penetrate the cold core. Letting it sit for 20-30 minutes ensures more even cooking from edge to center, giving you that perfect sear and juicy interior in sync.
What’s the best way to reheat leftover pork chops without drying them out?
Reheating pork chops is tricky, but the best method is a gentle, low-and-slow approach. Avoid the microwave at all costs—it will turn them to rubber. Instead, place the chops in a baking dish with a couple tablespoons of broth or water, cover tightly with foil, and warm them in a 275°F (135°C) oven for 10-15 minutes, just until heated through. This gently steams them back to life.
My butter burned during the basting step. What happened?
This is a common issue! Butter has a low smoke point and can burn easily over high heat. This is why we reduce the heat to medium immediately after flipping the chops. If your butter is still browning too fast and smelling acrid, your pan is likely still too hot. Don’t be afraid to take it off the heat for a moment to let it cool down, or add a bit more oil to the pan to help buffer the temperature.


Pan Seared Pork Chops
Learn how to make perfect Pan Seared Pork Chops with a golden crust and juicy interior. This easy, foolproof recipe is ready in under 20 minutes. Get the recipe now!
Ingredients
For the Ingredients
-
2 bone-in pork chops (about 1 to 1 ½ inches thick)
-
1 tablespoon kosher salt (plus more for seasoning)
-
1 teaspoon freshly ground black pepper
-
2 tablespoons high-smoke-point oil (like avocado, grapeseed, or canola)
-
2 tablespoons unsalted butter
-
3 cloves garlic (lightly smashed)
-
2 sprigs fresh thyme or rosemary (optional, but highly recommended)
Instructions
-
Prepare the pork chops. If you have time, brine the chops for 30 minutes to 2 hours in a solution of 4 cups water and 2 tablespoons kosher salt. Otherwise, pat the chops completely dry with paper towels—this is non-negotiable for a good crust. Season both sides very generously with salt and pepper, and let them sit at room temperature for about 30 minutes. You’ll notice the salt begins to dissolve on the surface; this is a good sign it’s seasoning deep into the meat.01
-
Preheat your pan. Place your heavy-bottomed skillet (cast iron is my absolute favorite for this) over medium-high heat. Let it get properly hot for a good 3-4 minutes. Add the high-smoke-point oil and swirl it around. The oil should shimmer and look thin—if it starts smoking immediately, your pan is too hot, so reduce the heat slightly. The ideal temperature is just below the smoke point.02
-
Sear the first side. Carefully lay the pork chops away from you in the hot oil. You should hear an immediate, vigorous sizzle. Now, this is crucial: do not move them! Resist the urge to poke, peek, or shift them around. Let them cook undisturbed for 4-5 minutes. You’re developing that gorgeous, caramelized crust. You’ll know it’s ready to flip when the edges look cooked about halfway up the side and the chop releases easily from the pan.03
-
Flip and add the aromatics. Use your tongs to flip the chops onto the second side. They should have a deep, golden-brown color. Immediately reduce the heat to medium. Now, add the butter, smashed garlic cloves, and herb sprigs to the pan. The butter will melt and foam almost instantly.04
-
Baste, baste, baste! As soon as the butter is melted, tilt the pan slightly towards you. Use a spoon to continuously scoop up the bubbling, fragrant butter and pour it over the top of the pork chops. Do this for the entire 3-4 minutes they cook on the second side. You’re essentially frying the top of the chop with that flavored butter, which cooks it more evenly and infuses it with the garlic and herb essence. The aroma at this stage is just… incredible.05
-
Check for doneness and rest. After about 4 minutes on the second side, start checking the internal temperature with your instant-read thermometer. Insert it horizontally into the thickest part of the chop, avoiding the bone. The moment it reads 140°F (60°C), immediately transfer the chops to a clean plate or cutting board. Let them rest for at least 5-7 minutes. This allows the juices, which have been driven to the center by the heat, to redistribute throughout the entire chop. If you cut in too early, all those precious juices will just run out onto the plate.06
Not what you're looking for?


