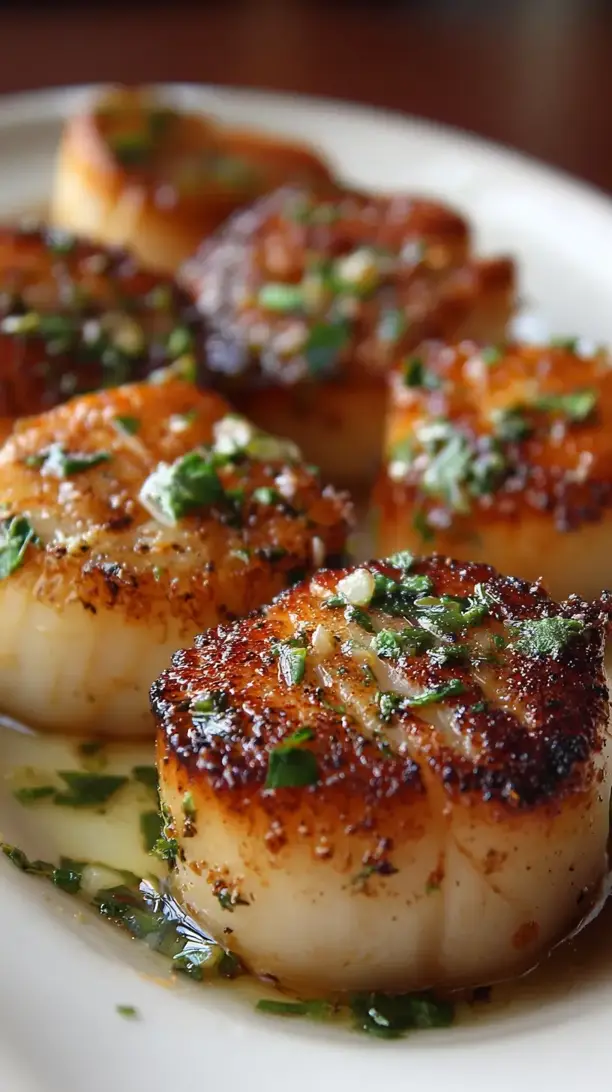
Perfectly cooked pan seared scallops deliver sweet, briny flavor and a golden crust with minimal effort. This recipe focuses on key principles like managing moisture and trusting high heat for restaurant-quality results. You can create these impressive pan seared scallops in under 15 minutes for an elegant dinner.
Craving a delicious Pan Seared Scallops? You've come to the right spot! From Dinner Ideas favorites to amazing Christmas Cookie recipes, there's something here for everyone.
Why You’ll Love This Pan Seared Scallops
- Quick & Impressive: Ready in 15 minutes with serious wow factor.
- Pure Sweet Flavor: High-heat sear locks in natural sweetness and briny essence.
- Golden Crust: Crisp exterior gives way to tender, creamy interior.
- Endlessly Versatile: Pairs beautifully with risotto, salads, or roasted veggies.
Ingredients & Tools
- 450 g (1 lb) large dry-packed sea scallops
- 2 tablespoons high-smoke-point oil (like avocado or grapeseed)
- 2 tablespoons unsalted butter
- 3 cloves garlic, lightly smashed
- 1 sprig fresh thyme or rosemary (optional)
- ½ teaspoon kosher salt, plus more to taste
- ¼ teaspoon freshly ground black pepper
- 1 tablespoon fresh lemon juice
- 2 tablespoons chopped fresh parsley
Tools: 1 large (12-inch) heavy-bottomed skillet (cast iron or stainless steel are ideal), Tongs, Paper towels
Notes: Seek out “dry-packed” scallops as they sear instead of steam. A heavy skillet is non-negotiable for even, blistering heat.
Nutrition (per serving)
| Calories: | 245 kcal |
| Protein: | 24 g |
| Fat: | 14 g |
| Carbs: | 5 g |
| Fiber: | 0 g |
Serves: 3 | Prep Time: 10 minutes | Cook Time: 6 minutes | Total Time: 16 minutes
Before You Start: Tips & Ingredient Notes
- Dry-Packed is Non-Negotiable. “Wet-packed” scallops are treated with a solution that makes them retain water. This extra moisture will prevent a good sear and they’ll steam in the pan. Dry-packed scallops will feel firm and look natural in color.
- Patience with the Pat-Dry. This might seem like a small step, but it’s the single most important one for that golden crust. Take the time to thoroughly pat each scallop dry with paper towels—you’ll be rewarded.
- Get Your Pan Screaming Hot. Don’t be shy with the heat. Your pan needs to be very hot before the scallops go in. A drop of water should skitter and evaporate instantly. This initial blast of heat is what creates the Maillard reaction, aka that beautiful browning.
- Don’t Crowd the Pan. Give each scallop some personal space. If you overcrowd the pan, the temperature will drop, and they’ll release liquid, leading to a steamed, pale result instead of a sear.
How to Make Pan Seared Scallops
Step 1: First, you’ll want to prep your scallops. If you see a small, tough side muscle on any of them (it often looks like a little tab), just pinch it off and discard it. Then, lay the scallops on a stack of paper towels and use more towels to pat them completely dry on all sides. Be thorough here—this is the secret to the crust. Season both sides liberally with the kosher salt and black pepper.
Step 2: Now, place your large, heavy-bottomed skillet over medium-high heat and let it get properly hot for a good 2-3 minutes. Add the high-smoke-point oil and swirl it to coat the pan. You’ll know it’s ready when the oil shimmers and looks thin—you might even see a slight wisp of smoke.
Step 3: Carefully place the scallops in the hot pan, making sure they aren’t touching each other. You should hear an immediate, confident sizzle. Now, the hard part: resist the urge to move them! Let them cook undisturbed for about 90 seconds to 2 minutes. You’ll notice the edges on the bottom turning a deep golden brown.
Step 4: Using tongs, check one scallop. If it releases easily from the pan and has a beautiful brown crust, it’s ready to flip. If it sticks, give it another 30 seconds. Flip each scallop—they should look gorgeous. Immediately add the butter, smashed garlic cloves, and the herb sprig to the pan.
Step 5: As the butter melts and foams, tilt the pan slightly towards you. Use a spoon to continuously baste the scallops with the hot, fragrant butter for about 60-90 seconds. This cooks the second side more gently and infuses them with incredible flavor. The second side won’t get as dark, and that’s perfectly fine.
Step 6: The scallops are done when they are just firm to the touch and opaque all the way through. Be careful not to overcook them, or they’ll become tough and rubbery. They should still have a slight give in the very center. Immediately transfer them to a warm plate to stop the cooking process.
Step 7: To finish, remove the pan from the heat. Squeeze in the fresh lemon juice and stir in the chopped parsley, scraping up any of those delicious browned bits from the bottom of the pan. Drizzle this incredible pan sauce right over the plated scallops and serve immediately.
Storage & Freshness Guide
- Fridge: Store cooked scallops in an airtight container for up to 2 days.
- Freezer: Freeze in a single layer then transfer to freezer bags for up to 3 months.
- Reviving: Reheat gently in a skillet over low heat to maintain texture.
Serving Suggestions
Complementary Dishes
- Creamy Parmesan Risotto — The rich, savory rice is the ultimate soft bed for the crisp scallops, and the flavors meld together beautifully.
- Simple Arugula Salad with Lemon Vinaigrette — The peppery arugula and sharp lemon cut through the richness of the scallops, creating a perfect balance on the plate.
- Garlic Sautéed Spinach — It wilts down quickly and acts as a flavorful, vibrant base that soaks up every last drop of that buttery pan sauce.
Drinks
- A Crisp, Unoaked Chardonnay — Its bright acidity and citrus notes complement the scallops’ sweetness without overpowering their delicate flavor.
- A Classic Gin Martini — The clean, botanical notes are a surprisingly elegant pairing that cleanses the palate between each luxurious bite.
- Sparkling Water with a Lemon Twist — For a non-alcoholic option, the bubbles and citrus are refreshing and highlight the dish’s simplicity.
Something Sweet
- Lemon Sorbet — It’s light, palate-cleansing, and continues the citrus theme from the pan sauce, making for a wonderfully cohesive meal.
- Dark Chocolate Pots de Crème — For a richer finish, the deep, bitter notes of dark chocolate provide a decadent contrast to the sweet, salty scallops.
- Fresh Berries with a Dollop of Crème Fraîche — Simple, fresh, and just sweet enough to end the meal on a bright, satisfying note.
Top Mistakes to Avoid
- Mistake: Using wet-packed scallops. This is the number one reason home cooks fail at searing. The added moisture guarantees a steamed, rubbery texture and a pale, unappetizing color. Always ask for dry-packed.
- Mistake: Not drying the scallops thoroughly. Even dry-packed scallops have surface moisture. Skipping the pat-dry step is like inviting steam into the pan, which prevents the Maillard reaction and that beautiful crust from forming.
- Mistake: Moving the scallops too soon. I know it’s tempting to peek or shuffle them, but you’ll tear the delicate crust that’s forming. Let the pan do its work—a proper sear means they’ll release naturally when ready.
- Mistake: Overcooking. Scallops cook incredibly fast. The goal is an opaque exterior with a slightly translucent, tender center. Once they turn uniformly solid and tough, you’ve gone too far. They continue to cook a bit after being removed from the pan, so err on the side of underdone.
Expert Tips
- Tip: Bring scallops to room temperature. Take them out of the fridge 15 minutes before cooking. This helps them cook more evenly, preventing a raw center and an overcooked exterior.
- Tip: Use a timer for the first side. It’s easy to lose track of time. Setting a timer for 90 seconds forces you to leave them alone, ensuring that perfect crust develops without any guesswork.
- Tip: Finish with flaky sea salt. After plating, sprinkle a tiny bit of a high-quality flaky sea salt (like Maldon) over the top. The delicate crunch and burst of salinity elevate the final dish immensely.
- Tip: Don’t discard the garlic. Those smashed, pan-roasted garlic cloves are soft, sweet, and incredibly delicious. Smear them on a piece of crusty bread or mash them into the scallops as you eat—it’s a chef’s treat.
FAQs
How can I tell if my scallops are fresh?
Fresh scallops should smell sweet and clean, like the ocean breeze, not fishy or ammonia-like. They should appear moist but not sitting in a pool of liquid, and their color should be a creamy white or a very pale beige. Avoid any that look super white or have a slimy film—those are past their prime.
Why did my scallops stick to the pan?
Sticking usually happens for one of three reasons: the pan wasn’t hot enough when you added them, the scallops weren’t dry enough, or you tried to move them too early. Make sure you get that oil shimmering, pat those scallops bone-dry, and have the patience to let a crust form—it will release on its own when it’s ready.
Can I use frozen scallops?
Absolutely, and it can be a more budget-friendly option. The key is to thaw them properly. Place them in a sealed bag and submerge them in cold water in the fridge overnight. Never thaw them at room temperature or in warm water, as this can compromise their texture. And, as always, pat them extremely dry before cooking.
What’s the purpose of the side muscle? Should I always remove it?
That little tough tab on the side is a muscle the scallop used to attach itself to its shell. It’s much tougher and chewier than the main adductor muscle (the sweet part we eat). Yes, you should always remove it—it’s simple to pinch off with your fingers, and it makes for a much more pleasant, uniformly tender eating experience.
What’s the best oil to use for searing?
You need an oil with a high smoke point so it doesn’t burn and turn acrid at the high temperatures required. Excellent choices are avocado oil, grapeseed oil, or refined (light) olive oil. Avoid extra virgin olive oil or butter for the initial sear, as they will burn and smoke excessively.


Pan Seared Scallops
Learn how to make perfect Pan Seared Scallops with a golden crust in just 15 minutes. Get the easy recipe and pro tips for a stunning dinner tonight!
Ingredients
For the Ingredients
-
450 g large dry-packed sea scallops
-
2 tablespoons high-smoke-point oil (like avocado or grapeseed)
-
2 tablespoons unsalted butter
-
3 cloves garlic (lightly smashed)
-
1 sprig fresh thyme or rosemary (optional)
-
0.5 teaspoon kosher salt (plus more to taste)
-
0.25 teaspoon freshly ground black pepper
-
1 tablespoon fresh lemon juice
-
2 tablespoons chopped fresh parsley
Instructions
-
First, you’ll want to prep your scallops. If you see a small, tough side muscle on any of them (it often looks like a little tab), just pinch it off and discard it. Then, lay the scallops on a stack of paper towels and use more towels to pat them completely dry on all sides. Be thorough here—this is the secret to the crust. Season both sides liberally with the kosher salt and black pepper.01
-
Now, place your large, heavy-bottomed skillet over medium-high heat and let it get properly hot for a good 2-3 minutes. Add the high-smoke-point oil and swirl it to coat the pan. You’ll know it’s ready when the oil shimmers and looks thin—you might even see a slight wisp of smoke.02
-
Carefully place the scallops in the hot pan, making sure they aren’t touching each other. You should hear an immediate, confident sizzle. Now, the hard part: resist the urge to move them! Let them cook undisturbed for about 90 seconds to 2 minutes. You’ll notice the edges on the bottom turning a deep golden brown.03
-
Using tongs, check one scallop. If it releases easily from the pan and has a beautiful brown crust, it’s ready to flip. If it sticks, give it another 30 seconds. Flip each scallop—they should look gorgeous. Immediately add the butter, smashed garlic cloves, and the herb sprig to the pan.04
-
As the butter melts and foams, tilt the pan slightly towards you. Use a spoon to continuously baste the scallops with the hot, fragrant butter for about 60-90 seconds. This cooks the second side more gently and infuses them with incredible flavor. The second side won’t get as dark, and that’s perfectly fine.05
-
The scallops are done when they are just firm to the touch and opaque all the way through. Be careful not to overcook them, or they’ll become tough and rubbery. They should still have a slight give in the very center. Immediately transfer them to a warm plate to stop the cooking process.06
-
To finish, remove the pan from the heat. Squeeze in the fresh lemon juice and stir in the chopped parsley, scraping up any of those delicious browned bits from the bottom of the pan. Drizzle this incredible pan sauce right over the plated scallops and serve immediately.07
Not what you're looking for?


