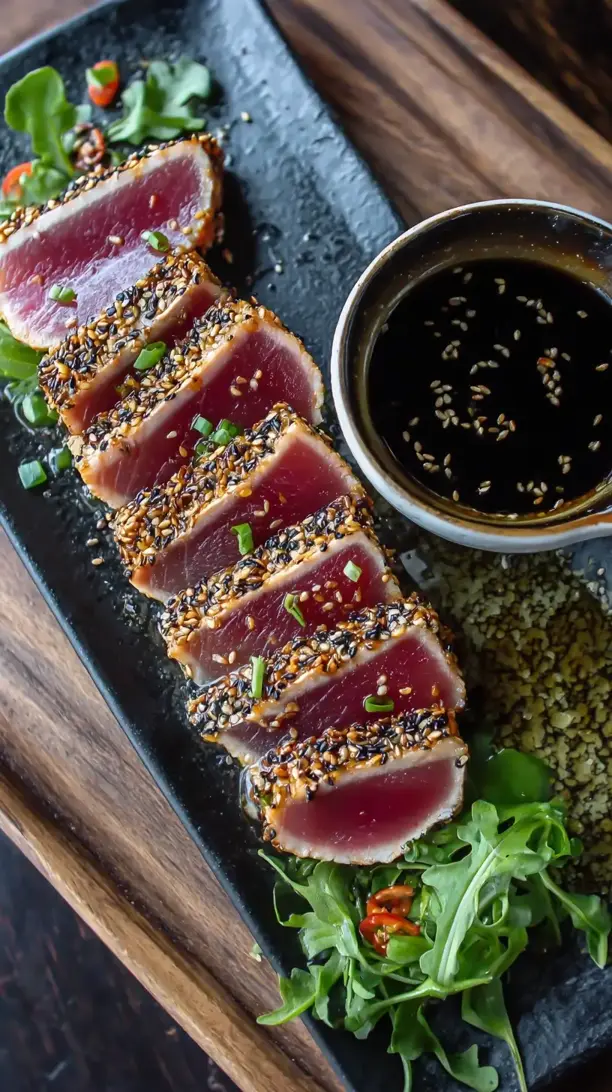
Pan seared tuna delivers a stunning contrast of a savory, peppery crust and a cool, ruby-red center. It feels restaurant-fancy but is surprisingly simple and quick to master at home. With a hot pan and quality fish, you can create this elegant meal in under 15 minutes.
Nothing beats a great Pan Seared Tuna. Whether you're a fan of Dinner Ideas or want to try something from our Dessert Recipes selection, keep scrolling!


Why You’ll Love This Pan Seared Tuna
- Fast & elegant: A protein-packed main course ready in minutes.
- Textural magic: Crisp crust and silky, rare interior in every bite.
- Simple to master: Straightforward technique with clear visual cues.
- Incredibly versatile: Perfect for salads, bowls, or even cubed for salads.
Ingredients & Tools
- 2 (6-8 oz) sushi-grade ahi tuna steaks, about 1-inch thick
- 1 tbsp whole black peppercorns
- 1 tbsp white sesame seeds
- 1 tsp coarse sea salt
- 2 tbsp neutral high-smoke-point oil (like avocado or grapeseed)
- 1 tbsp toasted sesame oil
- 2 tbsp soy sauce or tamari
- 1 lime, cut into wedges
- 2 tbsp fresh cilantro, chopped (for garnish)
Tools: A heavy-bottomed skillet (cast iron is ideal), a spice grinder or mortar and pestle, paper towels, and tongs.
Notes: Use sushi-grade tuna for safety since the center is served rare. Toasting and cracking your own peppercorns provides superior aroma and flavor.
Nutrition (per serving)
| Calories: | 310 kcal |
| Protein: | 42 g |
| Fat: | 14 g |
| Carbs: | 3 g |
| Fiber: | 1 g |
Serves: 2 | Prep Time: 10 minutes | Cook Time: 4 minutes | Total Time: 14 minutes
Before You Start: Tips & Ingredient Notes
- What does “sushi-grade” actually mean? This label indicates the fish has been frozen to a specific temperature to eliminate parasites, making it safe to eat raw or rare. Always buy from a reputable fishmonger you trust. Don’t be shy—ask them when it came in!
- Why a cast iron skillet? Cast iron retains and distributes heat incredibly evenly, which is crucial for getting a uniform, dark sear without overcooking the fish. A heavy stainless steel pan is a good second choice, but avoid non-stick as it often can’t handle the high heat we need.
- Patience with the pan is key. You absolutely must let your skillet get screaming hot before the tuna even gets near it. A properly heated pan ensures a quick sear that forms a crust and locks in the juices. If the pan isn’t hot enough, the fish will steam and stick.
- Don’t skip the toasting step for the seeds. Toasting the sesame seeds in a dry pan for a minute or two until fragrant wakes up their oils and gives them a nutty, deeper flavor that makes the crust truly special.
How to Make Pan Seared Tuna
Step 1: Prepare the Tuna and Spice Crust. First, take your tuna steaks out of the fridge and pat them completely dry with paper towels. This is a non-negotiable step—any surface moisture will prevent a good sear and cause the oil to splatter. Let the fish sit out for about 10 minutes to take the chill off. Meanwhile, add your black peppercorns and sesame seeds to a dry skillet over medium heat. Toast them for 1-2 minutes, shaking the pan frequently, until they’re fragrant. You’ll hear the peppercorns start to crackle. Transfer them to a spice grinder or mortar and pestle and coarsely crack them—you want a mix of fine and coarse pieces for great texture. Mix this with the coarse sea salt on a small plate.
Step 2: Coat the Tuna Generously. Drizzle the toasted sesame oil over all sides of the tuna steaks. This not only adds flavor but helps the spice mixture adhere. Now, press each side of the tuna firmly into the pepper-sesame-salt mixture. You want a nice, even, generous coating. Don’t be timid! The crust is a major flavor component. Set the coated steaks aside on a clean plate while you heat the pan.
Step 3: Get Your Pan Screaming Hot. Place your heavy-bottomed skillet over high heat and let it sit for a good 3-4 minutes. You want it seriously hot. To test, you can flick a few drops of water into the pan—they should instantly sizzle and evaporate. Once it’s hot, add the neutral high-heat oil and swirl it to coat the bottom. Give it another 30 seconds to heat up. The oil should be shimmering but not smoking excessively.
Step 4: The Main Event—Sear the Tuna. Carefully lay the tuna steaks in the hot pan using your tongs. You should hear an immediate, assertive sizzle. This is what you want! Do not move them. Let them sear undisturbed for exactly 1 minute and 30 seconds to form that beautiful crust. Peek at the edges—you should see the color change from the vibrant red of the raw fish to a cooked, light grey about a quarter of the way up the side.
Step 5: Flip and Finish. Using your tongs, gently but confidently flip each steak. Sear the second side for another 1 minute and 30 seconds. For a rare center, this timing is perfect for a 1-inch thick steak. If you prefer it more towards medium-rare, you can go for 2 minutes per side. Remember, the fish will continue to cook a little from residual heat after it’s out of the pan.
Step 6: Rest and Slice. Immediately transfer the seared tuna to a clean cutting board. Let it rest for at least 2-3 minutes. This allows the juices to redistribute, ensuring every slice is moist and tender. Just before serving, use a very sharp knife to slice the tuna against the grain into ½-inch thick slices. You’ll reveal that stunning contrast between the crust and the ruby interior.
Storage & Freshness Guide
- Fridge: Store leftovers tightly wrapped for up to 2 days.
- Freezer: Not recommended after searing; freeze raw sushi-grade tuna if needed.
- Reviving: Enjoy cold—sliced over salads. Do not reheat.
Serving Suggestions
Complementary Dishes
- Ginger-Sesame Soba Noodle Salad — The cool, nutty noodles provide a fantastic textural and temperature contrast to the warm, savory tuna.
- Simple Arugula Salad with a Citrus Vinaigrette — The peppery arugula and bright, acidic dressing cut through the richness of the fish beautifully.
- Stir-fried Asian Greens like Bok Choy — Their slight bitterness and garlicky flavor make a wonderful, healthy side that complements without overpowering.
Drinks
- A crisp, dry Rosé — Its bright acidity and subtle red fruit notes are a perfect match for the savory, peppery crust and the rich fish.
- An ice-cold Japanese Lager like Sapporo — The clean, crisp finish of the beer cleanses the palate between each flavorful bite.
- Ginger Beer Mocktail — The spicy-sweet kick of ginger harmonizes wonderfully with the sesame and soy elements in the dish.
Something Sweet
- Mango Sorbet with Lime Zest — The tropical, bright sweetness of the mango is a refreshing and light way to end the meal.
- Dark Chocolate-Dipped Fortune Cookies — A playful, slightly crunchy and bittersweet treat that nods back to the Asian-inspired flavors.
- Green Tea Ice Cream — Its subtle bitterness and creamy texture are a classic, elegant pairing that feels just right.
Top Mistakes to Avoid
- Mistake: Using tuna that isn’t sushi-grade. Since the center is meant to be rare, this is a critical food safety step. Regular “tuna steaks” from the freezer aisle are not processed for raw consumption.
- Mistake: Not drying the tuna thoroughly. Any moisture on the surface will create steam, preventing the crust from forming and making the fish more likely to stick to the pan. Pat, pat, pat it dry!
- Mistake: Moving the tuna in the pan. The moment you lay the fish down, leave it alone! If you try to move it or check it too early, you’ll tear the delicate crust that’s forming and it won’t be as pretty or as textured.
- Mistake: Skipping the rest time. Slicing the tuna immediately after searing will cause all the delicious juices to run out onto the cutting board instead of staying in the fish, leaving it drier.
Expert Tips
- Tip: Use a timer. With such a short cook time, every second counts. Guessing or eyeballing it can easily lead to overcooking. Set a timer for each side to ensure perfect doneness every single time.
- Tip: Score the skin side. If your tuna steaks have a thin layer of skin on one side, make a few shallow, diagonal scores through the skin (but not into the flesh) before searing. This will prevent it from curling up in the hot pan.
- Tip: Make a quick dipping sauce. While the tuna rests, whisk together equal parts soy sauce, lime juice, and a touch of honey or maple syrup with a sprinkle of red pepper flakes. It’s a fantastic, zingy accompaniment for dipping.
- Tip: Try a different crust. While the pepper-sesame classic is wonderful, don’t be afraid to experiment. A crust of crushed coriander seeds and lemon zest, or even coffee grounds and chili powder, can be absolutely incredible.
FAQs
Can I make this with frozen tuna?
Yes, but you have to do it correctly. Thaw the tuna slowly in the refrigerator overnight—never at room temperature or in warm water. Once fully thawed, pat it extremely dry, as frozen fish often releases more moisture. The quality of previously frozen sushi-grade tuna can be excellent, but avoid refreezing it once it’s thawed.
How can I tell when the tuna is done without cutting into it?
The best method is the “touch test.” Compare the firmness of the tuna to the fleshy part of your palm, just below your thumb. For rare, it should feel very soft with just a slight resistance, similar to when you touch that part of your hand with your fingers relaxed. As it cooks, it will firm up. The visual cue is the cooked grey “ring” you see on the side of the steak.
What if I don’t have a cast iron skillet?
A heavy-gauge stainless steel skillet is your next best bet. The key is the pan’s ability to hold and distribute high heat. If you only have a lighter pan, you may need to sear the tuna for a slightly shorter time on even higher heat to compensate, but watch it closely as hot spots can develop more easily.
Can I prepare the spice crust ahead of time?
Absolutely! You can toast and crack the peppercorns and sesame seeds up to a week in advance. Store them in an airtight container at room temperature. Mixing them with the salt ahead of time is fine too, but the salt can draw out moisture from the seeds over several days, so for the very best texture, I’d mix it the day you plan to cook.
What’s the best way to store and reheat leftovers?
Leftover seared tuna is best enjoyed cold! Wrap it tightly and store it in the fridge for up to 2 days. Slicing it cold over a salad is fantastic. I do not recommend reheating it, as it will almost certainly overcook the delicate interior and change the texture dramatically.


Pan Seared Tuna
Learn how to make perfect Pan Seared Tuna with a savory crust and rare center. This easy 15-minute recipe delivers restaurant-quality results at home. Cook it tonight!
Ingredients
For the Ingredients
-
2 sushi-grade ahi tuna steaks (6-8 oz each, about 1-inch thick)
-
1 tbsp whole black peppercorns
-
1 tbsp white sesame seeds
-
1 tsp coarse sea salt
-
2 tbsp neutral high-smoke-point oil (like avocado or grapeseed)
-
1 tbsp toasted sesame oil
-
2 tbsp soy sauce or tamari
-
1 lime (cut into wedges)
-
2 tbsp fresh cilantro (chopped, for garnish)
Instructions
-
First, take your tuna steaks out of the fridge and pat them completely dry with paper towels. Let the fish sit out for about 10 minutes to take the chill off. Meanwhile, add your black peppercorns and sesame seeds to a dry skillet over medium heat. Toast them for 1-2 minutes, shaking the pan frequently, until they’re fragrant. Transfer them to a spice grinder or mortar and pestle and coarsely crack them—you want a mix of fine and coarse pieces for great texture. Mix this with the coarse sea salt on a small plate.01
-
Drizzle the toasted sesame oil over all sides of the tuna steaks. Now, press each side of the tuna firmly into the pepper-sesame-salt mixture. You want a nice, even, generous coating. Set the coated steaks aside on a clean plate while you heat the pan.02
-
Place your heavy-bottomed skillet over high heat and let it sit for a good 3-4 minutes. Once it's hot, add the neutral high-heat oil and swirl it to coat the bottom. Give it another 30 seconds to heat up. The oil should be shimmering but not smoking excessively.03
-
Carefully lay the tuna steaks in the hot pan using your tongs. Do not move them. Let them sear undisturbed for exactly 1 minute and 30 seconds to form that beautiful crust. Peek at the edges—you should see the color change from the vibrant red of the raw fish to a cooked, light grey about a quarter of the way up the side.04
-
Using your tongs, gently but confidently flip each steak. Sear the second side for another 1 minute and 30 seconds. For a rare center, this timing is perfect for a 1-inch thick steak. If you prefer it more towards medium-rare, you can go for 2 minutes per side. Remember, the fish will continue to cook a little from residual heat after it's out of the pan.05
-
Immediately transfer the seared tuna to a clean cutting board. Let it rest for at least 2-3 minutes. Just before serving, use a very sharp knife to slice the tuna against the grain into ½-inch thick slices.06
Not what you're looking for?


