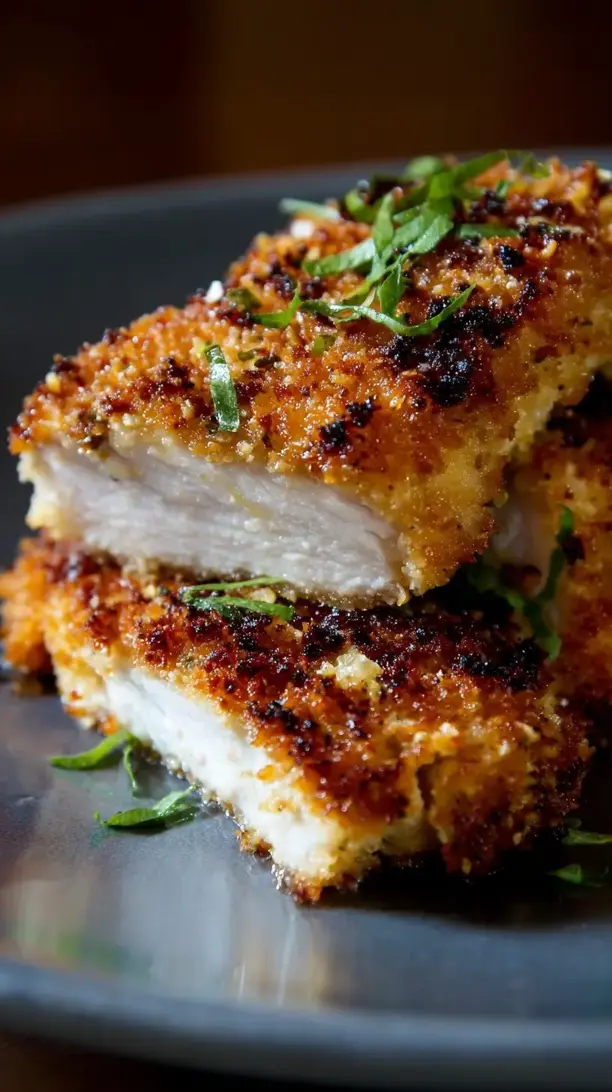
This Panko Crusted Chicken delivers a golden, crunchy exterior with wonderfully juicy meat inside. It’s a comforting yet slightly fancy dish that’s surprisingly simple to make. The technique ensures the crust stays crisp and the chicken cooks evenly every time.
Nothing beats a great Panko Crusted Chicken. Whether you're a fan of Chicken Recipes or want to try something from our Desserts selection, keep scrolling!


Why You’ll Love This Panko Crusted Chicken
- Unbeatable crunch: Panko creates a shatter-crisp crust that doesn’t get soggy.
- Surprisingly simple: Just a quick dredge and pan-fry with common ingredients.
- Endlessly versatile: A mild, crisp chicken that pairs with almost any side or sauce.
- Family-friendly: A crowd-pleaser for both picky eaters and dinner parties.
Ingredients & Tools
- 2 large boneless, skinless chicken breasts (about 1 lb or 450 g total)
- 1 cup (about 100 g) Panko breadcrumbs
- 1/2 cup (about 50 g) all-purpose flour
- 2 large eggs
- 1/2 cup (about 50 g) grated Parmesan cheese
- 1 tsp garlic powder
- 1 tsp paprika (smoked or sweet)
- 1/2 tsp dried oregano
- 1/2 tsp black pepper, freshly ground
- 1 tsp kosher salt, plus more for seasoning
- 1/4 cup neutral oil (like avocado, canola, or vegetable oil), for frying
- 1 tbsp fresh parsley, chopped (for garnish, optional)
- 1 lemon, cut into wedges (for serving)
Tools: 3 shallow bowls or plates, a large skillet (preferably cast-iron or non-stick), a meat mallet or rolling pin, paper towels, and a cooling rack (optional but helpful).
Notes: Don’t skip the Parmesan—it adds savory depth. Use a neutral oil with a high smoke point for perfect browning.
Nutrition (per serving)
| Calories: | 420 kcal |
| Protein: | 35 g |
| Fat: | 18 g |
| Carbs: | 25 g |
| Fiber: | 2 g |
Serves: 2 | Prep Time: 15 minutes | Cook Time: 12 minutes | Total Time: 27 minutes
Before You Start: Tips & Ingredient Notes
- Pound that chicken! This is the single most important step for even cooking. Thicker parts of the breast take longer to cook, often leading to a burnt crust by the time the center is done. A uniformly thin cutlet is your best friend here.
- Why Panko? Panko breadcrumbs are made from crustless bread, resulting in a lighter, flakier, and crispier texture than denser, sand-like traditional breadcrumbs. They create more surface area, which means more crunch in every single bite.
- Season every layer. Don’t just rely on the panko mixture for flavor. Give your chicken a light sprinkle of salt and pepper before you even start the dredging process. This builds flavor from the inside out.
- The power of dry hands and wet hands. To avoid a clumpy, messy coating situation, use one hand for handling the chicken in the dry ingredients (flour) and the other hand for the wet ingredients (egg). It’s a simple trick that makes a world of difference.
How to Make Panko Crusted Chicken
Step 1: Prepare the Chicken. Place the chicken breasts on a sturdy cutting board. If they are very thick, you can slice them horizontally to create two thinner cutlets from each breast. Cover them with a piece of plastic wrap. Using the flat side of a meat mallet or a rolling pin, gently pound the chicken until it’s an even ½-inch thickness throughout. This not only ensures even cooking but also tenderizes the meat. Season both sides lightly with a pinch of salt and pepper.
Step 2: Set Up Your Dredging Station. Get your three shallow bowls ready. In the first bowl, place the all-purpose flour. In the second bowl, whisk the two eggs with a tablespoon of water until they are smooth and uniform—this little bit of water helps thin the egg slightly for a more even coat. In the third bowl, combine the Panko breadcrumbs, grated Parmesan cheese, garlic powder, paprika, dried oregano, and the teaspoon of kosher salt and half teaspoon of black pepper. Use a fork to mix everything together thoroughly, ensuring the seasonings are well distributed.
Step 3: Coat the Chicken. Now for the fun part! Working with one piece of chicken at a time, dredge it in the flour, shaking off any excess. A light, even dusting is all you need—this helps the egg wash stick. Next, dip the floured chicken into the egg wash, letting the excess drip back into the bowl. Finally, press the chicken firmly into the Panko mixture, ensuring every bit of the surface is coated. Don’t be shy—really press it in to get a good, thick crust that will adhere during cooking. Place the finished cutlet on a clean plate and repeat with the remaining chicken.
Step 4: Pan-Fry to Perfection. Heat the neutral oil in your large skillet over medium heat. To test if the oil is ready, flick a tiny breadcrumb into it—if it sizzles immediately, you’re good to go. Carefully place the chicken cutlets in the pan, being careful not to overcrowd them; you may need to cook in batches. Cook for about 4-6 minutes on the first side, until the underside is a deep, golden brown. You’ll notice the edges starting to look crisp. Carefully flip the chicken and cook for another 4-6 minutes on the second side. The chicken is done when the internal temperature reaches 165°F (74°C) and the crust is uniformly golden and crisp.
Step 5: Drain and Rest. Once cooked, transfer the chicken to a cooling rack set over a baking sheet or a plate lined with paper towels. Let it rest for a couple of minutes before slicing. This allows the juices to redistribute throughout the meat, ensuring every bite is moist. If you skip this rest, the juices will just run out onto your cutting board when you slice into it. Garnish with fresh parsley and serve immediately with lemon wedges for squeezing over the top.
Storage & Freshness Guide
- Fridge: Store leftovers in an airtight container for up to 3 days.
- Freezer: Freeze cooked chicken in a single layer, then transfer to a freezer bag for up to 2 months.
- Reviving: Reheat in a 375°F oven on a wire rack for 10–15 minutes to restore crispness.
Serving Suggestions
Complementary Dishes
- Lemon Herb Orzo — The bright, citrusy notes in the orzo cut through the richness of the chicken beautifully, and the soft texture is a lovely contrast to the crunch.
- Simple Arugula Salad with a Lemon Vinaigrette — The peppery arugula and sharp vinaigrette provide a fresh, palate-cleansing counterpoint that balances the meal perfectly.
- Garlic Roasted Broccoli — The crispy, caramelized edges of the broccoli echo the textural theme and its savory flavor is a classic pairing with the Parmesan in the crust.
Drinks
- A Crisp Sauvignon Blanc — Its high acidity and citrus flavors mirror the lemon you’ll squeeze over the chicken, creating a harmonious and refreshing combination.
- Sparkling Water with Lemon — For a non-alcoholic option, the bubbles and citrus cleanse the palate between bites, keeping each mouthful of that crispy chicken feeling just as exciting as the first.
Something Sweet
- Lemon Sorbet — It’s light, refreshing, and continues the citrus thread from the main course, providing a clean and bright finish to the meal.
- Classic Vanilla Panna Cotta with a Berry Compote — The creamy, smooth panna cotta is a delightful textural shift, and the tart berries offer a sweet ending that doesn’t feel too heavy.
Top Mistakes to Avoid
- Mistake: Not pounding the chicken. I’ve messed this up before too, and you end up with a thin, overcooked edge and a thick, undercooked center. Taking that extra minute to pound the chicken is non-negotiable for perfect results.
- Mistake: Using oil that isn’t hot enough. If the oil isn’t properly heated, the chicken will absorb it like a sponge, resulting in a greasy, soggy crust instead of a light, crisp one. Always do the breadcrumb sizzle test!
- Mistake: Overcrowding the pan. Adding too many cutlets at once dramatically drops the oil temperature, causing the chicken to steam rather than fry. This leads to a pale, soft coating. Cook in batches for the best crust.
- Mistake: Moving the chicken too soon. As soon as you place the chicken in the pan, let it be! If you try to move it or check it too early, you’ll risk the crust sticking and tearing, leaving you with a patchy coating.
Expert Tips
- Tip: Add a splash of Dijon to your egg wash. Whisking a teaspoon of Dijon mustard into the eggs adds a subtle tang and helps the panko adhere even better. It also introduces another layer of flavor that works wonderfully with the Parmesan.
- Tip: Bake for a lighter option. For a less hands-on and lower-fat method, you can bake the breaded cutlets. Place them on a wire rack set over a baking sheet, spray lightly with cooking spray, and bake at 400°F (200°C) for 15-20 minutes, flipping halfway. The crust will be slightly less shatteringly crisp but still delicious.
- Tip: Double-coat for extra crunch. For an even thicker, more substantial crust, after the first dip in egg and panko, give it a quick second dip in the egg and another press into the panko. This is a pro-move for ultimate crunch lovers.
- Tip: Keep cooked chicken warm and crisp. If cooking in batches, place the finished cutlets on a wire rack in a 250°F (120°C) oven. This keeps them warm and prevents the steam from making the bottom soggy, unlike placing them on a plate.
FAQs
Can I make this Panko Crusted Chicken ahead of time?
You can prepare the chicken up to the point of cooking. After breading the cutlets, place them in a single layer on a baking sheet, cover loosely with plastic wrap, and refrigerate for up to 4 hours before frying. This is fantastic for getting a head start on dinner prep. I don’t recommend freezing the raw, breaded chicken as the panko can become soggy during thawing, compromising that perfect crunch.
Can I use regular breadcrumbs instead of Panko?
You can, but the texture will be quite different. Regular breadcrumbs are finer and denser, resulting in a tighter, sandier crust that’s more like traditional fried chicken. Panko creates a lighter, flakier, and much crispier coating that stays crispier for longer. If you must substitute, try to find the coarsest traditional breadcrumbs you can.
My crust is falling off! What did I do wrong?
This usually happens for one of two reasons. First, you might not have shaken off the excess flour properly, creating a barrier that prevents the egg from adhering to the chicken. Second, you might not have pressed firmly enough when applying the panko. A good, firm press is essential to embed the crumbs into the egg wash so they become one with the chicken.
How do I reheat leftovers without them getting soggy?
The best way to recapture the crunch is to use an oven or toaster oven. Avoid the microwave, as it will steam the crust and make it soft. Preheat your oven to 375°F (190°C) and place the chicken on a wire rack over a baking sheet. Heat for 10-15 minutes, until warm and re-crisped. It won’t be *quite* as perfect as fresh, but it’s a very close second.
Can I use chicken thighs for this recipe?
Absolutely! Boneless, skinless chicken thighs work wonderfully. They are inherently more juicy and flavorful. Just be sure to pound them to an even thickness as well, and note that they may require a minute or two longer cooking time due to their higher fat content. The rich flavor pairs beautifully with the crispy panko crust.


Panko Crusted Chicken
Make perfect Panko Crusted Chicken with a golden, crunchy crust and juicy interior. This easy recipe delivers restaurant-quality results at home. Get the recipe now!
Ingredients
For the Ingredients
-
2 large boneless, skinless chicken breasts (about 1 lb or 450 g total)
-
1 cup Panko breadcrumbs (about 100 g)
-
1/2 cup all-purpose flour (about 50 g)
-
2 large eggs
-
1/2 cup grated Parmesan cheese (about 50 g)
-
1 tsp garlic powder
-
1 tsp paprika (smoked or sweet)
-
1/2 tsp dried oregano
-
1/2 tsp black pepper (freshly ground)
-
1 tsp kosher salt (plus more for seasoning)
-
1/4 cup neutral oil (like avocado, canola, or vegetable oil, for frying)
-
1 tbsp fresh parsley (chopped, for garnish, optional)
-
1 lemon (cut into wedges, for serving)
Instructions
-
Place the chicken breasts on a sturdy cutting board. If they are very thick, you can slice them horizontally to create two thinner cutlets from each breast. Cover them with a piece of plastic wrap. Using the flat side of a meat mallet or a rolling pin, gently pound the chicken until it’s an even ½-inch thickness throughout. This not only ensures even cooking but also tenderizes the meat. Season both sides lightly with a pinch of salt and pepper.01
-
Get your three shallow bowls ready. In the first bowl, place the all-purpose flour. In the second bowl, whisk the two eggs with a tablespoon of water until they are smooth and uniform—this little bit of water helps thin the egg slightly for a more even coat. In the third bowl, combine the Panko breadcrumbs, grated Parmesan cheese, garlic powder, paprika, dried oregano, and the teaspoon of kosher salt and half teaspoon of black pepper. Use a fork to mix everything together thoroughly, ensuring the seasonings are well distributed.02
-
Working with one piece of chicken at a time, dredge it in the flour, shaking off any excess. A light, even dusting is all you need—this helps the egg wash stick. Next, dip the floured chicken into the egg wash, letting the excess drip back into the bowl. Finally, press the chicken firmly into the Panko mixture, ensuring every bit of the surface is coated. Don’t be shy—really press it in to get a good, thick crust that will adhere during cooking. Place the finished cutlet on a clean plate and repeat with the remaining chicken.03
-
Heat the neutral oil in your large skillet over medium heat. To test if the oil is ready, flick a tiny breadcrumb into it—if it sizzles immediately, you’re good to go. Carefully place the chicken cutlets in the pan, being careful not to overcrowd them; you may need to cook in batches. Cook for about 4-6 minutes on the first side, until the underside is a deep, golden brown. You’ll notice the edges starting to look crisp. Carefully flip the chicken and cook for another 4-6 minutes on the second side. The chicken is done when the internal temperature reaches 165°F (74°C) and the crust is uniformly golden and crisp.04
-
Once cooked, transfer the chicken to a cooling rack set over a baking sheet or a plate lined with paper towels. Let it rest for a couple of minutes before slicing. This allows the juices to redistribute throughout the meat, ensuring every bite is moist. If you skip this rest, the juices will just run out onto your cutting board when you slice into it. Garnish with fresh parsley and serve immediately with lemon wedges for squeezing over the top.05
Not what you're looking for?


