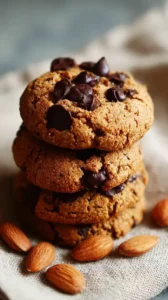
There’s something about the smell of cookies baking that instantly feels like home. For me, that feeling is wrapped up in the classic combo of peanut butter and jelly, now baked into a soft, chewy thumbprint cookie with a sweet, jammy heart. I created this easy cookie recipe to capture that warm, nostalgic hug in every bite—it’s my ultimate comfort food recipe.
I especially love making these for my holiday baking lineup. They’ve earned a permanent spot in my collection of Christmas cookie recipes, and they fit so perfectly among all the other holiday cookies Christmas celebrations are famous for. They’re a delightful, homespun twist on traditional Christmas sweets. Honestly, when it comes to easy Christmas treats, this one is a winner—no chilling required, which makes them a wonderfully stress-free addition to your platter of holiday treats.
So whether you’re packing them for a cookie swap or just need a little homemade joy with your afternoon coffee, consider these peanut butter and jelly cookies a wonderful Christmas dessert idea. They bring a simple, heartfelt sweetness to the season that I think you’ll absolutely love.
Craving a delicious Peanut Butter and Jelly Cookies? You've come to the right spot! From Christmas Cookie favorites to amazing Chicken recipes, there's something here for everyone.


Why You’ll Love This Peanut Butter and Jelly Cookies
- Ultimate comfort food: Beloved PB&J flavors baked into a warm, portable treat.
- Perfect texture: Soft and chewy edges with a tender, jam-moistened center.
- Simple to make: One-bowl recipe with no mixer or complicated steps.
- Endless customization: Use any jam or jelly you have on hand.
Ingredients & Tools
- 1 cup creamy peanut butter
- 1 cup light brown sugar, packed
- 1 large egg, at room temperature
- 1 teaspoon vanilla extract
- 1 teaspoon baking soda
- 1/4 teaspoon salt
- 1/3 cup of your favorite jam or jelly
Tools: A medium mixing bowl, a baking sheet, parchment paper or a silicone baking mat, a small spoon or teaspoon for the jam.
Notes: Use conventional creamy peanut butter (not natural) for best texture. Brown sugar provides moisture and chew—don’t substitute white sugar.
You’ll notice the ingredient list is beautifully short, and every component plays a crucial role. Using a standard, shelf-stable creamy peanut butter (not the natural, oily kind) gives the cookies their structure and that classic flavor. The brown sugar is key for that deep molasses sweetness and chewy texture—don’t be tempted to swap it for white sugar!
Nutrition (per serving)
| Calories: | 180 kcal |
| Protein: | 4 g |
| Fat: | 9 g |
| Carbs: | 22 g |
| Fiber: | 1 g |
Serves: 12 | Prep Time: 10 minutes | Cook Time: 10 minutes | Total Time: 20 minutes
Before You Start: Tips & Ingredient Notes
- Which peanut butter is best? For the best texture and shape, use a conventional, homogenized creamy peanut butter like Jif or Skippy. The natural kinds that separate can make the cookies spread too much and become greasy.
- Can I use crunchy peanut butter? Absolutely! If you love a little extra texture, crunchy peanut butter works wonderfully here and adds a lovely nutty bite to each cookie.
- What about the jam? Any flavor works, but thicker jams and preserves hold their shape a bit better than very runny jellies. If your jam is super loose, you can stir in a tiny teaspoon of cornstarch to thicken it up first.
- Why room temperature egg? It might seem like a small detail, but a room temperature egg incorporates much more smoothly into the peanut butter and sugar mixture, creating a more uniform and easier-to-handle dough.
How to Make Peanut Butter and Jelly Cookies
Step 1: Start by preheating your oven to 350°F (175°C) and lining a baking sheet with parchment paper or a silicone mat. This is a crucial step because these cookies have a good amount of sugar and can stick without a proper lining. You’ll thank me later when they slide right off the pan!
Step 2: In a medium bowl, combine the creamy peanut butter, packed brown sugar, egg, vanilla extract, baking soda, and salt. Use a sturdy spatula or a wooden spoon to mix everything together. You’ll notice the mixture will be thick and a little gritty at first, but keep stirring—it will come together into a cohesive, slightly sticky dough. This should only take a minute or two of good mixing.
Step 3: Now, it’s time to portion the dough. Using a cookie scoop or a tablespoon, scoop out rounded tablespoons of dough. Roll each portion between your palms to form a smooth ball. The dough might be a bit oily from the peanut butter, but that’s perfectly normal. Place the dough balls about 2 inches apart on your prepared baking sheet; they will spread a little as they bake.
Step 4: Here comes the fun part—the thumbprint! Using your thumb, the back of a small spoon, or your finger, make a deep, wide indentation in the center of each dough ball. Don’t be shy! You want a good-sized well to hold the jam, otherwise it can bubble over the sides. The edges of the cookie might crack slightly, which just adds to their rustic charm.
Step 5: Carefully spoon about a teaspoon of your chosen jam into each indentation. Try to keep the jam contained within the well you created. A little goes a long way here—overfilling will lead to a sticky, caramelized mess on your baking sheet (which still tastes delicious, but is harder to clean!).
Step 6: Bake the cookies for 10-12 minutes. The trick is to pull them out when the edges are just set and lightly golden, but the centers still look a little soft and puffy. They will not look fully cooked, and that is exactly what you want! They continue to set up as they cool on the hot pan, resulting in that dreamy, soft texture.
Step 7: Let the cookies cool on the baking sheet for at least 10 minutes before you even think about moving them. This is a non-negotiable resting period. The jam centers are molten lava hot straight from the oven and the cookies themselves are very fragile. Transferring them too early is the number one cause of cookie breakage. After 10 minutes, you can move them to a wire rack to cool completely… or just eat one warm, carefully.
Storage & Freshness Guide
- Fridge: Store in an airtight container for up to 1 week.
- Freezer: Freeze baked cookies for up to 2 months, or freeze dough balls (with thumbprint) and bake from frozen, adding 1–2 minutes.
- Reviving: Warm in a 300°F oven for 3–5 minutes to refresh texture.
Serving Suggestions
Complementary Dishes
- A cold glass of milk — It’s the classic pairing for a reason. The cool, creamy milk is the perfect contrast to the sweet, rich, and slightly salty cookie.
- A scoop of vanilla bean ice cream — For the ultimate dessert, sandwich a slightly warm cookie around a scoop of high-quality vanilla ice cream. The hot-and-cold contrast is sublime.
- A fresh fruit salad — If you’re serving these as part of a brunch or afternoon tea, a bright fruit salad with berries and citrus helps balance the sweetness and makes the spread feel a little more elegant.
Drinks
- Black coffee — The bitterness of a good, strong cup of coffee cuts through the sweetness of the jam and peanut butter beautifully, making for a very sophisticated snack.
- A cold glass of almond milk — A fantastic dairy-free alternative that still gives you that classic milk-and-cookies feeling, with a flavor that complements the nuttiness of the peanut butter.
- Earl Grey tea — The bergamot in the tea adds a lovely floral note that plays surprisingly well with the fruity jam and creates a very cozy, comforting moment.
Something Sweet
- Dark chocolate-dipped strawberries — Since you’ve already got the fruit and chocolate vibes going, these feel like a natural progression and add a touch of decadence to your cookie platter.
- A simple lemon bar — The sharp, tangy lemon provides a fantastic palate cleanser between bites of the richer, nuttier cookies, keeping your taste buds interested.
- Mini cheesecake bites — The creamy, tangy flavor of cheesecake is a wonderful companion to the peanut butter, creating a mini dessert buffet that feels incredibly indulgent.
Top Mistakes to Avoid
- Mistake: Using natural peanut butter. I’ve messed this up before too, thinking it would be healthier. The oils in natural peanut butter aren’t stabilized, which causes the cookies to spread excessively and become flat and greasy. Stick with the conventional stuff for this recipe.
- Mistake: Overbaking the cookies. It’s so tempting to leave them in until they look “done,” but that will give you a dry, crumbly cookie. Remember, they continue to cook on the hot pan. Pull them out when the edges are just golden and the centers look soft.
- Mistake: Moving the cookies too soon. The structural integrity of these cookies is very fragile straight out of the oven. If you try to move them immediately, they will fall apart and the jam will go everywhere. Patience is key here.
- Mistake: Skimping on the thumbprint. If you don’t press a deep, wide enough well into the dough ball, the jam has nowhere to go but all over your baking sheet. Make a good, confident indentation!
Expert Tips
- Tip: Lightly wet your thumb or spoon. When making the thumbprint indentation, dip your thumb or the back of the spoon in a tiny bit of water first. This prevents the dough from sticking to you and creates a much cleaner, smoother well for the jam.
- Tip: Use a small cookie scoop for uniformity. This ensures all your cookies are the same size, which means they will bake at the same rate. No more half-burnt, half-doughy batches!
- Tip: Swirl two jams together. For a truly show-stopping look and flavor, try adding a small spoonful of two different jams—like raspberry and apricot—and gently swirl them together in the thumbprint. It looks gorgeous and tastes incredible.
- Tip: Add a sprinkle of sea salt. Right when the cookies come out of the oven, while the jam is still glossy and hot, sprinkle a tiny pinch of flaky sea salt over the top. It elevates the flavors to a whole new level.
FAQs
Can I make these cookies ahead of time?
Absolutely! You have a couple of options. You can bake them and store them in an airtight container at room temperature for up to 3 days. For longer storage, you can freeze the baked cookies for up to 2 months. Alternatively, you can prepare the dough balls, make the thumbprints, and freeze them on the baking sheet before transferring to a freezer bag. You can bake them straight from frozen, just add 1-2 minutes to the baking time.
Can I use a sugar substitute?
I wouldn’t recommend it for this particular recipe. The brown sugar isn’t just for sweetness; it provides moisture and is essential for the cookie’s structure and chewy texture. Using a granulated substitute like erythritol will likely result in a dry, crumbly cookie that doesn’t hold its shape well. This is one recipe where real sugar really is best.
My cookies spread too much. What happened?
This is almost always due to the type of peanut butter. If you used a natural variety, that’s the culprit. Another reason could be that your baking soda is old and has lost its leavening power, which can affect how the cookie sets. Finally, make sure you’re accurately measuring your peanut butter—if you have too much, it can lead to excess spreading.
Can I add chocolate chips to this recipe?
You sure can! I would recommend reducing the jam by about half if you do, just to avoid an overly sweet cookie. Fold in about 1/2 cup of semi-sweet or milk chocolate chips into the dough after it’s mixed. The combination of peanut butter, chocolate, and a hint of jam is absolutely divine.
Why are my cookies dry and crumbly?
This is a classic sign of overbaking. Remember, these cookies set up as they cool. If you bake them until they look fully firm in the center, they will be overdone by the time they cool. Trust the process and pull them out when the centers still look soft. Using a light-colored, non-insulated baking sheet can also help prevent the bottoms from over-browning too quickly.


Peanut Butter and Jelly Cookies: Easy No-Chill Recipe
Peanut Butter and Jelly Cookies are the ultimate easy cookie recipe. These soft, jam-filled treats are perfect for holiday baking and bring nostalgic comfort to any dessert table.
Ingredients
For the Ingredients
-
1 cup creamy peanut butter
-
1 cup light brown sugar (packed)
-
1 large egg (at room temperature)
-
1 teaspoon vanilla extract
-
1 teaspoon baking soda
-
0.25 teaspoon salt
-
0.33 cup jam or jelly (your favorite)
Instructions
-
Start by preheating your oven to 350°F (175°C) and lining a baking sheet with parchment paper or a silicone mat.01
-
In a medium bowl, combine the creamy peanut butter, packed brown sugar, egg, vanilla extract, baking soda, and salt.02
-
Using a cookie scoop or a tablespoon, scoop out rounded tablespoons of dough and roll each portion between your palms to form a smooth ball.03
-
Place the dough balls about 2 inches apart on your prepared baking sheet and make a deep, wide indentation in the center of each dough ball.04
-
Carefully spoon about a teaspoon of your chosen jam into each indentation.05
-
Bake the cookies for 10-12 minutes, pulling them out when the edges are just set and lightly golden, but the centers still look a little soft and puffy.06
-
Let the cookies cool on the baking sheet for at least 10 minutes before moving them.07
Not what you're looking for?


