Let me tell you about my love affair with pickled veggies. It started years ago at a tiny roadside deli where I bit into a sandwich piled high with these vibrant, tangy slices of heaven. That first crisp, acidic crunch hooked me for life. Now, I keep a jar in my fridge at all times—because nothing wakes up a meal like homemade Pickled Vegetables.
This isn’t just about tossing veggies in vinegar. It’s about creating a symphony of bright acidity, subtle sweetness, and aromatic spices that transforms even the simplest ingredients into something extraordinary. And the best part? You control everything—no mystery preservatives, just pure, crisp flavor.
Love Pickled Veggies? So do we! If you're into Appetizer Recipes or curious about Chicken Thigh Recipes, you'll find plenty of inspiration below.


Why This Recipe Works
- Effortless prep—No cooking, just heat and pour.
- Endlessly customizable—Use whatever veggies are in your crisper.
- Gets better with time—Like a good friendship, the flavors deepen the longer they sit.
The Story Behind the Sauce
- Saves veggies from the compost bin—Give that wilting cauliflower a second life.
- Gut-friendly—If fermented, it’s packed with probiotics (though quick-pickling skips this step).
- The ultimate flavor booster—Toss them on tacos, burgers, or even avocado toast.
Essential Ingredients & Tools
Ingredients
- 1 cup distilled white vinegar—The backbone of tang. Swap in Apple Cider vinegar for a mellower kick.
- 1 cup water—Keeps the acidity in check so your taste buds don’t revolt.
- 2 tbsp sugar—Just enough to smooth out the vinegar’s sharp edges. Honey or maple syrup work too.
- 1 tbsp kosher salt—Essential for flavor and texture. Skip the iodized stuff—it clouds the brine.
- 1 tsp black peppercorns—Adds a whisper of heat.
- 1 tsp mustard seeds—Earthy depth that makes you go, “Hmm, what’s that?” Coriander seeds work too.
- 2 bay leaves—Because every brine deserves a little sophistication.
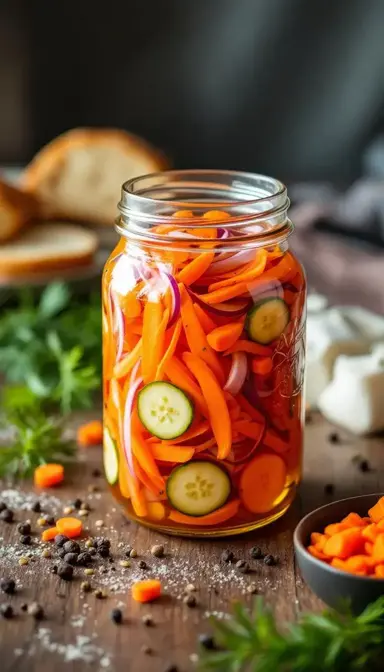
- 1 cup carrots (julienned)—Sweet, crunchy, and impossible to resist.
- 1 cup cauliflower florets—Like little sponges soaking up all that tangy goodness.
- 1 cup red onion (thinly sliced)—Starts sharp but mellows into something magical.
- 1 cup radishes (sliced)—Peppery bite meets acidic punch.
- 1 cup cucumber (sliced)—The classic. Use English cukes to avoid a seedy mess.
Tools
- Mason jars (16 oz.)—The trusty sidekick of every pickling enthusiast. A clean pasta jar works in a pinch.
- Small saucepan—For simmering that brine to perfection.
- Mandoline or sharp knife—Uniform slices mean even pickling. No one wants a floppy carrot.
Makes enough to fill two 16-oz jars | Prep: 15 min | Pickling Time: 24+ hours
How to Make Pickled Veggies
- Prep Your Veggies
Slice them evenly—about ¼-inch thick. Why? Because nobody likes a half-pickled radish. Pack them snugly into jars, leaving ½-inch headspace. Pro tip: Denser veggies (like carrots) go on the bottom; delicate ones (like cukes) on top to prevent crushing.
- Brine Time
Combine 1 cup vinegar, 1 cup water, 2 tbsp sugar, 1 tbsp salt, and spices (1 tsp black peppercorns, 1 tsp mustard seeds, 2 bay leaves) in a saucepan. Heat until it just starts to simmer—no boiling allowed. Stir until the sugar and salt dissolve (about 3–5 minutes). Vigorous boiling evaporates liquid and over-concentrates acidity.
- The Pour
Carefully flood those veggies with hot brine. If anything floats, gently press it down with a clean spoon. Let the jars cool to room temperature—about 1 hour. Pro move: Add a grape leaf or oak leaf to keep everything crisp (their natural tannins prevent softening).
- The Waiting Game
Seal the jars and refrigerate. Wait at least 24 hours—I know, torture. But trust me, 48 hours is even better. The brine might look cloudy at first; that’s just the spices doing their thing.
Pro Technique
Blanching for the Win
For carrots or cauliflower, dunk them in boiling water for 30 seconds, then shock them in ice water. This softens their cell walls slightly, helping them absorb brine faster while staying crunchy. Bonus: Add 1 tsp salt to the blanching water to boost flavor absorption.
The Crispness Hack
Toss a grape leaf, oak leaf, or even a black tea bag into the jar. Their tannins inhibit enzymes that cause sogginess. For a quick fix, ¼ tsp of Pickle Crisp (calcium chloride) works too.
Chef’s Wisdom
The Golden Ratio
Stick to 1:1 vinegar to water. Less vinegar risks spoilage; more feels like drinking straight acid. For a gentler tang, swap half the vinegar with apple cider or rice vinegar. Never go below 1:1—safety first.
Quick-Pickling vs. Fermentation
This recipe is quick-pickling—fast, easy, no fuss. Fermented pickles (think Kimchi) use salt and natural bacteria to develop probiotics, but require non-chlorinated water and mold monitoring.
Storage & Freshness Guide
Fridge Life
They’ll last up to 3 weeks if submerged and sealed. Cloudy brine? Normal. Mold? Toss it. Always use clean utensils to avoid contamination.
Canning for the Long Haul
Want shelf-stable pickles? Process jars in a boiling water bath for 10 minutes. They’ll keep for 6+ months in a cool, dark place. Ensure brine covers veggies by ½ inch.
Reviving Tired Pickles
Drain the old brine, pour in fresh simmered brine, and add a garlic clove or pinch of sugar. They won’t be as crisp, but they’ll still pack flavor.
Nutrition Profile
Per ½ cup:
- 25 calories
- 0g fat
- 6g carbs
- 1g fiber
Ingredient Variations and Their Impact
- Ginger-Lovers: Swap white vinegar for rice vinegar and add a 1-inch knob of peeled ginger.
- Spice Seekers: Toss in a dried chili or 1 tsp turmeric for heat and golden color.
- Sweet & Floral: Use honey instead of sugar (but add 2 tbsp extra water to balance).
Perfect Pairings
Complementary Dishes
- Fried Chicken Sandwiches: The tangy crunch cuts through rich, crispy coatings. Layer pickled onions or carrots for a textural contrast.
- Cheese Boards: Pair with aged cheddar or creamy brie—the acidity balances fatty cheeses. Add honey-drizzled crackers for sweetness.
Drinks
- Dry Riesling: Its crisp acidity mirrors the pickles’ tang. Pro tip: Chill the wine to 45°F for maximum refreshment.
- Hefeweizen Beer: The citrusy notes complement mustard seeds in the brine.
Something Sweet
- Dark Chocolate Bark: The bitterness contrasts with the pickles’ brightness. Serve with sea salt for a savory-sweet bite.
- Peach Sorbet: A light, fruity dessert that cleanses the palate after tangy pickles.
This isn’t just a recipe—it’s a gateway to endless crunchy, tangy possibilities. Play with flavors, make it your own, and never underestimate the power of a good pickle.


Pickled Veggies: The Ultimate Crunchy, Tangy Sidekick
Learn how to make easy, crunchy Pickled Veggies at home with my no-cook recipe. Perfect for tacos, burgers, and more. Start pickling today!
Ingredients
For the Brine
-
1 cup distilled white vinegar
-
1 cup water
-
2 tbsp granulated sugar
-
1 tbsp kosher salt
-
1 tsp whole black peppercorns
-
1 tsp mustard seeds
-
2 bay leaves
For the Vegetables (choose 3–4)
-
1 cup carrots (julienned)
-
1 cup cauliflower florets
-
1 cup red onion (thinly sliced)
-
1 cup radishes (sliced)
-
1 cup cucumber (sliced)
Instructions
-
Wash and slice vegetables uniformly (¼-inch thick). Pack tightly into clean jars, leaving ½-inch headspace.01
-
Combine brine ingredients in a saucepan. Simmer until sugar and salt dissolve (3–5 minutes).02
-
Pour hot brine over vegetables, ensuring full submersion. Cool to room temperature (1 hour).03
-
Seal jars and refrigerate for 24+ hours before serving.04
Not what you're looking for?