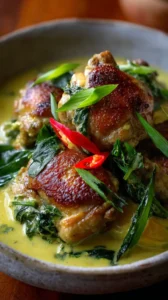
These Pico de Gallo Chicken Thighs deliver a vibrant, restaurant-quality meal with minimal effort. Crispy, juicy chicken thighs are topped with a fresh homemade pico de gallo for a perfect contrast of hot and cool, savory and bright. It’s a simple yet impressive dish that’s bursting with flavor.
Craving a delicious Pico de Gallo Chicken Thighs? You've come to the right spot! From Chicken Thigh Recipes favorites to amazing Crockpot Recipes recipes, there's something here for everyone.


Why You’ll Love This Pico de Gallo Chicken Thighs
- Flavor explosion: Rich seared chicken meets zesty, fresh pico de gallo.
- Perfect textures: Crispy skin against juicy, chunky salsa in every bite.
- Surprisingly simple: Straightforward searing and chopping for a stunning result.
- Incredibly versatile: Serve over rice, in tortillas, on salad, or solo.
Ingredients & Tools
- 6 bone-in, skin-on chicken thighs
- 2 tbsp olive oil, divided
- 1 tsp kosher salt
- 1/2 tsp black pepper
- 1 tsp garlic powder
- 1 tsp ground cumin
- 4 medium ripe tomatoes, diced
- 1/2 medium red onion, finely diced
- 1 jalapeño, seeds removed and finely diced
- 1/2 cup fresh cilantro, chopped
- 2 limes, juiced
- 1/4 tsp salt, for the pico de gallo
Tools: A large, heavy-bottomed oven-safe skillet (like cast iron), a sharp chef’s knife, and a cutting board.
Notes: Using bone-in, skin-on thighs is non-negotiable here—they stay incredibly juicy and the skin gets fantastically crispy. And for the pico de gallo, please use the ripest, reddest tomatoes you can find; it makes a world of difference in flavor.
Nutrition (per serving)
| Calories: | 420 kcal |
| Protein: | 35 g |
| Fat: | 28 g |
| Carbs: | 8 g |
| Fiber: | 2 g |
Serves: 3 | Prep Time: 15 minutes | Cook Time: 25 minutes | Total Time: 40 minutes
Before You Start: Tips & Ingredient Notes
- Pat your chicken thighs DRY. This is the single most important step for crispy skin. Use paper towels to thoroughly dry the skin side. Any moisture will steam the skin instead of letting it sear and crisp up beautifully.
- Let your pico de gallo rest. After you mix it, let it sit for at least 10-15 minutes before serving. This allows the flavors to meld together and the salt to draw out the juices from the tomatoes, creating a more cohesive and flavorful salsa.
- Don’t be shy with the seasoning. Chicken thighs can handle a good amount of salt and spice. Really get that seasoning mix under the skin as well as on top for maximum flavor penetration throughout the meat.
- Temperature is key. Make sure your skillet is properly preheated before the chicken goes in. You should hear a confident sizzle the moment the skin touches the pan—that’s how you know you’re on the right track for a perfect sear.
How to Make Pico de Gallo Chicken Thighs
Step 1: Start by preparing your pico de gallo so the flavors have time to develop. Dice your tomatoes and red onion into a small, uniform chop—you want everything to be bite-sized. Finely dice the jalapeño, and if you’re sensitive to heat, remember to remove all the seeds and white membranes. Add these to a medium bowl along with the chopped cilantro, lime juice, and 1/4 teaspoon of salt. Gently stir everything together, then set it aside at room temperature.
Step 2: Now, prep your chicken. Use paper towels to pat the chicken thighs completely dry, paying special attention to the skin side. In a small bowl, mix together the 1 teaspoon of kosher salt, black pepper, garlic powder, and cumin. Sprinkle this seasoning blend evenly over both sides of the chicken thighs, and don’t forget to gently lift the skin and get a little bit of seasoning directly onto the meat itself.
Step 3: Preheat your oven to 400°F (200°C). Place your heavy, oven-safe skillet over medium-high heat and add one tablespoon of the olive oil. Once the oil is shimmering hot, carefully place the chicken thighs in the pan, skin-side down. You should hear an immediate, lively sizzle. Resist the urge to move them! Let them cook undisturbed for 8-10 minutes to develop that deep, golden-brown crust.
Step 4: After the skin is beautifully crisped, use tongs to flip the chicken thighs over. You’ll notice the skin has shrunk a bit and is clinging tightly to the meat. Immediately transfer the entire skillet to the preheated oven. This allows the chicken to finish cooking through gently from all sides, ensuring the meat is juicy and tender without burning the skin.
Step 5: Roast the chicken for about 12-15 minutes, or until the internal temperature reaches 165°F (74°C) when checked with a meat thermometer inserted into the thickest part of the thigh, avoiding the bone. The juices should also run clear. Once done, carefully remove the skillet from the oven—remember, the handle will be extremely hot!
Step 6: Let the chicken rest in the skillet for about 5 minutes. This is a crucial step that allows the juices to redistribute throughout the meat, making every bite succulent. While it rests, give your pico de gallo one final stir. You’ll see it has created a lovely, flavorful juice at the bottom of the bowl.
Step 7: To serve, place one or two chicken thighs on each plate and generously spoon the fresh pico de gallo over the top and around the sides. The contrast of the hot, savory chicken with the cool, zesty salsa is what this dish is all about. Dive in and enjoy the incredible textures and flavors you’ve just created.
Storage & Freshness Guide
- Fridge: Store chicken and pico de gallo separately in airtight containers for up to 3 days.
- Freezer: Freeze cooked chicken (without pico) for up to 3 months. Thaw in fridge before reheating.
- Reviving: Reheat chicken in oven or air fryer at 375°F to re-crisp skin. Pico is best served cold.
Serving Suggestions
Complementary Dishes
- Cilantro-Lime Rice — The fresh, citrusy notes in the rice are a perfect base that soaks up all the delicious juices from the chicken and pico de gallo.
- Charred Corn and Black Bean Salad — This adds a wonderful smoky sweetness and extra fiber, making the meal feel even more substantial and vibrant.
- Warm Corn Tortillas — Perfect for making little DIY tacos, letting everyone build their own perfect bite with chunks of the crispy chicken and fresh salsa.
Drinks
- A Classic Margarita — The sharp tang of lime and tequila cuts through the richness of the chicken and elevates the fresh flavors of the pico de gallo beautifully.
- Ice-Cold Mexican Lager — A crisp, light beer is a no-fuss pairing that cleanses the palate between bites and complements the dish without overpowering it.
- Sparkling Water with Lime — A simple, refreshing non-alcoholic option that provides the bubbles and citrus to balance the meal perfectly.
Something Sweet
- Mango Sorbet — The tropical, fruity finish is a light and refreshing way to end the meal, continuing the bright flavor theme.
- Churros with Chocolate Sauce — For a truly indulgent end, the warm cinnamon sugar and rich chocolate are a fantastic contrast to the savory main course.
- Flan — The creamy, cool caramel custard is a classic dessert that provides a smooth, sweet counterpoint to the zesty and savory notes of the dinner.
Top Mistakes to Avoid
- Mistake: Moving the chicken too soon. If you try to peek or shift the thighs before a crust has formed, the skin will tear and stick to the pan. You’ll lose that perfect, crispy texture. Trust the process and let it sizzle.
- Mistake: Using cold chicken straight from the fridge. I’ve messed this up before too. Taking the chill off the chicken for 15-20 minutes before cooking leads to more even cooking and a better sear on the skin.
- Mistake: Over-mixing the pico de gallo. Stir it gently just to combine. If you’re too vigorous, you’ll bruise the herbs and crush the tomatoes, turning your vibrant salsa into a mushy sauce.
- Mistake: Skipping the rest time for the chicken. Slicing into the chicken right out of the oven will cause all those precious, flavorful juices to spill out onto the cutting board instead of staying in the meat where they belong.
Expert Tips
- Tip: Render the fat slowly. After you’ve achieved a good sear, you can lower the heat slightly for a minute to really render out the subcutaneous fat, making the skin even thinner and crispier. You’ll hear the sizzle change tone as the water cooks off and the fat fries the skin.
- Tip: Add a twist to your pico. For an extra layer of flavor, try adding a finely diced avocado or a handful of fresh corn kernels to your pico de gallo right before serving. It adds creaminess or a pop of sweetness that’s just delightful.
- Tip: Use the leftover skillet goodness. After removing the chicken, there will be delicious rendered chicken fat and browned bits in the pan. Deglaze it with a splash of chicken broth or lime juice to make a simple, incredible pan sauce to drizzle over everything.
- Tip: Score the skin. Take a very sharp knife and make a few shallow, diagonal cuts through the chicken skin (not into the meat) before seasoning. This helps the fat render more effectively and allows the seasoning to penetrate deeper.
FAQs
Can I use chicken breasts instead of thighs?
You can, but honestly, I wouldn’t recommend it for this recipe. Chicken breasts are much leaner and can easily dry out, especially with the high-heat searing and oven finish. The rich, forgiving fat in the thighs is what keeps the meat incredibly juicy and pairs so well with the crisp skin. If you must use breasts, opt for skin-on and reduce the oven time significantly to avoid overcooking.
How can I make this spicier?
The heat level is totally customizable! For a bigger kick, leave the seeds and white ribs in your jalapeño when dicing it for the pico de gallo. You could also add a pinch of cayenne pepper or chili powder to the chicken’s dry rub. Another great trick is to add a few thin slices of a spicier pepper, like a serrano, to the pico de gallo for an extra punch.
How far in advance can I make the pico de gallo?
You can chop the ingredients for the pico de gallo a few hours ahead and keep them separate in the fridge. Combine them with the lime juice and salt no more than an hour before serving. If it sits mixed for too long, the salt will draw out too much liquid from the tomatoes and the cilantro will start to wilt, making it a bit watery and less vibrant.
What if I don’t have an oven-safe skillet?
No problem! You can still achieve great results. Simply sear the chicken skin-side down in a regular skillet until crispy. Then, instead of flipping and putting the whole pan in the oven, transfer the thighs to a baking sheet lined with a wire rack, skin-side up, and finish cooking in the oven. This method actually helps keep the skin extra crispy all over.
How should I store and reheat leftovers?
Store the chicken and pico de gallo separately in airtight containers in the fridge for up to 3 days. To reheat the chicken, the best method is in an air fryer or a conventional oven at 375°F (190°C) for about 8-10 minutes. This will help re-crisp the skin. Avoid the microwave, as it will make the skin rubbery. The pico de gallo is best served cold.


Pico De Gallo Chicken Thighs
Make juicy, crispy Pico de Gallo Chicken Thighs in 40 minutes! This easy recipe pairs savory chicken with fresh salsa. Get the step-by-step guide now!
Ingredients
For the chicken:
-
6 bone-in, skin-on chicken thighs
-
2 tbsp olive oil (divided)
-
1 tsp kosher salt
-
1/2 tsp black pepper
-
1 tsp garlic powder
-
1 tsp ground cumin
For the pico de gallo:
-
4 medium ripe tomatoes (diced)
-
1/2 medium red onion (finely diced)
-
1 jalapeño (seeds removed and finely diced)
-
1/2 cup fresh cilantro (chopped)
-
2 limes (juiced)
-
1/4 tsp salt (for the pico de gallo)
Instructions
-
Start by preparing your pico de gallo so the flavors have time to develop. Dice your tomatoes and red onion into a small, uniform chop—you want everything to be bite-sized. Finely dice the jalapeño, and if you’re sensitive to heat, remember to remove all the seeds and white membranes. Add these to a medium bowl along with the chopped cilantro, lime juice, and 1/4 teaspoon of salt. Gently stir everything together, then set it aside at room temperature.01
-
Now, prep your chicken. Use paper towels to pat the chicken thighs completely dry, paying special attention to the skin side. In a small bowl, mix together the 1 teaspoon of kosher salt, black pepper, garlic powder, and cumin. Sprinkle this seasoning blend evenly over both sides of the chicken thighs, and don’t forget to gently lift the skin and get a little bit of seasoning directly onto the meat itself.02
-
Preheat your oven to 400°F (200°C). Place your heavy, oven-safe skillet over medium-high heat and add one tablespoon of the olive oil. Once the oil is shimmering hot, carefully place the chicken thighs in the pan, skin-side down. You should hear an immediate, lively sizzle. Resist the urge to move them! Let them cook undisturbed for 8-10 minutes to develop that deep, golden-brown crust.03
-
After the skin is beautifully crisped, use tongs to flip the chicken thighs over. You’ll notice the skin has shrunk a bit and is clinging tightly to the meat. Immediately transfer the entire skillet to the preheated oven. This allows the chicken to finish cooking through gently from all sides, ensuring the meat is juicy and tender without burning the skin.04
-
Roast the chicken for about 12-15 minutes, or until the internal temperature reaches 165°F (74°C) when checked with a meat thermometer inserted into the thickest part of the thigh, avoiding the bone. The juices should also run clear. Once done, carefully remove the skillet from the oven—remember, the handle will be extremely hot!05
-
Let the chicken rest in the skillet for about 5 minutes. This is a crucial step that allows the juices to redistribute throughout the meat, making every bite succulent. While it rests, give your pico de gallo one final stir. You’ll see it has created a lovely, flavorful juice at the bottom of the bowl.06
-
To serve, place one or two chicken thighs on each plate and generously spoon the fresh pico de gallo over the top and around the sides. The contrast of the hot, savory chicken with the cool, zesty salsa is what this dish is all about. Dive in and enjoy the incredible textures and flavors you’ve just created.07
Not what you're looking for?


