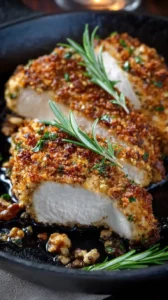
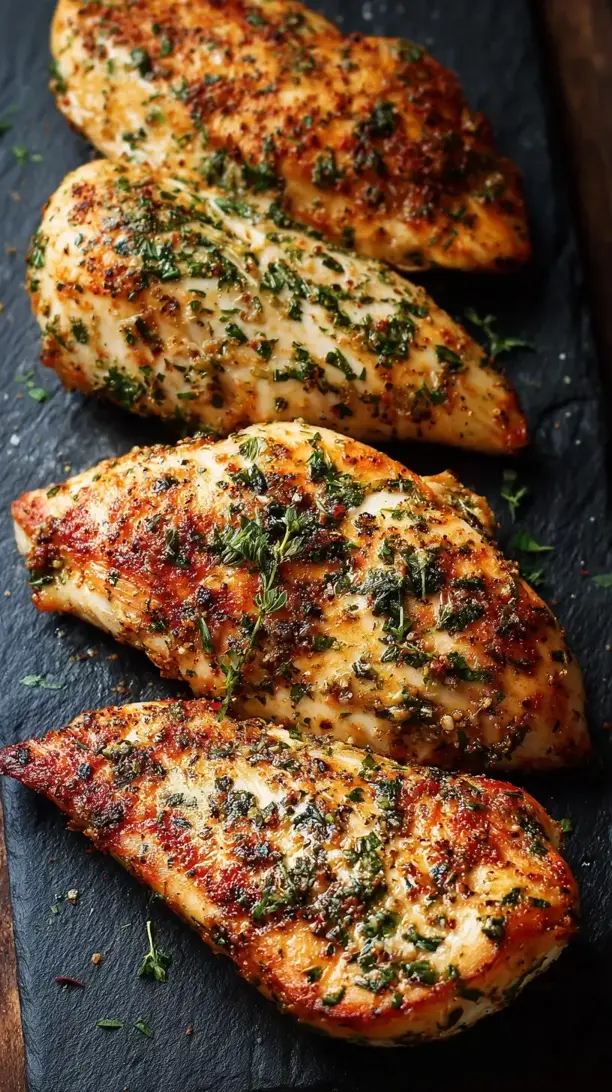
This Ranch Chicken Breast recipe is both ridiculously easy and packed with flavor. The classic ranch seasoning blend forms a delicious crust while keeping the chicken wonderfully moist inside. It’s the perfect comforting meal for busy weeknights or casual gatherings.
Craving a delicious Ranch Chicken Breast? You've come to the right spot! From Chicken Breast Recipes favorites to amazing Dessert Recipes recipes, there's something here for everyone.


Why You’ll Love This Ranch Chicken Breast
- Effortless prep: Just sprinkle seasoning and bake.
- Bold flavor: Creamy, herby ranch pairs perfectly with juicy chicken.
- Versatile serving: Great with salads, pasta, or in sandwiches.
- Perfect texture: Moist inside with a savory, lightly crisp crust.
Ingredients & Tools
- 4 boneless, skinless chicken breasts (about 1.5 lbs / 680 g)
- 3 tbsp ranch seasoning mix (store-bought or homemade)
- 2 tbsp olive oil
- 1 tsp garlic powder
- 1/2 tsp smoked paprika (optional, for a hint of warmth)
- 1/4 tsp black pepper
- 1 tbsp fresh parsley, chopped (for garnish)
- 1 lemon, cut into wedges (for serving)
Tools: baking sheet, parchment paper or aluminum foil, small mixing bowl, meat thermometer (highly recommended), basting brush
Notes: Using good-quality ranch seasoning is key. A homemade blend with dried dill, parsley, garlic powder, and buttermilk powder elevates the dish. Don’t skip the olive oil—it helps the seasoning stick and promotes a golden crust.
Nutrition (per serving)
| Calories: | 280 kcal |
| Protein: | 35 g |
| Fat: | 12 g |
| Carbs: | 4 g |
| Fiber: | 1 g |
Serves: 4 | Prep Time: 10 minutes | Cook Time: 25 minutes | Total Time: 35 minutes
Before You Start: Tips & Ingredient Notes
- Chicken breast thickness matters. If your breasts are very thick or uneven, consider pounding them to an even ¾-inch thickness. This ensures they cook evenly—no dry edges with an undercooked center.
- Homemade vs. store-bought ranch seasoning. While store-bought works perfectly fine, making your own allows you to control the salt and herb levels. A simple blend of dried dill, parsley, garlic powder, onion powder, and a touch of buttermilk powder is fantastic.
- Don’t skip the oil. The olive oil isn’t just for moisture—it helps the seasoning form a cohesive crust that doesn’t burn. It also adds a subtle richness that balances the tangy ranch flavors.
- Room temperature chicken cooks more evenly. Let the chicken sit out for 15–20 minutes before seasoning and baking. Cold chicken straight from the fridge can lead to uneven cooking.
How to Make Ranch Chicken Breast
Step 1: Preheat your oven to 400°F (200°C). Line a baking sheet with parchment paper or aluminum foil for easy cleanup—trust me, you’ll thank yourself later. While the oven heats up, pat the chicken breasts completely dry with paper towels. This step is crucial because moisture on the surface can steam the chicken instead of letting the seasoning form that nice crust.
Step 2: In a small bowl, mix together the ranch seasoning, garlic powder, smoked paprika (if using), and black pepper. Drizzle the olive oil over both sides of each chicken breast, then generously sprinkle the seasoning mixture, pressing gently to help it adhere. You’ll notice the oil helps the spices cling beautifully—this is what creates that flavorful, textured coating.
Step 3: Arrange the seasoned chicken breasts on the prepared baking sheet, making sure they aren’t touching. This allows hot air to circulate evenly, so each piece cooks uniformly. Slide the baking sheet into the preheated oven and bake for 22–26 minutes. The exact time will depend on the thickness of your chicken, but you’re aiming for an internal temperature of 165°F (74°C).
Step 4: About halfway through the baking time, you might notice the aroma filling your kitchen—that herby, savory scent is a good sign! If you like, you can baste the chicken with any pan juices to enhance moisture, but it’s not strictly necessary. The ranch crust should look golden and speckled with herbs when it’s done.
Step 5: Once the chicken reaches the safe internal temperature, remove it from the oven and let it rest for 5 minutes on the baking sheet. Resting is key—it allows the juices to redistribute throughout the meat, so each bite is succulent and tender. Garnish with fresh parsley and serve with lemon wedges for a bright, zesty finish.
Storage & Freshness Guide
- Fridge: Store cooled chicken in an airtight container for up to 3 days.
- Freezer: Wrap tightly and freeze for up to 3 months. Thaw in fridge before reheating.
- Reviving: Reheat in a baking dish with a splash of broth, covered, at 325°F for 15 minutes.
Serving Suggestions
Complementary Dishes
- Garlic mashed potatoes — The creamy, buttery potatoes are a perfect canvas for the savory ranch seasoning and any pan juices.
- Roasted asparagus or green beans — The slight char and earthy flavor of roasted veggies balance the herby chicken beautifully.
- A crisp garden salad with a light vinaigrette — The freshness and acidity cut through the richness, making the meal feel well-rounded.
Drinks
- Chilled Chardonnay — Its slight oakiness and citrus notes complement the herby, creamy flavors without overpowering them.
- Sparkling water with lemon — The effervescence and citrus cleanse the palate between bites, especially if you’re serving this on a warm evening.
- Iced herbal tea — Something with mint or lemon verbena adds a refreshing, non-alcoholic option that pairs wonderfully.
Something Sweet
- Lemon bars — The zesty, tangy sweetness provides a lovely contrast to the savory, herby main course.
- Vanilla bean panna cotta — Its smooth, creamy texture and subtle flavor are a delicate, satisfying end to the meal.
- Berry crumble with vanilla ice cream — The warm, fruity filling and cool ice cream make for a comforting, homey dessert.
Top Mistakes to Avoid
- Mistake: Not drying the chicken before seasoning. Excess moisture creates steam, which can prevent the crust from forming properly and make the seasoning slide off.
- Mistake: Overcooking the chicken. Chicken breasts can go from juicy to dry quickly. Use a meat thermometer—it’s the most reliable way to ensure perfect doneness without guesswork.
- Mistake: Crowding the baking sheet. If the chicken pieces are too close, they’ll steam instead of roast, resulting in a less crispy crust and uneven cooking.
- Mistake: Skipping the rest time. Cutting into the chicken immediately lets all those precious juices escape. Letting it rest ensures maximum tenderness.
Expert Tips
- Tip: Add a sprinkle of Parmesan. About 5 minutes before the chicken is done, sprinkle a little grated Parmesan over the top. It melts into the crust, adding a salty, umami kick that’s absolutely divine.
- Tip: Use the broiler for extra color. If your crust isn’t as golden as you’d like, pop the baking sheet under the broiler for the last 1–2 minutes. Watch it closely—it can go from golden to burnt in seconds.
- Tip: Butterfly thicker breasts. If your chicken breasts are very thick, butterfly them by slicing horizontally almost through, then opening like a book. This creates more surface area for seasoning and ensures even cooking.
- <


Ranch Chicken Breast
Learn how to make juicy, flavorful Ranch Chicken Breast with a savory crust. This easy, 35-minute recipe is perfect for busy weeknights. Get cooking now!
Ingredients
For the Ingredients
-
4 boneless, skinless chicken breasts (about 1.5 lbs / 680 g)
-
3 tbsp ranch seasoning mix (store-bought or homemade)
-
2 tbsp olive oil
-
1 tsp garlic powder
-
1/2 tsp smoked paprika (optional, for a hint of warmth)
-
1/4 tsp black pepper
-
1 tbsp fresh parsley (chopped, for garnish)
-
1 lemon (cut into wedges, for serving)
Instructions
-
Preheat your oven to 400°F (200°C). Line a baking sheet with parchment paper or aluminum foil for easy cleanup—trust me, you’ll thank yourself later. While the oven heats up, pat the chicken breasts completely dry with paper towels. This step is crucial because moisture on the surface can steam the chicken instead of letting the seasoning form that nice crust.01
-
In a small bowl, mix together the ranch seasoning, garlic powder, smoked paprika (if using), and black pepper. Drizzle the olive oil over both sides of each chicken breast, then generously sprinkle the seasoning mixture, pressing gently to help it adhere. You’ll notice the oil helps the spices cling beautifully—this is what creates that flavorful, textured coating.02
-
Arrange the seasoned chicken breasts on the prepared baking sheet, making sure they aren’t touching. This allows hot air to circulate evenly, so each piece cooks uniformly. Slide the baking sheet into the preheated oven and bake for 22–26 minutes. The exact time will depend on the thickness of your chicken, but you’re aiming for an internal temperature of 165°F (74°C).03
-
About halfway through the baking time, you might notice the aroma filling your kitchen—that herby, savory scent is a good sign! If you like, you can baste the chicken with any pan juices to enhance moisture, but it’s not strictly necessary. The ranch crust should look golden and speckled with herbs when it’s done.04
-
Once the chicken reaches the safe internal temperature, remove it from the oven and let it rest for 5 minutes on the baking sheet. Resting is key—it allows the juices to redistribute throughout the meat, so each bite is succulent and tender. Garnish with fresh parsley and serve with lemon wedges for a bright, zesty finish.05
Not what you're looking for?


