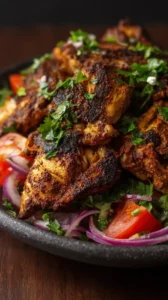
This Red Pepper Flake Chicken delivers a comforting yet exciting meal with minimal fuss. The chicken stays juicy, coated in a glossy, garlic-infused oil with a gentle, building warmth. It’s a 30-minute dish that makes your kitchen smell incredible and leaves everyone asking for seconds.
Nothing beats a great Red Pepper Flake Chicken. Whether you're a fan of Chicken Breast Recipes or want to try something from our Chicken selection, keep scrolling!


Why You’ll Love This Red Pepper Flake Chicken
- Balanced heat: Warm, toasty spice complements savory chicken and sweet garlic.
- Dreamy texture: Brining keeps the chicken succulent and tender.
- Deceptively simple: A 30-minute meal that tastes like you spent hours.
- Incredibly versatile: Serve over pasta, potatoes, or salad—don’t waste the sauce!
Ingredients & Tools
- 2 large boneless, skinless chicken breasts (about 1 lb / 450 g total)
- 2 tbsp kosher salt, for brining
- 4 tbsp extra virgin olive oil, divided
- 6-8 large garlic cloves, thinly sliced
- 1.5 tsp red pepper flakes (adjust to your heat preference)
- 1/2 cup dry white wine (like Sauvignon Blanc or Pinot Grigio)
- 1/2 cup chicken broth, low sodium
- 2 tbsp unsalted butter, cold
- 1 tbsp fresh lemon juice
- 1/4 cup fresh parsley, finely chopped
- Freshly cracked black pepper
Tools: A large skillet (stainless steel or cast iron works best), tongs, a sharp knife, and a microplane or garlic press (optional for the garlic).
Notes: Don’t skip the brining step—it’s the secret to incredibly moist chicken. And when it comes to the red pepper flakes, toasting them gently in the oil is non-negotiable. It unlocks their full, aromatic potential, moving them from just “spicy” to deeply “flavorful.”
Nutrition (per serving)
| Calories: | 385 kcal |
| Protein: | 28 g |
| Fat: | 26 g |
| Carbs: | 5 g |
| Fiber: | 1 g |
Serves: 2 | Prep Time: 15 minutes | Cook Time: 15 minutes | Total Time: 30 minutes
Before You Start: Tips & Ingredient Notes
- Chicken Thickness is Key. If your chicken breasts are very thick, slice them in half horizontally to create two thinner cutlets. This ensures quick, even cooking and a better sauce-to-chicken ratio in every bite.
- Don’t Fear the Flakes. A teaspoon and a half gives a gentle, building warmth. If you’re sensitive to spice, start with one teaspoon. If you love heat, feel free to go up to two—but beware, the flavor intensifies as they toast.
- Use a Good Skillet. You want a pan that holds heat well for a proper sear. A heavy-bottomed stainless steel or cast-iron skillet is perfect. Non-stick can work, but you won’t get those lovely browned bits (the fond) that form the base of your sauce.
- Fresh Garlic is Non-Negotiable. I know it’s tempting to reach for the jar, but for this recipe, please use fresh garlic cloves. The pre-minced stuff can have a bitter, off flavor when cooked this way and it just won’t taste the same.
How to Make Red Pepper Flake Chicken
Step 1: Brine the Chicken. In a medium bowl, dissolve 2 tablespoons of kosher salt in about 4 cups of warm water. Stir until the salt is completely dissolved. Add the chicken breasts, ensuring they’re fully submerged, and let them sit for 15 minutes. This brief brine seasons the meat all the way through and helps it retain moisture during cooking. Don’t leave it for much longer, or it could become too salty.
Step 2: Prep and Dry. While the chicken is brining, thinly slice your garlic cloves and chop your parsley. After 15 minutes, remove the chicken from the brine and pat it completely dry with paper towels. This is crucial—wet chicken will steam instead of sear. If your breasts are thick, now is the time to butterfly them or pound them to an even ½-inch thickness. Season both sides generously with black pepper (you won’t need extra salt after the brine).
Step 3: Sear the Chicken. Heat 2 tablespoons of the olive oil in your large skillet over medium-high heat until it shimmers. Carefully add the chicken breasts. You should hear a confident sizzle. Cook for 4-5 minutes without moving them, until a beautiful golden-brown crust forms on the bottom. Flip and cook for another 3-4 minutes on the other side until cooked through. The internal temperature should read 165°F (74°C). Remove the chicken to a plate and let it rest.
Step 4: Toast the Aromatics. Reduce the heat to medium-low. To the same skillet, add the remaining 2 tablespoons of olive oil. Add the sliced garlic and red pepper flakes. Now, the magic happens. Cook, stirring constantly, for about 60-90 seconds. You’ll notice the garlic becoming fragrant and lightly golden, and the pepper flakes will darken slightly and smell toasty and incredible. Be vigilant—garlic can burn in a heartbeat, and burnt garlic is bitter.
Step 5: Build the Pan Sauce. Increase the heat to medium-high. Pour in the white wine—it will bubble and steam dramatically. Use your spatula to scrape up all those browned bits from the bottom of the pan. Let the wine reduce by about half, which will take 1-2 minutes. Then, pour in the chicken broth and let it simmer for another 2 minutes until the sauce thickens slightly.
Step 6: Finish the Sauce. Turn off the heat. Swirl in the cold butter, one tablespoon at a time, until it melts and emulsifies into the sauce, making it glossy and rich. Stir in the fresh lemon juice and most of the chopped parsley. Taste the sauce and adjust seasoning if needed—it might need another crack of black pepper.
Step 7: Bring It All Together. Return the rested chicken and any accumulated juices on the plate back to the skillet. Spoon the glorious sauce over the top, ensuring every bit of chicken is coated. Let it warm through for a minute over low heat. Garnish with the remaining fresh parsley and serve immediately.
Storage & Freshness Guide
- Fridge: Store in an airtight container for up to 3 days.
- Freezer: Freeze chicken and sauce separately for up to 2 months.
- Reviving: Reheat gently in a skillet with a splash of broth or water.
Serving Suggestions
Complementary Dishes
- Creamy Polenta — The soft, mild polenta is the perfect canvas to soak up every last drop of the spicy, garlicky sauce. It creates a wonderful contrast in textures.
- Simple Arugula Salad — A pile of peppery arugula dressed with just lemon juice and olive oil provides a fresh, crisp counterpoint to the rich chicken and cuts through the heat beautifully.
- Garlic Bread — This is non-negotiable for sauce-mopping duties. A crusty baguette, toasted with garlic butter, is the ultimate tool for ensuring not a single drop of that incredible oil goes to waste.
Drinks
- A Crisp Pinot Grigio — The bright acidity and citrus notes in this white wine will cleanse your palate between bites and complement the lemon in the sauce perfectly.
- A Citrusy IPA — If you’re a beer person, an IPA with strong citrusy hop notes can stand up to the dish’s bold flavors and spice, creating a really refreshing combination.
- Sparkling Water with Lemon — For a non-alcoholic option, the effervescence and citrus are fantastic for resetting your taste buds and keeping everything feeling light.
Something Sweet
- Lemon Sorbet — The clean, sharp, and cold sweetness of a good lemon sorbet is the perfect palate cleanser after a meal with a gentle kick. It feels incredibly refreshing.
- Panna Cotta with Berry Compote — The cool, creamy, and subtly sweet panna cotta provides a lovely, smooth finish that contrasts with the dish’s warm and savory notes.
- Dark Chocolate Espresso Beans — Just a few of these after dinner. The bitter dark chocolate and coffee notes are a sophisticated way to end the meal and contrast the spice.
Top Mistakes to Avoid
- Mistake: Not Drying the Chicken. If you put wet chicken in a hot pan, it will release steam and prevent that beautiful, caramelized sear from forming. You’ll end up with boiled, grey chicken instead of golden-brown and flavorful.
- Mistake: Burning the Garlic and Pepper Flakes. This is the heart of the dish’s flavor. If you crank the heat too high, the garlic will turn bitter and the pepper flakes will taste acrid instead of toasty and complex. Medium-low heat and constant attention are your best friends here.
- Mistake: Overcooking the Chicken. Even with the brine, chicken breasts can dry out if left on the heat for too long. Use a meat thermometer and pull it at 165°F (74°C). Remember, it will continue to cook a little while resting.
- Mistake: Skipping the Fond. Those browned bits stuck to the bottom of the pan after searing the chicken are pure flavor. Deglazing the pan with wine and scraping them up is what builds a deeply savory, complex sauce. Don’t leave that goodness behind!
Expert Tips
- Tip: Use Chicken Thighs for More Flavor. If you prefer dark meat, boneless, skinless chicken thighs work wonderfully here. They’re inherently more forgiving and juicy. Just increase the initial searing time by a minute or two per side.
- Tip: Make it a “Butterfly” Effect. For super quick and even cooking, butterfly your chicken breasts. Slice them almost all the way through horizontally and open them up like a book. This creates a larger surface area for more searing and sauce-adherence.
- Tip: Infuse Your Oil Ahead of Time. For an even deeper flavor, gently warm ½ cup of olive oil with the red pepper flakes and a few garlic cloves over the lowest heat for 15 minutes. Strain it and use this infused oil for cooking. It’s a next-level flavor bomb.
- Tip: Finish with Fresh Herbs. While parsley is classic, don’t be afraid to experiment. Fresh basil, oregano, or even a little fresh thyme added at the very end can add another wonderful layer of freshness.
FAQs
Can I make this dish less spicy?
Absolutely! The heat level is completely customizable. Start with just ½ to 1 teaspoon of red pepper flakes. You can always add a pinch more at the end if you want more kick, but you can’t take it out once it’s in. Remember, toasting them will still bring out their flavor without as much intense heat.
I don’t have white wine. What can I use instead?
No problem! The wine adds acidity and depth, but you can substitute it with an equal amount of additional chicken broth mixed with a tablespoon of fresh lemon juice or white wine vinegar. The goal is to have that acidic component to deglaze the pan and brighten the sauce.
How should I store and reheat leftovers?
Store any leftover chicken and sauce in an airtight container in the refrigerator for up to 3 days. To reheat, gently warm it in a skillet over low heat with a tiny splash of water or broth to loosen the sauce. Avoid the microwave, as it can make the chicken rubbery and overcook the garlic.
Can I use pre-cooked chicken for this recipe?
You could, but you’d be missing out on the best part! The sauce is built on the fond (the browned bits) from searing the raw chicken. If you use pre-cooked chicken, you’ll just be warming it in a flavored oil, which is nice, but not the same deep, integrated flavor. I highly recommend cooking the chicken from raw for the full experience.
What’s the purpose of adding cold butter at the end?
This technique, called “monter au beurre,” is a classic French method for finishing sauces. Adding cold butter off the heat and swirling it in emulsifies the sauce, giving it a velvety texture, a beautiful glossy sheen, and a rich, rounded flavor that ties all the other ingredients together beautifully.


Red Pepper Flake Chicken
Make juicy, flavorful Red Pepper Flake Chicken in just 30 minutes! This easy recipe features a garlicky pan sauce with a gentle, building heat. Get the recipe now!
Ingredients
For the main ingredients:
-
2 large boneless, skinless chicken breasts (about 1 lb / 450 g total)
-
2 tbsp kosher salt (for brining)
-
4 tbsp extra virgin olive oil (divided)
-
6-8 large garlic cloves (thinly sliced)
-
1.5 tsp red pepper flakes (adjust to your heat preference)
-
0.5 cup dry white wine (like Sauvignon Blanc or Pinot Grigio)
-
0.5 cup chicken broth (low sodium)
-
2 tbsp unsalted butter (cold)
-
1 tbsp fresh lemon juice
-
0.25 cup fresh parsley (finely chopped)
-
Freshly cracked black pepper
Instructions
-
In a medium bowl, dissolve 2 tablespoons of kosher salt in about 4 cups of warm water. Stir until the salt is completely dissolved. Add the chicken breasts, ensuring they’re fully submerged, and let them sit for 15 minutes. This brief brine seasons the meat all the way through and helps it retain moisture during cooking. Don’t leave it for much longer, or it could become too salty.01
-
While the chicken is brining, thinly slice your garlic cloves and chop your parsley. After 15 minutes, remove the chicken from the brine and pat it completely dry with paper towels. This is crucial—wet chicken will steam instead of sear. If your breasts are thick, now is the time to butterfly them or pound them to an even ½-inch thickness. Season both sides generously with black pepper (you won't need extra salt after the brine).02
-
Heat 2 tablespoons of the olive oil in your large skillet over medium-high heat until it shimmers. Carefully add the chicken breasts. You should hear a confident sizzle. Cook for 4-5 minutes without moving them, until a beautiful golden-brown crust forms on the bottom. Flip and cook for another 3-4 minutes on the other side until cooked through. The internal temperature should read 165°F (74°C). Remove the chicken to a plate and let it rest.03
-
Reduce the heat to medium-low. To the same skillet, add the remaining 2 tablespoons of olive oil. Add the sliced garlic and red pepper flakes. Now, the magic happens. Cook, stirring constantly, for about 60-90 seconds. You’ll notice the garlic becoming fragrant and lightly golden, and the pepper flakes will darken slightly and smell toasty and incredible. Be vigilant—garlic can burn in a heartbeat, and burnt garlic is bitter.04
-
Increase the heat to medium-high. Pour in the white wine—it will bubble and steam dramatically. Use your spatula to scrape up all those browned bits from the bottom of the pan. Let the wine reduce by about half, which will take 1-2 minutes. Then, pour in the chicken broth and let it simmer for another 2 minutes until the sauce thickens slightly.05
-
Turn off the heat. Swirl in the cold butter, one tablespoon at a time, until it melts and emulsifies into the sauce, making it glossy and rich. Stir in the fresh lemon juice and most of the chopped parsley. Taste the sauce and adjust seasoning if needed—it might need another crack of black pepper.06
-
Return the rested chicken and any accumulated juices on the plate back to the skillet. Spoon the glorious sauce over the top, ensuring every bit of chicken is coated. Let it warm through for a minute over low heat. Garnish with the remaining fresh parsley and serve immediately.07
Not what you're looking for?


