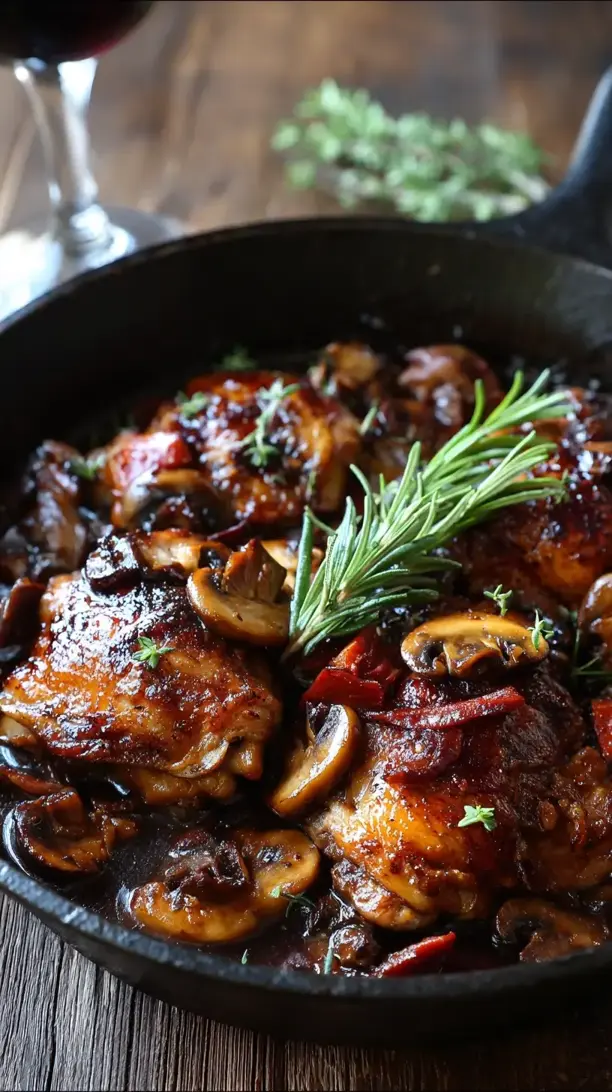
These Red Wine Chicken Thighs deliver deep, savory flavor with minimal effort. Tender chicken braises in a rich red wine sauce with garlic, herbs, and mushrooms. It’s a rustic yet elegant meal perfect for cozy dinners.
Love Red Wine Chicken Thighs? So do we! If you're into Chicken Thigh Recipes or curious about Dinner Ideas, you'll find plenty of inspiration below.


Why You’ll Love This Red Wine Chicken Thighs
- Deep flavor, minimal effort: Slow braising creates a rich, restaurant-quality dish.
- Juicy, tender chicken: Bone-in, skin-on thighs stay moist and are hard to overcook.
- Amazing aroma: Your kitchen will smell like pure comfort as it simmers.
- Meal prep & entertaining: Tastes even better the next day and impresses guests.
Ingredients & Tools
- 6 bone-in, skin-on chicken thighs
- 2 tbsp olive oil
- 1 large yellow onion, diced
- 4 cloves garlic, minced
- 250 g cremini mushrooms, sliced
- 2 carrots, peeled and chopped
- 2 stalks celery, chopped
- 375 ml dry red wine (like Cabernet Sauvignon or Merlot)
- 240 ml chicken broth
- 2 tbsp tomato paste
- 2 bay leaves
- 1 tsp fresh thyme leaves (or ½ tsp dried)
- 1 tbsp balsamic vinegar
- to taste salt and black pepper
- 2 tbsp chopped fresh parsley, for garnish
Tools: A large, oven-safe Dutch oven or heavy-bottomed pot with a lid, tongs, a wooden spoon.
Notes: Use a good, dry red wine you’d enjoy drinking—it forms the backbone of the sauce. Don’t skip the balsamic vinegar; it adds brightness that balances the richness.
Nutrition (per serving)
| Calories: | 480 kcal |
| Protein: | 35 g |
| Fat: | 22 g |
| Carbs: | 12 g |
| Fiber: | 2 g |
Serves: 4 | Prep Time: 20 minutes | Cook Time: 1 hour 15 minutes | Total Time: 1 hour 35 minutes
Before You Start: Tips & Ingredient Notes
- Choose the right wine. Go for a dry, full-bodied red like a Cabernet Sauvignon or Merlot. Avoid cooking wines or anything too sweet, as it can make the final dish cloying. If you wouldn’t drink a glass of it, don’t cook with it!
- Why bone-in, skin-on thighs? The bone adds incredible flavor to the braising liquid, and the skin helps keep the meat incredibly juicy and provides a lovely texture contrast once seared. You can use boneless, but you’ll sacrifice some depth.
- Don’t rush the sear. Getting a really good, golden-brown crust on the chicken skin is crucial for building flavor. Be patient and let it sizzle without moving it around too much—this can take a good 5-7 minutes per batch.
- Prep your veggies uniformly. Try to chop your onions, carrots, and celery into similar-sized pieces. This ensures they cook evenly and soften at the same rate, creating a more harmonious texture in the final sauce.
How to Make Red Wine Chicken Thighs
Step 1: Pat the chicken thighs completely dry with paper towels and season generously on both sides with salt and pepper. This is a crucial step for getting that beautifully crispy skin. Heat the olive oil in your Dutch oven over medium-high heat until it shimmers. Carefully place the chicken thighs in the pot, skin-side down, working in batches if necessary to avoid overcrowding. Let them cook undisturbed for 5-7 minutes, until the skin is deeply golden brown and crispy. Flip and cook for another 2-3 minutes on the other side just to sear. Transfer the chicken to a plate; it won’t be cooked through yet.
Step 2: Reduce the heat to medium. Add the diced onion, carrots, and celery to the same pot. You’ll notice all those lovely browned bits from the chicken at the bottom—that’s pure flavor! Cook the vegetables, stirring occasionally with your wooden spoon, for about 6-8 minutes, until they have softened and the onions are translucent. Add the minced garlic and cook for just one more minute until fragrant; you don’t want it to burn.
Step 3: Add the sliced mushrooms to the pot. They’ll release a lot of liquid at first—just let them cook down, stirring occasionally, for about 5-7 minutes until they’ve browned slightly and most of the liquid has evaporated. Push the vegetables to one side and add the tomato paste to the cleared spot in the pot. Let it cook for a minute or two, stirring, until it darkens slightly. This “toasts” the tomato paste and deepens its flavor immensely.
Step 4: Now, pour in the red wine. Use your wooden spoon to scrape up all the browned bits from the bottom of the pot—this is called deglazing, and it’s where a ton of the sauce’s complexity comes from. Let the wine simmer for about 3-4 minutes, allowing the alcohol to cook off and the liquid to reduce by about a third. You should notice the sharp smell of alcohol fading and being replaced by a richer, fruitier aroma.
Step 5: Stir in the chicken broth, fresh thyme, and bay leaves. Bring the liquid to a gentle simmer. Nestle the seared chicken thighs back into the pot, along with any juices that accumulated on the plate. The liquid should come about halfway up the sides of the chicken. Cover the pot with a tight-fitting lid, reduce the heat to low, and let it braise gently for 45-50 minutes. The chicken is done when it’s incredibly tender and pulls away from the bone easily.
Step 6: Once the chicken is cooked, carefully transfer the thighs to a serving platter. If the sauce seems a bit thin, you can turn the heat up to medium-high and let it simmer uncovered for 5-10 minutes to reduce and thicken to your liking. The trick is to let it bubble until it coats the back of a spoon. Remove the pot from the heat, fish out the bay leaves, and stir in the balsamic vinegar. Taste the sauce and adjust the seasoning with more salt and pepper if needed. Spoon the rich sauce and vegetables over the chicken, garnish with fresh parsley, and serve immediately.
Storage & Freshness Guide
- Fridge: Store in an airtight container for up to 4 days.
- Freezer: Freeze for up to 3 months in a sealed container.
- Reviving: Reheat gently on the stovetop, adding a splash of broth if needed.
Serving Suggestions
Complementary Dishes
- Creamy mashed potatoes — The ultimate comfort food pairing; the fluffy potatoes are perfect for soaking up every last drop of that glorious red wine sauce.
- Buttery egg noodles or polenta — Both provide a soft, neutral base that lets the deep flavors of the chicken and sauce truly shine without competing.
- Crusty bread — A must-have for mopping up the sauce from your plate—trust me, you won’t want to leave a single drop behind.
Drinks
- The same red wine you cooked with — It’s a perfect pairing, creating a harmonious flavor experience from plate to glass.
- A light-bodied Pinot Noir — Its bright acidity and red fruit notes can cut through the richness of the dish beautifully.
Something Sweet
- Dark chocolate pot de crème — The intense, bittersweet chocolate provides a sophisticated and decadent finish that doesn’t feel too heavy.
- Poached pears — Light, fragrant, and slightly spiced, they offer a refreshing and elegant contrast to the savory main course.
Top Mistakes to Avoid
- Mistake: Not patting the chicken dry before searing. Moisture is the enemy of a crispy sear. If the skin is wet, it will steam instead of brown, and you’ll miss out on that essential texture and flavor.
- Mistake: Crowding the pot when browning the chicken. If you put too many thighs in at once, the temperature drops and they release liquid, leading to steamed, pale chicken. I’ve messed this up before too—patience is key! Cook in batches if your pot isn’t large enough.
- Mistake: Skipping the deglazing step. Those browned bits at the bottom of the pan are pure flavor gold. If you don’t scrape them up with the wine, you’re leaving a huge amount of taste behind.
- Mistake: Using a sweet or “cooking” wine. Sweet wines will make your sauce cloying, and “cooking wines” often contain added salt and preservatives that can throw off the entire balance of your dish.
Expert Tips
- Tip: Make it a day ahead. Braised dishes like this almost always taste better the next day. The flavors have more time to meld and deepen. Just gently reheat it on the stovetop before serving.
- Tip: For a thicker sauce, make a beurre manié. If you prefer a thicker, gravy-like consistency, mash together equal parts soft butter and flour (about 1 tbsp each) into a paste. Whisk this into the simmering sauce after you’ve removed the chicken, and let it cook for 2-3 minutes until thickened.
- Tip: Add a Parmesan rind. If you have a leftover rind of Parmigiano-Reggiano in your fridge, toss it into the pot during the braising step. It will melt into the sauce, adding an incredible layer of savory, umami depth.
- Tip: Finish with fresh herbs. Don’t underestimate the power of a fresh garnish. A sprinkle of chopped parsley or even some fresh chives right at the end adds a pop of color and a bright, fresh flavor that lifts the whole dish.
FAQs
Can I use boneless, skinless chicken thighs?
You absolutely can, but you’ll lose some flavor and texture. The bone contributes a lot of richness to the braising liquid, and the skin provides fat and protects the meat from drying out. If you do use boneless, skinless thighs, reduce the braising time by about 10-15 minutes to prevent them from becoming overcooked and stringy. The result will still be tasty, just not quite as deep or succulent.
What’s the best red wine to use for cooking this?
Stick with a dry, full-bodied red that you enjoy drinking. A Cabernet Sauvignon, Merlot, or a Syrah/Shiraz works wonderfully. These wines have the structure and fruitiness to stand up to the long cooking time without turning bitter. A general rule of thumb: if it tastes good in your glass, it will taste good in your food. Avoid anything labeled “cooking wine” at all costs.
Can I make this in a slow cooker?
Yes, you can adapt this for a slow cooker! Follow the steps to sear the chicken and sauté the vegetables in a skillet first to build flavor. Then, transfer everything to your slow cooker, add the liquids and herbs, and cook on LOW for 6-7 hours or on HIGH for 3-4 hours. The sauce might be a bit thinner, so you may need to thicken it at the end by simmering in a pan.
How should I store and reheat leftovers?
Leftovers will keep beautifully in an airtight container in the refrigerator for up to 4 days. The flavors actually improve! To reheat, gently warm it in a covered saucepan over low heat on the stovetop, adding a splash of broth or water if the sauce seems too thick. You can also reheat individual portions in the microwave, stirring halfway through.
My sauce is too thin. How can I thicken it?
The easiest way is to let it simmer uncovered for an extra 5-10 minutes after removing the chicken; the reduction will naturally thicken it. If it’s still too thin, you can create a slurry by mixing one tablespoon of cornstarch with two tablespoons of cold water until smooth. Whisk this into the simmering sauce and cook for another 1-2 minutes until thickened. Alternatively, use the beurre manié method mentioned in the expert tips for a richer, silkier finish.


Red Wine Chicken Thighs
Make tender Red Wine Chicken Thighs braised in a rich sauce. This easy, elegant recipe is perfect for weeknights or entertaining. Get the full recipe now!
Ingredients
For the Ingredients
-
6 bone-in, skin-on chicken thighs
-
2 tbsp olive oil
-
1 large yellow onion (diced)
-
4 cloves garlic (minced)
-
250 g cremini mushrooms (sliced)
-
2 carrots (peeled and chopped)
-
2 stalks celery (chopped)
-
375 ml dry red wine (like Cabernet Sauvignon or Merlot)
-
240 ml chicken broth
-
2 tbsp tomato paste
-
2 bay leaves
-
1 tsp fresh thyme leaves (or ½ tsp dried)
-
1 tbsp balsamic vinegar
-
salt and black pepper (to taste)
-
2 tbsp chopped fresh parsley (for garnish)
Instructions
-
Pat the chicken thighs completely dry with paper towels and season generously on both sides with salt and pepper. Heat the olive oil in your Dutch oven over medium-high heat until it shimmers. Carefully place the chicken thighs in the pot, skin-side down, working in batches if necessary to avoid overcrowding. Let them cook undisturbed for 5-7 minutes, until the skin is deeply golden brown and crispy. Flip and cook for another 2-3 minutes on the other side just to sear. Transfer the chicken to a plate; it won’t be cooked through yet.01
-
Reduce the heat to medium. Add the diced onion, carrots, and celery to the same pot. Cook the vegetables, stirring occasionally with your wooden spoon, for about 6-8 minutes, until they have softened and the onions are translucent. Add the minced garlic and cook for just one more minute until fragrant; you don’t want it to burn.02
-
Add the sliced mushrooms to the pot. Let them cook down, stirring occasionally, for about 5-7 minutes until they’ve browned slightly and most of the liquid has evaporated. Push the vegetables to one side and add the tomato paste to the cleared spot in the pot. Let it cook for a minute or two, stirring, until it darkens slightly.03
-
Pour in the red wine. Use your wooden spoon to scrape up all the browned bits from the bottom of the pot. Let the wine simmer for about 3-4 minutes, allowing the alcohol to cook off and the liquid to reduce by about a third.04
-
Stir in the chicken broth, fresh thyme, and bay leaves. Bring the liquid to a gentle simmer. Nestle the seared chicken thighs back into the pot, along with any juices that accumulated on the plate. Cover the pot with a tight-fitting lid, reduce the heat to low, and let it braise gently for 45-50 minutes. The chicken is done when it’s incredibly tender and pulls away from the bone easily.05
-
Once the chicken is cooked, carefully transfer the thighs to a serving platter. If the sauce seems a bit thin, you can turn the heat up to medium-high and let it simmer uncovered for 5-10 minutes to reduce and thicken to your liking. Remove the pot from the heat, fish out the bay leaves, and stir in the balsamic vinegar. Taste the sauce and adjust the seasoning with more salt and pepper if needed. Spoon the rich sauce and vegetables over the chicken, garnish with fresh parsley, and serve immediately.06
Not what you're looking for?


