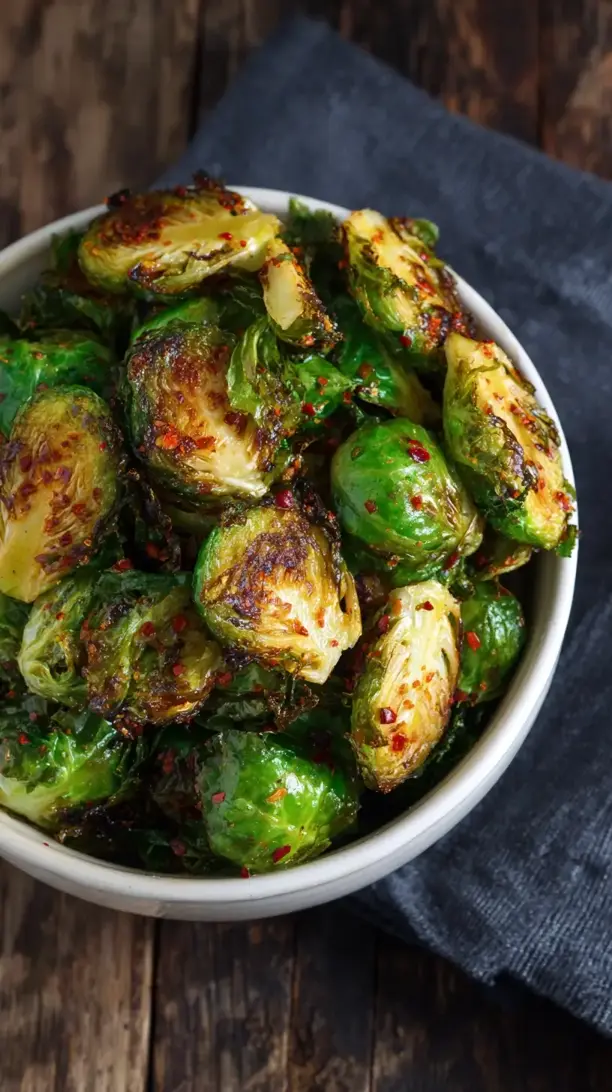
These roasted Brussels sprouts chips completely transform the humble vegetable into a light, crispy, and addictive snack. The outer leaves become bronzed and shatteringly crisp with a nutty, caramelized flavor. This simple method turns Brussels sprouts into a gourmet treat you’ll devour straight from the pan.
Craving a delicious Roasted Brussels Sprouts Chips? You've come to the right spot! From Snacks favorites to amazing Chicken Breast Recipes recipes, there's something here for everyone.

Why You’ll Love This Roasted Brussels Sprouts Chips
- Seriously addictive snack: Forget potato chips—these have a shatteringly crisp texture and deep, nutty flavor.
- Deceptively simple: With just a few ingredients and patient roasting, you transform a misunderstood vegetable.
- Reduces food waste: Uses outer leaves you might normally discard, turning them into the star.
- Incredibly versatile: Enjoy plain, as a salad topper, or crumbled over soups and pasta.
Ingredients & Tools
- 1 lb Brussels sprouts
- 2 tablespoons olive oil
- 1/2 teaspoon garlic powder
- 1/2 teaspoon fine sea salt, plus more to taste
- 1/4 teaspoon freshly cracked black pepper
- Optional: A pinch of smoked paprika or a generous sprinkle of nutritional yeast for a cheesy flavor.
Tools: A large baking sheet, parchment paper, a large mixing bowl
Notes: Try to find firm, bright green sprouts that feel heavy for their size—they’re fresher and have tighter, more plentiful leaves.
Nutrition (per serving)
| Calories: | 85 kcal |
| Protein: | 3 g |
| Fat: | 5 g |
| Carbs: | 9 g |
| Fiber: | 4 g |
Serves: 4 | Prep Time: 15 minutes | Cook Time: 15-20 minutes | Total Time: 30-35 minutes
Before You Start: Tips & Ingredient Notes
- Choosing your sprouts. Look for smaller to medium-sized Brussels sprouts. They tend to be sweeter and more tender than the giant ones, which can sometimes be a bit woody and bitter. Freshness is everything here.
- The power of dry leaves. After you wash your sprouts, make sure you pat the leaves completely dry with a clean kitchen towel. Any lingering water will steam the leaves in the oven instead of letting them get wonderfully crisp.
- Don’t crowd the pan. This is the golden rule for crispy roasted anything. If the leaves are piled on top of each other, they’ll steam and become soggy. We want a single, even layer with a little breathing room for each leaf.
- Embrace the imperfect core. After you’ve removed all the leaves you can, you’ll be left with a tight core. Don’t throw it away! You can thinly slice it and roast it alongside the leaves—it won’t get as chip-like, but it’ll still be deliciously tender and roasted.
How to Make Roasted Brussels Sprouts Chips
Step 1: First, prep your sprouts. Trim off the very bottom of the stem from each Brussels sprout. Then, starting from the base, carefully peel off the outer leaves, layer by layer. You’ll notice that as you get closer to the center, the leaves will become tighter and more difficult to remove. That’s okay! Just place the stubborn core aside for another use. You want to end up with a big bowl of loose leaves.
Step 2: Now, let’s get them ready for the oven. In a large mixing bowl, combine the Brussels sprouts leaves, olive oil, garlic powder, salt, and pepper. Use your hands to toss everything together, making sure every single leaf is lightly and evenly coated with the oil and seasonings. This hands-on approach is the best way to ensure no leaf is left behind. You’ll feel the leaves become slightly slick and shiny.
Step 3: Time to arrange them for their transformation. Line a large baking sheet with parchment paper—this prevents sticking and makes cleanup a breeze. Spread the seasoned leaves out in a single, even layer. Be patient here and try to avoid any overlapping. If they’re too crowded, they’ll steam instead of roast, and we’re going for maximum crispiness.
Step 4: Roast to perfection. Place the baking sheet in a preheated 375°F (190°C) oven. You’ll want to roast them for about 15 to 20 minutes, but keep a very close eye on them, especially after the 10-minute mark. The leaves on the edges will brown first. The goal is a deep golden brown color with some darker, almost charred spots. They should be light, delicate, and make a rustling sound when you shake the pan.
Step 5: The final touch. As soon as you pull the baking sheet from the oven, give the chips a taste. They might need another tiny pinch of salt while they’re still hot. Let them cool on the pan for a minute or two—they’ll continue to crisp up as they sit. Then, transfer them to a serving bowl and try not to eat them all in one go. They are best enjoyed the day they are made, while their magical crispness is at its peak.
Storage & Freshness Guide
- Fridge: Not recommended; best enjoyed immediately for maximum crispness.
- Freezer: Not suitable due to loss of texture upon thawing.
- Reviving: If they soften, spread on a baking sheet and warm at 300°F for 3-5 minutes to re-crisp.
Serving Suggestions
Complementary Dishes
- A simple herby dip — A cool, creamy dip made with Greek yogurt, lemon zest, and fresh dill provides a lovely, tangy contrast to the salty, crispy chips.
- As a salad garnish — Crumble these chips over a simple green salad or a grain bowl. They add an incredible crunch that’s far more interesting than standard croutons.
- Alongside a juicy burger — Serve a bowl of these instead of fries. Their lightness is a perfect counterpoint to a rich, hearty burger and they feel wonderfully gourmet.
Drinks
- A crisp, dry white wine — A Sauvignon Blanc or Pinot Grigio has the acidity to cut through the richness of the oil and complement the vegetal notes beautifully.
- A light lager or pilsner — The clean, crisp finish of a good lager is a classic pairing with anything salty and snackable, making it a perfect match for these chips.
- Sparkling water with lemon — For a non-alcoholic option, the bubbles and citrus cleanse the palate between handfuls, keeping each bite tasting fresh and vibrant.
Something Sweet
- Dark chocolate-covered almonds — The bitter-sweet depth of dark chocolate and the nutty crunch of almonds elegantly continue the sophisticated, nutty theme of the meal.
- Lemon sorbet — After a savory, salty snack, a few scoops of bright, tart lemon sorbet feel incredibly refreshing and light, like a palate-cleansing reset.
- Shortbread cookies — A simple, buttery shortbread cookie provides a sweet, crumbly finish that doesn’t overpower the delicate memory of those delicious chips.
Top Mistakes to Avoid
- Mistake: Skipping the drying step. If your leaves are even slightly damp from washing, the moisture will steam them in the oven. You’ll end up with soggy, steamed leaves instead of crispy chips. Pat them thoroughly dry!
- Mistake: Using too much oil. A little oil goes a long way. You just want a light, even coating. Drowning the leaves in oil will make them greasy and they’ll never achieve that light, crisp texture we’re after.
- Mistake: Not watching them closely at the end. These chips go from perfectly golden to burnt in a matter of seconds. Don’t walk away during the last five minutes of cooking. Your nose and eyes are the best tools here.
- Mistake: Storing them in a sealed container while warm. Any residual heat will create steam, which will immediately make your hard-won chips soft and limp. Always let them cool completely before storing.
Expert Tips
- Tip: Massage the oil in. Don’t just toss the leaves with the oil—get in there with your hands and gently massage it in. This ensures every nook and cranny of each leaf is coated, which is the secret to all-over crispiness.
- Tip: Use two baking sheets if needed. If your leaves are looking a little crowded, it’s worth splitting them between two pans. Overcrowding is the enemy of crispness. A little extra space is a small price to pay for the perfect chip.
- Tip: Add flaky salt at the end. While fine sea salt is great for the initial seasoning, finishing the hot chips with a sprinkle of flaky sea salt (like Maldon) adds a wonderful textural crunch and a burst of saline flavor.
- Tip: Experiment with seasonings post-bake. For the most vibrant flavor, add delicate seasonings like nutritional yeast, cayenne pepper, or sumac after the chips come out of the oven. This keeps their flavors bright and prevents them from burning.
FAQs
Can I make these in an air fryer?
Absolutely! An air fryer is a fantastic tool for this recipe. The circulating air helps them get extra crisp. Cook them at 375°F (190°C) for about 8-10 minutes, shaking the basket halfway through. Just keep a very close eye on them, as they can cook even faster than in the oven. The same rules apply—single layer, don’t overcrowd, and watch them like a hawk at the end.
Why are my chips not getting crispy?
The most common culprits are moisture and overcrowding. If you didn’t dry the leaves thoroughly, or if they were packed too tightly on the pan, they will steam instead of roast. Another possibility is the oven temperature—make sure your oven is fully preheated and consider using an oven thermometer to check for accuracy. Ovens can often run cooler than their display says.
Can I use frozen Brussels sprouts?
I wouldn’t recommend it for this specific recipe. Frozen sprouts have a much higher water content, and when they thaw, they become very wet and limp. It’s nearly impossible to get them dry enough to achieve that signature crisp chip texture. Fresh is definitely the way to go for this one.
How should I store leftovers?
If you have any leftovers (a rare occurrence!), let them cool completely to room temperature. Then, transfer them to a paper towel-lined container or a loosely covered bowl. Do not seal them in an airtight container while they are still warm, as the trapped steam will make them soft. They are best enjoyed within 24 hours.
What can I do with the leftover cores?
Don’t toss them! Those cores are still perfectly edible and delicious. You can thinly slice them and sauté them with a little garlic and butter for a quick side dish, roast them alongside the leaves (they’ll be more tender than crispy), or add them to a stir-fry or soup for a boost of flavor and nutrition.


Roasted Brussels Sprouts Chips
Learn how to make crispy Roasted Brussels Sprouts Chips with this easy recipe. A healthy, addictive snack perfect for any occasion. Get the recipe now!
Ingredients
For the Ingredients & Tools
-
1 lb Brussels sprouts
-
2 tablespoons olive oil
-
1/2 teaspoon garlic powder
-
1/2 teaspoon fine sea salt
-
1/4 teaspoon freshly cracked black pepper
-
A pinch smoked paprika or a generous sprinkle of nutritional yeast (for a cheesy flavor)
Instructions
-
First, prep your sprouts. Trim off the very bottom of the stem from each Brussels sprout. Then, starting from the base, carefully peel off the outer leaves, layer by layer. You’ll notice that as you get closer to the center, the leaves will become tighter and more difficult to remove. That’s okay! Just place the stubborn core aside for another use. You want to end up with a big bowl of loose leaves.01
-
Now, let’s get them ready for the oven. In a large mixing bowl, combine the Brussels sprouts leaves, olive oil, garlic powder, salt, and pepper. Use your hands to toss everything together, making sure every single leaf is lightly and evenly coated with the oil and seasonings. This hands-on approach is the best way to ensure no leaf is left behind. You’ll feel the leaves become slightly slick and shiny.02
-
Time to arrange them for their transformation. Line a large baking sheet with parchment paper—this prevents sticking and makes cleanup a breeze. Spread the seasoned leaves out in a single, even layer. Be patient here and try to avoid any overlapping. If they’re too crowded, they’ll steam instead of roast, and we’re going for maximum crispiness.03
-
Roast to perfection. Place the baking sheet in a preheated 375°F (190°C) oven. You’ll want to roast them for about 15 to 20 minutes, but keep a very close eye on them, especially after the 10-minute mark. The leaves on the edges will brown first. The goal is a deep golden brown color with some darker, almost charred spots. They should be light, delicate, and make a rustling sound when you shake the pan.04
-
The final touch. As soon as you pull the baking sheet from the oven, give the chips a taste. They might need another tiny pinch of salt while they’re still hot. Let them cool on the pan for a minute or two—they’ll continue to crisp up as they sit. Then, transfer them to a serving bowl and try not to eat them all in one go. They are best enjoyed the day they are made, while their magical crispness is at its peak.05
Not what you're looking for?


