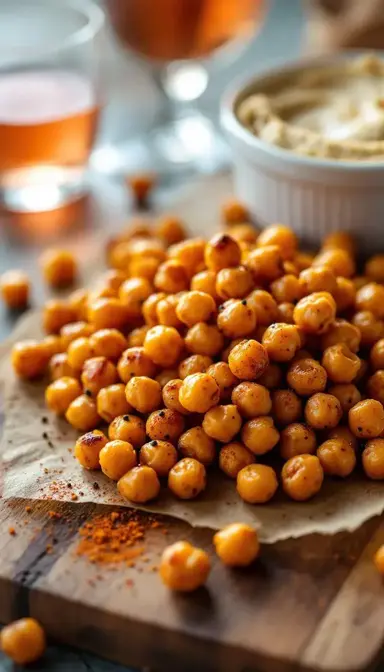
Transform humble canned chickpeas into crispy, golden, addictive roasted chickpeas with this simple technique. This recipe delivers a shatteringly crisp exterior and fluffy interior, perfect for snacking or topping salads. The flavor possibilities for these roasted chickpeas are endless, from savory spices to sweet cinnamon.
Craving a delicious Roasted Chickpeas? You've come to the right spot! From Snacks favorites to amazing Christmas Cookie recipes, there's something here for everyone.


Why You’ll Love This Roasted Chickpeas
Unbeatable Texture: Perfect crisp-shell, fluffy-center with an audible crunch.
Incredibly Versatile: Great for salads, grain bowls, or as a breadcrumb alternative.
Wholesome & Satisfying: Packed with plant-based protein and fiber to keep you full.
Seriously Simple: Just a can of chickpeas, oil, and spices for a quick, delicious treat.
Ingredients & Tools
- 2 cans (15 oz / 425 g each) chickpeas
- 2 tablespoons olive oil or avocado oil
- 1 teaspoon fine sea salt
- 1/2 teaspoon garlic powder
- 1/2 teaspoon smoked paprika
- 1/4 teaspoon black pepper
Tools: A large rimmed baking sheet, kitchen towel or paper towels, a large bowl
Notes: Using two cans gives a nice big batch. The oil is crucial for browning, and the spices are a classic, versatile base.
Nutrition (per serving)
| Calories: | 150 kcal |
| Protein: | 6 g |
| Fat: | 6 g |
| Carbs: | 19 g |
| Fiber: | 5 g |
Serves: 4 | Prep Time: 10 mins | Cook Time: 30-40 mins | Total Time: 40-50 mins
Before You Start: Tips & Ingredient Notes
- Dry Those Beans! This is the single most important step for crispiness. After rinsing, spend a few extra minutes patting the chickpeas thoroughly dry with a clean kitchen towel. Removing the surface moisture and even some of the thin skins is what allows them to roast instead of steam.
- Oil Choice Matters. A neutral oil with a high smoke point, like avocado or regular olive oil, works best. Extra virgin olive oil can sometimes burn at the high temperatures needed, imparting a bitter flavor.
- Don’t Crowd the Pan. Spread the chickpeas in a single layer with a little space between them. If they’re piled on top of each other, they’ll steam and become soft and chewy—the opposite of what we want.
- Spice Timing is Key. Hold back on adding any fine, sugary, or delicate spices (like cayenne or cinnamon) until the last 5-10 minutes of roasting. This prevents them from burning and becoming acrid.
How to Make Roasted Chickpeas
Step 1: First, you’ll want to prep your chickpeas. Preheat your oven to 400°F (200°C). Drain both cans of chickpeas into a colander and give them a really good rinse under cold water. This washes away the starchy liquid they’re packed in. Now, for the crucial part: drying. Spread the rinsed chickpeas out on a clean kitchen towel and gently pat them dry. Roll them around a bit—you’ll notice some of the thin, translucent skins will start to loosen and come off. You don’t have to be obsessive and remove every single one, but getting most of them off will help immensely with the final texture.
Step 2: Transfer your dried chickpeas to a large, dry bowl. Drizzle them with the two tablespoons of oil. Now, use your hands or a spatula to toss them until every single chickpea is lightly and evenly coated. This thin layer of oil is what will conduct the heat and create that beautiful, golden, crispy shell. Once they’re glossy, it’s time for the base seasonings. Sprinkle over the salt, garlic powder, smoked paprika, and black pepper. Toss again, making sure the spices are distributed as evenly as possible.
Step 3: Grab your rimmed baking sheet. Pour the seasoned chickpeas onto the sheet and spread them out into a single, even layer. Make sure they aren’t piled on top of each other—a little space is your friend here, as it allows for hot air to circulate and crisp them up from all sides. If your baking sheet seems a bit crowded, it’s better to use two sheets. This attention to detail is what separates okay roasted chickpeas from truly great ones.
Step 4: Slide the baking sheet into the preheated oven. You’re going to roast them for 30 to 40 minutes, but you can’t just set a timer and walk away. The trick is to shake the pan every 10-15 minutes. This ensures they brown evenly and don’t stick to the pan. You’ll start to hear a faint sizzling sound, and around the 20-minute mark, you’ll notice them turning a light golden color. They’re on their way!
Step 5: In the last 10 minutes of cooking, keep a very close eye on them. This is when they can go from perfectly golden to burnt surprisingly quickly. You’re looking for a deep, golden-brown color and a shatteringly crisp texture when you bite into one (let it cool first!). They will also feel lighter and sound a bit more hollow if you shake the pan. When they reach this stage, take them out of the oven immediately.
Step 6: This next part requires a little patience. Let the roasted chickpeas cool completely right on the baking sheet. I know it’s tempting to eat them straight from the oven, but they continue to crisp up as they cool. This resting period is the final step to achieving that ideal crunchy texture. Once they’re at room temperature, they’re ready to be devoured. If you’re adding any final, delicate seasonings (like a sprinkle of flaky salt or a dusting of chili powder), now is the time to do it.
Storage & Freshness Guide
- Fridge: Not recommended; they lose crispness. Store at room temperature.
- Freezer: Freezing not advised; texture becomes unpleasantly soft.
- Reviving: Spread on a baking sheet and reheat at 350°F (175°C) for 5-10 minutes to restore crunch.
Serving Suggestions
Complementary Dishes
- A Vibrant Grain Bowl — Scatter a handful over a base of quinoa or farro with roasted vegetables and a lemony tahini dressing. They add a crucial protein-packed crunch that ties the whole bowl together.
- Creamy Soups & Stews — Use them as a garnish for lentil soup or a creamy tomato bisque. They’re the perfect textural contrast to a smooth, silky soup, replacing croutons in the most delicious way.
- Fresh Green Salads — Toss them into a simple arugula salad with shaved Parmesan and a lemon vinaigrette. They make the salad substantial enough to be a main course.
Drinks
- A Crisp Lager or Pale Ale — The clean, hoppy bitterness of the beer cuts through the savory, slightly fatty richness of the chickpeas, creating a wonderfully balanced snacking experience.
- Sparkling Water with Lemon — The effervescence cleanses the palate between handfuls, while the citrus note complements the savory spices beautifully without being overpowering.
- Herbal Iced Tea — A cool, unsweetened mint or hibiscus tea offers a refreshing, non-alcoholic counterpart that doesn’t compete with the bold flavors of the snack.
Something Sweet
- Dark Chocolate-Dipped Orange Slices — The deep, bitter chocolate and bright, sweet citrus provide a perfect, simple finale that contrasts wonderfully with the savory, spiced snack you just enjoyed.
- A Small Bowl of Fresh Berries — Sometimes simplicity is best. The natural sweetness and slight acidity of raspberries or blueberries are a light and refreshing way to end your snacking session.
- Vanilla Bean Yogurt with Honey — A few spoonfuls of creamy, cool yogurt drizzled with honey creates a lovely, soothing contrast to the crunchy, salty chickpeas.
Top Mistakes to Avoid
- Mistake: Not Drying the Chickpeas Enough. Any residual water on the surface will steam the chickpeas, preventing them from getting crisp. I’ve messed this up before too—it leads to a soft, sometimes chewy texture that’s just not the same.
- Mistake: Using Too Much Oil. While you need enough to coat them, a heavy hand with the oil can make them greasy and cause them to fry unevenly in the oven. A light, even coating is the goal.
- Mistake: Adding Sugar or Honey Too Early. If you’re making a sweet version, any sugar-based glaze should be added in the last 5-10 minutes of cooking. Otherwise, it will burn and create a bitter, unpleasant flavor.
- Mistake: Storing Them While Still Warm. Trapping steam in a container is a surefire way to turn your crispy masterpiece into a soft, sad snack. Always, always let them cool completely first.
Expert Tips
- Tip: Loosen the Skins with a Towel. After rinsing, place the chickpeas in the center of a clean kitchen towel, gather the edges, and rub them vigorously. The friction helps pop off a majority of the skins in seconds, making the drying process faster and the result crispier.
- Tip: Test for Doneness by Sound. Shake the baking sheet near the end of the cooking time. If the chickpeas sound light and rattle like little pebbles, they’re likely done. It’s a great auditory cue to complement the visual one.
- Tip: Create Flavor Variations After Cooling. For maximum flavor impact, toss the fully cooled chickpeas with finely grated Parmesan and lemon zest, or a blend of nutritional yeast and onion powder for a “cheesy” vegan version. The cool surface helps the fine powders adhere.
- Tip: Revive Them if They Go Soft. If they lose their crunch after a day, don’t despair! Spread them on a baking sheet and pop them back into a 350°F (175°C) oven for 5-10 minutes. They’ll crisp right back up.
FAQs
Why are my roasted chickpeas not crispy?
This almost always comes down to moisture. The most common culprits are not drying the chickpeas thoroughly enough after rinsing, or crowding the pan so they steam instead of roast. The thin skins can also trap steam, so removing as many as you can during the drying step makes a huge difference. Finally, make sure your oven is fully preheated and you’re giving them enough time—they can take up to 40 minutes or even longer depending on your oven’s true temperature and the size of the chickpeas.
Can I use dried chickpeas instead of canned?
Absolutely! You’ll need to start with about 1 cup of dried chickpeas. Soak them overnight in plenty of water, then drain and cook them in fresh water until they are tender but still firm (usually 45-60 minutes). Let them cool and dry them thoroughly before proceeding with the recipe. The benefit is you can control the texture from the start, but canned are a fantastic and convenient shortcut.
How long do roasted chickpeas stay crispy?
Stored correctly in a paper towel-lined airtight container at room temperature, they are at their absolute best for about 2-3 days. The paper towel helps absorb any residual moisture that might be released. They’re still safe to eat after that, but they will gradually lose their signature crunch and become more chewy over time.
Can I make sweet roasted chickpeas?
You sure can! It’s a delicious alternative. For a sweet version, toss the oiled chickpeas with 1-2 tablespoons of maple syrup or honey (reduce the oil slightly), along with spices like cinnamon, nutmeg, and a pinch of salt. Be very careful—add the sweet glaze in the last 10 minutes of cooking and watch them like a hawk, as the sugar can burn easily.
My chickpeas are popping in the oven. Is that normal?
A little bit of popping is totally normal and actually a good sign! It means the internal moisture is turning to steam and escaping, which is part of what creates that fluffy interior and crisp shell. If they are popping violently or jumping off the pan, your oven might be a bit too hot, so you could try reducing the temperature by 25°F (about 15°C) next time.


Roasted Chickpeas
Learn how to make perfectly crispy Roasted Chickpeas with this simple recipe. A healthy, addictive snack or salad topper. Get the foolproof method now!
Ingredients
For the Ingredients
-
2 can chickpeas (15 oz / 425 g each)
-
2 tablespoon olive oil or avocado oil
-
1 teaspoon fine sea salt
-
1/2 teaspoon garlic powder
-
1/2 teaspoon smoked paprika
-
1/4 teaspoon black pepper
Instructions
-
First, you’ll want to prep your chickpeas. Preheat your oven to 400°F (200°C). Drain both cans of chickpeas into a colander and give them a really good rinse under cold water. This washes away the starchy liquid they’re packed in. Now, for the crucial part: drying. Spread the rinsed chickpeas out on a clean kitchen towel and gently pat them dry. Roll them around a bit—you’ll notice some of the thin, translucent skins will start to loosen and come off. You don’t have to be obsessive and remove every single one, but getting most of them off will help immensely with the final texture.01
-
Transfer your dried chickpeas to a large, dry bowl. Drizzle them with the two tablespoons of oil. Now, use your hands or a spatula to toss them until every single chickpea is lightly and evenly coated. This thin layer of oil is what will conduct the heat and create that beautiful, golden, crispy shell. Once they’re glossy, it’s time for the base seasonings. Sprinkle over the salt, garlic powder, smoked paprika, and black pepper. Toss again, making sure the spices are distributed as evenly as possible.02
-
Grab your rimmed baking sheet. Pour the seasoned chickpeas onto the sheet and spread them out into a single, even layer. Make sure they aren’t piled on top of each other—a little space is your friend here, as it allows for hot air to circulate and crisp them up from all sides. If your baking sheet seems a bit crowded, it’s better to use two sheets. This attention to detail is what separates okay roasted chickpeas from truly great ones.03
-
Slide the baking sheet into the preheated oven. You’re going to roast them for 30 to 40 minutes, but you can’t just set a timer and walk away. The trick is to shake the pan every 10-15 minutes. This ensures they brown evenly and don’t stick to the pan. You’ll start to hear a faint sizzling sound, and around the 20-minute mark, you’ll notice them turning a light golden color. They’re on their way!04
-
In the last 10 minutes of cooking, keep a very close eye on them. This is when they can go from perfectly golden to burnt surprisingly quickly. You’re looking for a deep, golden-brown color and a shatteringly crisp texture when you bite into one (let it cool first!). They will also feel lighter and sound a bit more hollow if you shake the pan. When they reach this stage, take them out of the oven immediately.05
-
This next part requires a little patience. Let the roasted chickpeas cool completely right on the baking sheet. I know it’s tempting to eat them straight from the oven, but they continue to crisp up as they cool. This resting period is the final step to achieving that ideal crunchy texture. Once they’re at room temperature, they’re ready to be devoured. If you’re adding any final, delicate seasonings (like a sprinkle of flaky salt or a dusting of chili powder), now is the time to do it.06
Not what you're looking for?


