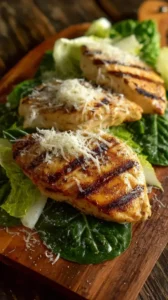
This Sage Butter Chicken recipe delivers a rustic yet elegant meal with minimal effort. The combination of juicy chicken, crispy skin, and a nutty sage butter sauce feels gourmet but comes together quickly. It’s a comforting, impressive dish perfect for any night.
Craving a delicious Sage Butter Chicken? You've come to the right spot! From Chicken Breast Recipes favorites to amazing Crockpot Recipes recipes, there's something here for everyone.


Why You’ll Love This Sage Butter Chicken
- Minimal effort, maximum flavor: Gourmet taste from simple steps.
- Luxurious pan sauce: Silky, glossy finish from deglazing.
- Versatile & adaptable: Pairs with pasta, potatoes, or salad.
- Heavenly aroma: Warm, savory scent fills your kitchen.
Ingredients & Tools
- 4 bone-in, skin-on chicken thighs
- 2 tbsp olive oil
- 6 tbsp unsalted butter
- 12–15 fresh sage leaves
- 3 garlic cloves, lightly crushed
- ¼ cup dry white wine or chicken broth
- 1 tbsp fresh lemon juice
- Kosher salt and freshly ground black pepper
Tools: A large, heavy-bottomed skillet (cast iron works wonderfully), tongs, and a instant-read thermometer are helpful but not mandatory.
Notes: Using high-quality, fresh sage is key here—dried just won’t deliver the same aromatic punch. And don’t shy away from the butter; it’s the foundation of that rich, nutty sauce that makes this dish so memorable.
Nutrition (per serving)
| Calories: | 520 kcal |
| Protein: | 28 g |
| Fat: | 42 g |
| Carbs: | 2 g |
| Fiber: | 0.5 g |
Serves: 4 | Prep Time: 10 minutes | Cook Time: 25 minutes | Total Time: 35 minutes
Before You Start: Tips & Ingredient Notes
- Pat that chicken dry. Seriously, take an extra minute to thoroughly pat the chicken skin dry with paper towels. This is the secret to getting that beautifully crisp, golden skin instead of steaming it.
- Why bone-in, skin-on thighs? They stay incredibly juicy during cooking and render fat that flavors the entire dish. You can use breasts, but thighs are more forgiving and deliver richer results.
- Don’t use salted butter. Unsalted butter gives you full control over the seasoning. Since we’re browning the butter, unsalted also prevents it from burning too quickly.
- Have your wine or broth measured and ready. The deglazing step happens fast, and having the liquid nearby ensures you can scrape up the flavorful bits before they burn, creating an instant sauce.
How to Make Sage Butter Chicken
Step 1: Start by prepping your chicken. Pat the chicken thighs completely dry with paper towels—this is non-negotiable for crisp skin. Season both sides generously with salt and pepper. Let them sit at room temperature for about 10 minutes while you prep your other ingredients; this helps them cook more evenly.
Step 2: Heat the olive oil in your large skillet over medium-high heat until it shimmers. Carefully place the chicken thighs in the pan, skin-side down. You should hear a confident sizzle. Resist the urge to move them! Let them cook undisturbed for 6–8 minutes, until the skin is deep golden brown and crispy. Flip them over and cook for another 4–5 minutes on the other side. Transfer the chicken to a plate; it won’t be fully cooked through yet.
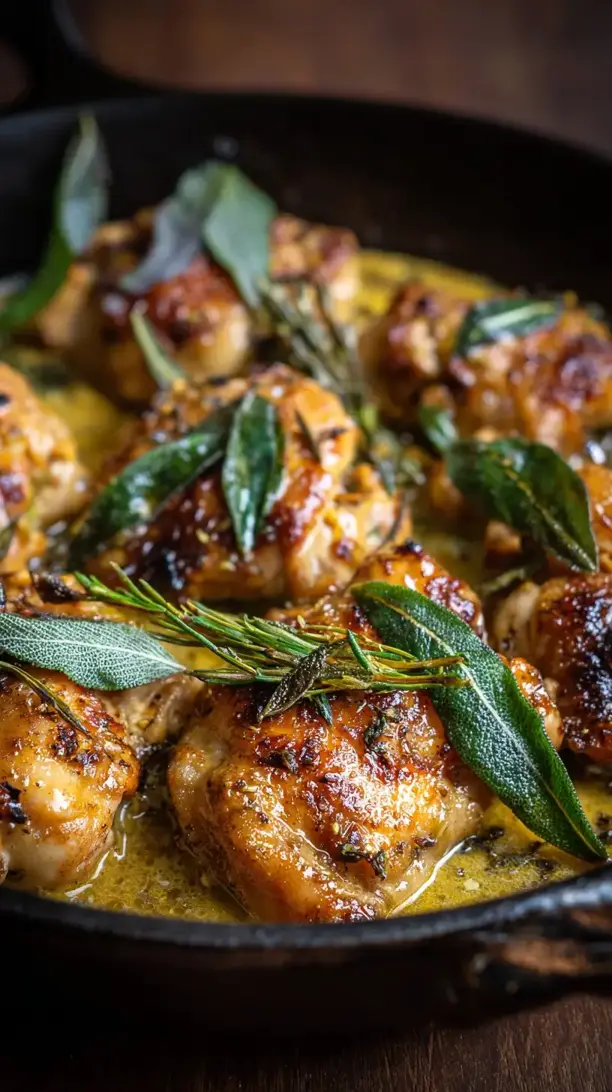
Step 3: Reduce the heat to medium and add the butter to the skillet. Once it melts, add the sage leaves and crushed garlic cloves. Swirl the pan frequently. You’ll notice the butter will foam, then the milk solids will begin to turn a toasty brown and smell nutty—this is brown butter, and it’s pure magic. Let the sage crisp up for about 1–2 minutes, then remove the garlic and set the crispy sage leaves aside for garnish.
Step 4: Return the chicken thighs to the skillet, skin-side up, along with any accumulated juices. Spoon the brown butter sauce over the chicken continuously for about 5–7 minutes. The chicken is done when an instant-read thermometer inserted into the thickest part (avoiding the bone) reads 165°F (74°C). The sauce should look glossy and deeply flavored.
Step 5: Transfer the chicken to a serving platter. Pour the white wine or broth into the hot skillet—it will bubble and steam vigorously. Use a wooden spoon to scrape all the browned bits from the bottom of the pan. Let the liquid reduce by half, which should take just a minute or two. Turn off the heat and stir in the fresh lemon juice.
Step 6: Pour the finished pan sauce over the plated chicken. Top with the reserved crispy sage leaves. Let it rest for a couple of minutes before serving so the juices redistribute, then dig in.
Storage & Freshness Guide
- Fridge: Store chicken and sauce in an airtight container for up to 3 days.
- Freezer: Freeze in a sealed container for up to 1 month. Thaw in fridge before reheating.
- Reviving: Reheat in a 300°F oven until warm; avoid microwaving to keep skin crisp.
Serving Suggestions
Complementary Dishes
- Creamy mashed potatoes — They are the ultimate vehicle for that incredible sage brown butter sauce, making sure you don’t waste a single drop.
- Buttered egg noodles or pappardelle pasta — A simple, starchy base that soaks up the sauce beautifully and turns this into a more substantial, comfort-food meal.
- Sautéed green beans with almonds — The crisp-tender texture and slight nuttiness provide a lovely contrast to the rich, savory chicken.
Drinks
- A crisp, unoaked Chardonnay — Its bright acidity and citrus notes cut through the richness of the butter and cleanse the palate beautifully between bites.
- A light Belgian-style ale — The slight fruity and spicy yeast character complements the herbal sage and stands up well to the savory depth of the dish.
Something Sweet
- Lemon sorbet — Its bright, clean, and refreshing citrus flavor is the perfect palate-cleanser after a rich, savory meal like this one.
- Pear and almond tart — The subtle sweetness and delicate spice of the pears harmonize wonderfully with the nutty brown butter notes from the main course.
Top Mistakes to Avoid
- Mistake: Crowding the pan. If you put too many chicken thighs in at once, they’ll steam instead of sear, and you’ll end up with pale, rubbery skin. Cook in batches if your skillet is small.
- Mistake> Burning the butter. Brown butter turns to black, bitter butter in a flash. Keep the heat at medium and watch it like a hawk once the sage goes in—you want a nutty aroma and amber color, not smoke.
- Mistake: Skipping the deglazing step. All those browned bits stuck to the pan are pure flavor. Not adding liquid to scrape them up means you’re leaving the best part of the sauce behind.
- Mistake: Cutting into the chicken immediately. Letting it rest for a few minutes allows the juices to settle back into the meat. If you cut right in, all those delicious juices will run out onto the plate.
Expert Tips
- Tip: Use a splatter screen. Frying sage and searing chicken can get a bit messy. A splatter screen keeps your stovetop clean while still allowing steam to escape so everything gets perfectly crisp.
- Tip> Make it a complete pan meal. After removing the chicken to make the sauce, you can toss in some halved baby potatoes or asparagus spears to cook in the residual heat and buttery goodness for a zero-waste side.
- Tip: Infuse the butter ahead of time. For an even deeper sage flavor, gently warm the butter with the sage leaves over low heat for 10 minutes, then let it cool. Strain out the leaves and use this infused butter for cooking.
- Tip: Finish with flaky salt. Just before serving, sprinkle a tiny bit of flaky sea salt over the crispy chicken skin. It adds a delightful textural crunch and a final pop of salinity that elevates every bite.
FAQs
Can I use dried sage instead of fresh?
I really don’t recommend it for this recipe. Fresh sage leaves are essential because they crisp up beautifully in the butter, providing both flavor and a lovely garnish. Dried sage has a much more concentrated, almost musty flavor that can become bitter when cooked this way, and it won’t give you those delightful crispy bits. If you’re in a pinch, use half the amount of dried sage added directly to the butter, but seek out fresh for the best result.
What can I use instead of white wine?
Absolutely! Chicken broth is a fantastic non-alcoholic substitute. You could also use a splash of vermouth, which has a nice herbal quality, or even a tablespoon of fresh lemon juice mixed with a few tablespoons of water. The goal is to have a little acidic liquid to deglaze the pan and lift all the flavorful fond. The sauce will still be delicious.
My butter keeps burning. What am I doing wrong?
This usually means your heat is too high. After searing the chicken, you must reduce the heat to medium before adding the butter. Butter has milk solids that brown quickly and can burn. If you notice it darkening too fast, don’t hesitate to take the pan off the heat for a moment to cool down. Using a light-colored skillet can also help you monitor the color change more easily.
Can I make this with boneless, skinless chicken breasts?
You can, but the method changes a bit. Boneless, skinless breasts cook much faster. You would sear them for 3-4 minutes per side, then remove them before making the sauce. The final result will be leaner and you’ll miss out on the incredible crispy skin, but it will still be tasty. Just be very careful not to overcook the breast meat, as it can dry out quickly.
How should I store and reheat leftovers?
Store any leftover chicken and sauce in an airtight container in the refrigerator for up to 3 days. To reheat, place the chicken on a baking sheet and warm it in a 300°F (150°C) oven until heated through. Avoid the microwave, as it will make the skin soggy. You can gently warm the sauce separately in a small saucepan, adding a tiny splash of water or broth if it has thickened too much.


Sage Butter Chicken
Make this easy Sage Butter Chicken recipe for a juicy, crispy-skinned meal with a rich, nutty pan sauce. Ready in 35 minutes. Get the recipe now!
Ingredients
For the Ingredients
-
4 bone-in, skin-on chicken thighs
-
2 tbsp olive oil
-
6 tbsp unsalted butter
-
12–15 fresh sage leaves
-
3 garlic cloves (lightly crushed)
-
¼ cup dry white wine or chicken broth
-
1 tbsp fresh lemon juice
-
Kosher salt and freshly ground black pepper
Instructions
-
Start by prepping your chicken. Pat the chicken thighs completely dry with paper towels—this is non-negotiable for crisp skin. Season both sides generously with salt and pepper. Let them sit at room temperature for about 10 minutes while you prep your other ingredients; this helps them cook more evenly.01
-
Heat the olive oil in your large skillet over medium-high heat until it shimmers. Carefully place the chicken thighs in the pan, skin-side down. You should hear a confident sizzle. Resist the urge to move them! Let them cook undisturbed for 6–8 minutes, until the skin is deep golden brown and crispy. Flip them over and cook for another 4–5 minutes on the other side. Transfer the chicken to a plate; it won’t be fully cooked through yet.02
-
Reduce the heat to medium and add the butter to the skillet. Once it melts, add the sage leaves and crushed garlic cloves. Swirl the pan frequently. You’ll notice the butter will foam, then the milk solids will begin to turn a toasty brown and smell nutty—this is brown butter, and it’s pure magic. Let the sage crisp up for about 1–2 minutes, then remove the garlic and set the crispy sage leaves aside for garnish.03
-
Return the chicken thighs to the skillet, skin-side up, along with any accumulated juices. Spoon the brown butter sauce over the chicken continuously for about 5–7 minutes. The chicken is done when an instant-read thermometer inserted into the thickest part (avoiding the bone) reads 165°F (74°C). The sauce should look glossy and deeply flavored.04
-
Transfer the chicken to a serving platter. Pour the white wine or broth into the hot skillet—it will bubble and steam vigorously. Use a wooden spoon to scrape all the browned bits from the bottom of the pan. Let the liquid reduce by half, which should take just a minute or two. Turn off the heat and stir in the fresh lemon juice.05
-
Pour the finished pan sauce over the plated chicken. Top with the reserved crispy sage leaves. Let it rest for a couple of minutes before serving so the juices redistribute, then dig in.06
Not what you're looking for?


