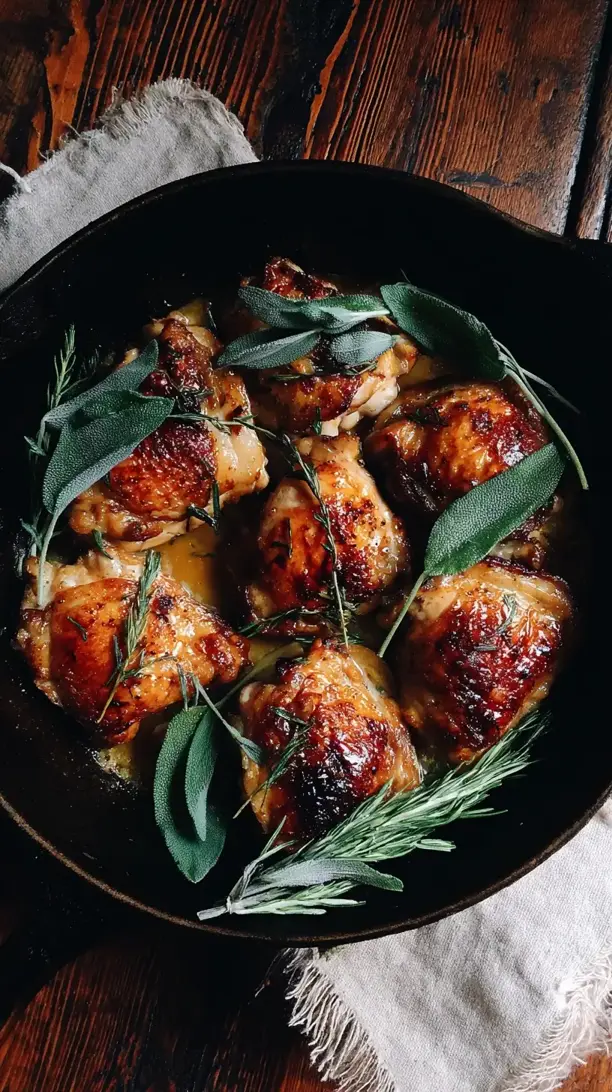
This Sage Chicken recipe delivers a comforting, elegant meal with minimal effort. The magic happens when fresh sage crisps in butter, creating a nutty aroma that clings to golden-brown chicken. It’s a one-pan wonder perfect for busy nights or weekend guests.
Love Sage Chicken? So do we! If you're into Chicken Recipes or curious about Breakfast & Brunch, you'll find plenty of inspiration below.


Why You’ll Love This Sage Chicken
- Aromatic & cozy: Sage and butter create a warm, earthy scent that fills your kitchen.
- Perfect texture: Juicy chicken with crisp skin and crispy sage leaves throughout.
- Fancy but easy: Restaurant-quality meal cooked in one pan for minimal cleanup.
- Versatile serving: Pairs with mashed potatoes, pasta, or salad for any craving.
Ingredients & Tools
- 4 bone-in, skin-on chicken thighs (about 600 g total)
- 20-25 fresh sage leaves
- 3 tbsp unsalted butter
- 2 tbsp olive oil
- 4 garlic cloves, lightly crushed
- ½ cup dry white wine (like Sauvignon Blanc)
- ½ cup chicken broth
- 1 lemon, juiced
- Kosher salt and freshly ground black pepper
Tools: Large oven-safe skillet (cast iron works beautifully), tongs, instant-read thermometer
Notes: Don’t skip the fresh sage—dried won’t provide the same aroma or crispy leaves. The white wine deglazes the pan, creating a simple but spectacular pan sauce.
Nutrition (per serving)
| Calories: | 420 kcal |
| Protein: | 28 g |
| Fat: | 32 g |
| Carbs: | 3 g |
| Fiber: | 1 g |
Serves: 4 | Prep Time: 10 minutes | Cook Time: 30 minutes | Total Time: 40 minutes
Before You Start: Tips & Ingredient Notes
- Pat that chicken completely dry. This might be the most important step for crispy skin. Any moisture on the surface will steam the skin instead of letting it get golden and crackly. Use paper towels and really press to absorb all moisture.
- Why bone-in, skin-on thighs? They’re more forgiving than breasts and stay incredibly juicy during cooking. The bones add flavor, and that skin? It’s your canvas for all that sage-infused goodness.
- Don’t be shy with the salt. Season the chicken generously on both sides, getting under the skin if you can. This ensures every bite is perfectly seasoned, not just the surface.
- Have all your ingredients measured and ready. This recipe moves quickly once you start cooking. Having your wine, broth, and lemon juice pre-measured means you can focus on building that beautiful sauce without anything burning.
How to Make Sage Chicken
Step 1: Start by prepping your chicken. Pat it completely dry with paper towels—this is non-negotiable for crispy skin. Season both sides generously with salt and pepper, really working it into the skin. Let it sit at room temperature for about 15 minutes while you gather your other ingredients. This brief rest helps the chicken cook more evenly.
Step 2: Heat your large oven-safe skillet over medium-high heat. Add the olive oil and 1 tablespoon of butter. When the butter melts and starts to foam, carefully add the chicken thighs skin-side down. You should hear a nice sizzle—that’s what you want! Resist the urge to move them around; let them cook undisturbed for 6-8 minutes until the skin is deeply golden brown and crisp.
Step 3: Flip the chicken using tongs. It should release easily from the pan if it’s properly browned. Cook for another 3-4 minutes on the second side until you get some color there too. You’re not cooking it through yet—just building that beautiful color and flavor. Remove the chicken to a plate temporarily.
Step 4: Reduce the heat to medium. Add the remaining 2 tablespoons of butter to the skillet. Once melted, add most of your sage leaves (reserve a few for garnish) and the crushed garlic cloves. The sage will sizzle and crisp up in about 30-45 seconds—watch closely as it can burn quickly. You’ll know it’s ready when the leaves are dark green and crisp, and your kitchen smells incredible.
Step 5: Remove the crispy sage leaves with a slotted spoon and set them aside on a paper towel. Leave the garlic in the pan—it still has more flavor to give. Now return the chicken to the skillet, skin-side up this time. Spoon some of that sage-infused butter over the top of each piece.
Step 6: Transfer the entire skillet to a preheated 400°F (200°C) oven. Roast for 15-18 minutes, or until the chicken reaches an internal temperature of 165°F (74°C) when tested with an instant-read thermometer inserted into the thickest part without touching bone.
Step 7: Carefully remove the skillet from the oven (remember that handle is hot!). Transfer the chicken to a clean plate to rest. Place the skillet back on the stove over medium heat. Add the white wine—it will sizzle and steam dramatically. Use a wooden spoon to scrape up all those browned bits from the bottom of the pan. Let the wine reduce by about half.
Step 8: Add the chicken broth and lemon juice. Let the sauce simmer and reduce for 3-4 minutes until it slightly thickens and coats the back of a spoon. Taste and adjust seasoning with more salt or pepper if needed. Remove the garlic cloves and discard them—they’ve given their all.
Step 9: Return the chicken to the skillet, along with any accumulated juices from the plate. Spoon the sauce over the top and scatter those reserved crispy sage leaves over everything. Serve immediately, making sure everyone gets plenty of that incredible pan sauce.
Storage & Freshness Guide
- Fridge: Store leftovers in an airtight container for up to 3 days.
- Freezer: Freeze cooked chicken (without crispy sage) for up to 2 months in a freezer-safe bag.
- Reviving: Reheat gently in a skillet with a splash of broth to maintain moisture.
Serving Suggestions
Complementary Dishes
- Creamy mashed potatoes — The ultimate comfort pairing that soaks up every drop of that lemony sage sauce beautifully.
- Garlic sautéed spinach — A quick, vibrant green that wilts down in minutes and complements the earthy sage notes perfectly.
- Buttery egg noodles — Simple, comforting, and the ideal canvas for that incredible pan sauce.
Drinks
- Crisp Sauvignon Blanc — Its citrusy notes mirror the lemon in the sauce and cut through the richness of the dish beautifully.
- Light-bodied Pinot Noir — A red that won’t overpower the herbs, with enough acidity to complement rather than compete.
- Sparkling water with lemon — The bubbles cleanse the palate between bites of that rich, herby chicken.
Something Sweet
- Lemon sorbet — Bright, clean, and refreshing—the perfect palate cleanser after a rich, savory meal.
- Almond biscotti — Crunchy, not-too-sweet cookies that pair wonderfully with coffee or a dessert wine.
- Vanilla panna cotta — Silky, cool, and simple—a dessert that feels elegant without requiring much work after your main course.
Top Mistakes to Avoid
- Moving the chicken too soon. When you first place the chicken in the pan, let it sear undisturbed. If you try to move it too early, the skin will tear and stick to the pan instead of developing that perfect crispy crust.
- Burning the sage. Sage leaves can go from perfectly crisp to unpleasantly bitter in seconds. Watch them closely and remove them as soon as they darken and become crisp.
- Skipping the pan sauce. Those browned bits at the bottom of the pan are pure flavor gold! Deglazing with wine and broth creates a sauce that ties the whole dish together—don’t waste that incredible foundation.
- Overcooking the chicken. Using an instant-read thermometer takes the guesswork out. Chicken thighs are forgiving, but they can still dry out if left in the oven too long.
Expert Tips
- Tip: For extra crispy skin, you can lightly dust the skin side with a tiny bit of cornstarch or baking powder before seasoning. This helps draw out moisture and promotes browning—just a quarter teaspoon per thigh makes a noticeable difference.
- Tip: If you don’t have an oven-safe skillet, you can transfer the chicken and sage butter to a baking dish before going into the oven. The results will be similar, though you might lose some of those crispy pan bits for your sauce.
- Tip: Let the chicken rest for at least 5 minutes after cooking. This allows the juices to redistribute throughout the meat, ensuring every bite is moist and flavorful rather than running out onto the plate.
- Tip: For a creamier sauce, swirl in another tablespoon of cold butter at the very end after you’ve removed the pan from heat. This emulsifies the sauce, giving it a beautiful glossy texture and richer flavor.
FAQs
Can I use chicken breasts instead of thighs?
You absolutely can, but you’ll need to adjust the cooking time. Boneless, skinless breasts will cook much faster—sear them for 3-4 minutes per side and they might not even need the oven time. Just be careful not to overcook them, as breasts dry out more easily than thighs. If using bone-in breasts, follow the same timing as thighs but check the temperature earlier since sizes can vary.
What if I don’t have white wine?
No worries! You can substitute with additional chicken broth mixed with a tablespoon of white wine vinegar or lemon juice. The acidity is what really matters here to balance the richness. Apple cider vinegar works in a pinch too—just use a bit less as it has a stronger flavor.
Can I make this ahead of time?
You can prep components ahead—crisp the sage leaves and store them in an airtight container, and season the chicken the night before. But for the best texture, cook it fresh. The crispy skin won’t hold up well to reheating, though the flavors will still be delicious if you have leftovers.
Why are my sage leaves turning brown and bitter?
This means your heat was too high or you cooked them too long. Sage contains oils that can become bitter when overheated. Next time, keep the heat at medium and remove them the moment they become crisp—usually under a minute. They continue to cook a bit after removal, so err on the side of underdone.
Can I use dried sage instead?
While fresh is definitely preferred for this recipe, in a pinch you can use 1-2 teaspoons of dried rubbed sage. Add it directly to the butter after removing the chicken, letting it toast for just 20 seconds before proceeding. You won’t get those crispy leaves, but the flavor will still be there.


Sage Chicken
Make this easy Sage Chicken recipe with crispy skin and a buttery pan sauce. A one-pan meal perfect for any night. Get the simple recipe now!
Ingredients
For the Ingredients
-
4 bone-in, skin-on chicken thighs (about 600 g total)
-
20-25 fresh sage leaves
-
3 tbsp unsalted butter
-
2 tbsp olive oil
-
4 garlic cloves (lightly crushed)
-
½ cup dry white wine (like Sauvignon Blanc)
-
½ cup chicken broth
-
1 lemon (juiced)
-
Kosher salt and freshly ground black pepper
Instructions
-
Start by prepping your chicken. Pat it completely dry with paper towels—this is non-negotiable for crispy skin. Season both sides generously with salt and pepper, really working it into the skin. Let it sit at room temperature for about 15 minutes while you gather your other ingredients. This brief rest helps the chicken cook more evenly.01
-
Heat your large oven-safe skillet over medium-high heat. Add the olive oil and 1 tablespoon of butter. When the butter melts and starts to foam, carefully add the chicken thighs skin-side down. You should hear a nice sizzle—that’s what you want! Resist the urge to move them around; let them cook undisturbed for 6-8 minutes until the skin is deeply golden brown and crisp.02
-
Flip the chicken using tongs. It should release easily from the pan if it’s properly browned. Cook for another 3-4 minutes on the second side until you get some color there too. You’re not cooking it through yet—just building that beautiful color and flavor. Remove the chicken to a plate temporarily.03
-
Reduce the heat to medium. Add the remaining 2 tablespoons of butter to the skillet. Once melted, add most of your sage leaves (reserve a few for garnish) and the crushed garlic cloves. The sage will sizzle and crisp up in about 30-45 seconds—watch closely as it can burn quickly. You’ll know it’s ready when the leaves are dark green and crisp, and your kitchen smells incredible.04
-
Remove the crispy sage leaves with a slotted spoon and set them aside on a paper towel. Leave the garlic in the pan—it still has more flavor to give. Now return the chicken to the skillet, skin-side up this time. Spoon some of that sage-infused butter over the top of each piece.05
-
Transfer the entire skillet to a preheated 400°F (200°C) oven. Roast for 15-18 minutes, or until the chicken reaches an internal temperature of 165°F (74°C) when tested with an instant-read thermometer inserted into the thickest part without touching bone.06
-
Carefully remove the skillet from the oven (remember that handle is hot!). Transfer the chicken to a clean plate to rest. Place the skillet back on the stove over medium heat. Add the white wine—it will sizzle and steam dramatically. Use a wooden spoon to scrape up all those browned bits from the bottom of the pan. Let the wine reduce by about half.07
-
Add the chicken broth and lemon juice. Let the sauce simmer and reduce for 3-4 minutes until it slightly thickens and coats the back of a spoon. Taste and adjust seasoning with more salt or pepper if needed. Remove the garlic cloves and discard them—they’ve given their all.08
-
Return the chicken to the skillet, along with any accumulated juices from the plate. Spoon the sauce over the top and scatter those reserved crispy sage leaves over everything. Serve immediately, making sure everyone gets plenty of that incredible pan sauce.09
Not what you're looking for?


