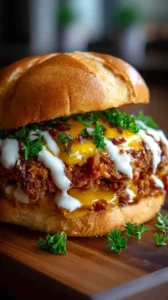
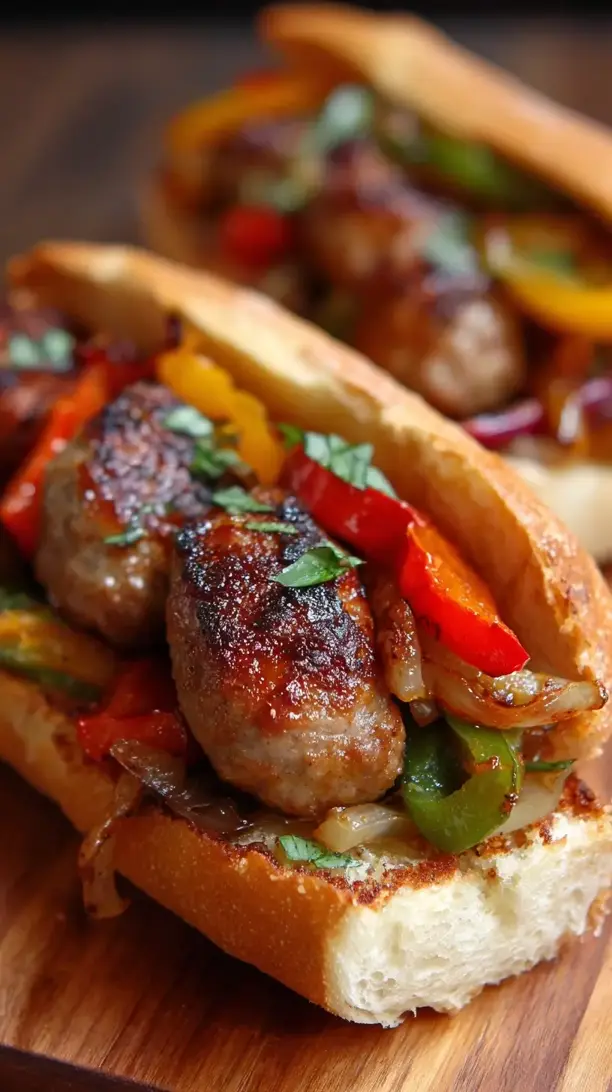
These Sausage and Peppers Sandwiches are a classic for a reason—juicy sausages mingle with sweet bell peppers and onions, all simmered into a flavorful, one-pan filling. It’s a comforting, no-fuss meal perfect for busy weeknights or weekend lunches. The aroma alone is pure comfort.
Love Sausage and Peppers Sandwiches? So do we! If you're into Dinner Ideas or curious about Dessert Recipes, you'll find plenty of inspiration below.


Why You’ll Love This Sausage and Peppers Sandwiches
- Hands-off flavor: Slow simmering melds the savory sausages, sweet peppers, and tender onions.
- One-pan wonder: Easy cleanup with maximum flavor from browning and deglazing.
- Endlessly adaptable: Use sweet or hot sausage, any bell peppers, and add your favorite extras.
- Perfect make-ahead: Tastes even better the next day, ideal for meal prep or crowds.
Ingredients & Tools
- 4 large Italian sausage links (sweet, hot, or a mix)
- 2 large bell peppers (I like one red and one yellow for color)
- 1 large yellow onion
- 3 cloves garlic, minced
- 2 tbsp olive oil
- 1/2 tsp dried oregano
- 1/4 tsp red pepper flakes (optional, for heat)
- 1/2 cup chicken or vegetable broth
- Salt and black pepper to taste
- 4 sturdy hoagie or sub rolls
Tools: A large, heavy-bottomed skillet or Dutch oven with a lid.
Notes: The quality of your sausage really is the star here, so choose one you genuinely enjoy. And don’t skip the broth—it helps to deglaze the pan, lifting all those flavorful browned bits and creating a simple, incredible sauce that brings everything together.
Nutrition (per serving)
| Calories: | 580 kcal |
| Protein: | 24 g |
| Fat: | 38 g |
| Carbs: | 35 g |
| Fiber: | 4 g |
Serves: 4 | Prep Time: 15 minutes | Cook Time: 30 minutes | Total Time: 45 minutes
Before You Start: Tips & Ingredient Notes
- Prick or not to prick? I don’t recommend pricking the sausage casings before cooking. Keeping them intact helps the sausages retain their flavorful juices and fat, which then renders out into the pan and becomes the cooking medium for your peppers and onions, infusing them with incredible taste.
- Slice your veggies uniformly. Try to cut your peppers and onions into strips of a similar thickness. This isn’t just for looks—it ensures they all cook at the same rate, so you don’t end up with some crunchy bits and some mushy ones. You want that perfect, tender-but-not-soggy texture throughout.
- Choose your rolls wisely. A soft but sturdy roll is key. You need something that can hold up to the juicy filling without disintegrating in your hands. A classic Italian sub roll or a hoagie bun works perfectly—they’re soft enough to bite into easily but have enough structure to contain the delicious mess.
- Don’t rush the browning. Giving the sausages a good, deep brown color on the outside is your first step to building a foundation of flavor. That fond—the little browned bits stuck to the pan—is pure gold. It’s where a lot of the deep, savory taste comes from, so be patient and let it happen.
How to Make Sausage and Peppers Sandwiches
Step 1: Brown the Sausages. Start by heating one tablespoon of the olive oil in your large skillet over medium heat. Once the oil is shimmering, carefully add the sausages. You’ll want to cook them for about 4-5 minutes per side, turning them occasionally, until they’re nicely browned on all sides. Don’t worry about cooking them through completely at this stage—they’ll finish cooking later. The goal here is to develop that beautiful, caramelized color and render out some of the fat. Once browned, transfer the sausages to a clean plate. You should see lovely golden bits stuck to the bottom of the pan; that’s your flavor base.
Step 2: Sauté the Aromatics. Add the remaining tablespoon of olive oil to the same skillet. Toss in your sliced onions and a pinch of salt. The salt will help draw out their moisture and speed up the softening process. Cook, stirring occasionally, for about 5-6 minutes until the onions have started to turn translucent and soften. You’ll notice they’ll take on a slightly golden hue around the edges. Now, add the minced garlic, dried oregano, and red pepper flakes (if using). Stir constantly for just 30-60 seconds—until the garlic becomes incredibly fragrant. Be careful not to burn it!
Step 3: Cook Down the Peppers. Add all of your sliced bell peppers to the skillet. Give everything a good stir to coat the peppers in the oil and onion mixture. Cook for about 8-10 minutes, stirring every now and then. You’re looking for the peppers to soften significantly and wilt, losing their raw crunch. They’ll also brighten in color initially before deepening slightly. This step is all about developing their natural sweetness.
Step 4: Deglaze and Simmer. Pour the chicken or vegetable broth into the skillet. Use your spoon or spatula to scrape up all those browned bits from the bottom of the pan—this is called deglazing, and it’s a crucial step for building a flavorful sauce. Once the broth is bubbling, nestle the browned sausages back into the pan, right on top of the bed of peppers and onions. Reduce the heat to low, cover the skillet with a lid, and let it all simmer gently for 12-15 minutes. This allows the sausages to cook through completely and the flavors to meld beautifully.
Step 5: Reduce the Sauce. After simmering, uncover the skillet. If there’s still a fair amount of liquid, turn the heat up to medium and let it cook uncovered for another 3-5 minutes, allowing the sauce to reduce and thicken slightly. You’re not looking for a thick gravy, but you also don’t want a soupy filling for your sandwich. The mixture should look glossy and the peppers should be very tender. Give it a taste and season with more salt and black pepper as needed.
Step 6: Assemble the Sandwiches. While the filling is finishing up, you can lightly toast your hoagie rolls if you like—it adds a lovely texture and helps prevent sogginess. To assemble, place one sausage link into each roll, then generously pile the pepper and onion mixture on top, spooning over any remaining juices from the pan. Serve immediately while everything is hot and juicy. Get those napkins ready!
Storage & Freshness Guide
- Fridge: Store filling separately from rolls in airtight containers for up to 4 days.
- Freezer: Freeze filling for up to 3 months; thaw in fridge before reheating.
- Reviving: Reheat gently in a skillet with a splash of broth or water to prevent drying.
Serving Suggestions
Complementary Dishes
- A simple arugula salad with lemon vinaigrette — The peppery, bitter notes of the arugula and the sharp acidity of the lemon provide a fantastic, palate-cleansing contrast to the rich, savory sandwich.
- Oven-baked zucchini fries — They give you that satisfying “fry” experience with a lighter touch, and their mild flavor doesn’t compete with the main event.
- Garlic sautéed broccoli rabe — This brings a pleasant bitterness and a bit of green to the plate, and its robust flavor stands up beautifully to the hearty sausage.
Drinks
- A crisp, cold lager or pilsner — The carbonation and clean, slightly bitter finish of the beer cut through the richness of the sausage and peppers perfectly, making each bite taste fresh and new.
- Chilled Pinot Grigio — Its bright acidity and citrus notes act in a similar way to the beer, cleansing the palate and complementing the sweet peppers without overpowering them.
- Sparkling water with a lemon wedge — A non-alcoholic option that still provides the effervescence and acidity needed to balance the meal and keep things feeling light.
Something Sweet
- Lemon sorbet — It’s incredibly refreshing and acts as a perfect “reset” after a savory, hearty meal. The sharp, clean citrus flavor is a wonderful way to finish.
- Dark chocolate-dipped strawberries — The bittersweet chocolate and sweet-tart fruit feel indulgent but not overly heavy, providing a simple, elegant end note.
- A small piece of ricotta cheesecake — It’s lighter than a New York-style cheesecake, with a subtle tang that feels like a natural, comforting progression from the Italian-inspired main course.
Top Mistakes to Avoid
- Overcrowding the pan when browning the sausages. If you cram them all in, they’ll steam instead of sear, and you’ll miss out on that crucial caramelization. If necessary, cook them in two batches to ensure each one gets proper contact with the hot surface.
- Adding the garlic too early. Garlic burns in a flash and turns bitter, which can ruin the entire dish. Always add it towards the end of cooking your onions, just for that brief, fragrant 30-second stir before you add the peppers.
- Cutting the peppers and onions too thick. If they’re too chunky, they won’t soften and sweeten properly in the given cooking time. You’ll be left with a crunchy, raw-tasting texture that clashes with the tender sausage. Aim for uniform, 1/4-inch strips.
- Skipping the deglazing step. That layer of browned bits on the pan is pure, concentrated flavor. If you don’t add the liquid and scrape it up, you’re literally washing flavor down the drain. It only takes a moment but makes a world of difference.
Expert Tips
- Tip: Let the sausages come to room temperature. Taking them out of the fridge 15-20 minutes before cooking helps them cook more evenly. A cold sausage straight from the fridge can end up with a overcooked outside and a cool center.
- Tip: Add a splash of balsamic vinegar. When you add the broth, a tablespoon of good balsamic vinegar can work wonders. It adds a subtle, sweet acidity that enhances the sweetness of the peppers and gives the whole dish a more complex, rounded flavor profile.
- Tip: Use a mix of sausage types. Try using two sweet and two hot Italian sausages. This gives you the best of both worlds—a rich, savory base with little pockets of spicy heat that keep every bite interesting.
- Tip: Toast your rolls with a little garlic. Split your rolls and rub the cut sides with a halved garlic clove before toasting them. It’s a tiny step that infuses the bread with a wonderful, aromatic garlic flavor that elevates the entire sandwich.
- Tip: Finish with fresh herbs. Right before serving, sprinkle the filling with a handful of freshly chopped parsley or basil. The bright, fresh flavor of the herbs provides a lovely contrast to the deep, savory, cooked flavors of the sausage and peppers.
FAQs
Can I make this with chicken or turkey sausage?
Absolutely! The method works exactly the same. Just be aware that leaner sausages like chicken or turkey may not render out as much fat, so you might need to add an extra drizzle of oil to the pan when cooking the peppers and onions. Also, keep a close eye on the cooking time as they can sometimes cook a bit faster than pork sausages.
How can I make this spicier?
You have a few great options here. First, use all hot Italian sausage instead of sweet. Second, don’t be shy with the red pepper flakes—you can easily double the amount. For a real kick, add a finely chopped fresh chili pepper (like a jalapeño or serrano) along with the bell peppers. The seeds will add the most heat, so include them if you’re feeling brave.
What’s the best way to store and reheat leftovers?
Store the sausage and pepper filling separately from the rolls in airtight containers in the fridge for up to 4 days. To reheat, gently warm the filling in a skillet over medium-low heat with a tiny splash of water or broth to keep it from drying out. I don’t recommend freezing the assembled sandwiches, but the filling freezes quite well for up to 3 months.
Can I cook this in a slow cooker?
You can, though you’ll lose the initial browning step which adds so much flavor. If you do, I highly recommend browning the sausages in a skillet first, then transferring them and all the other ingredients (except the rolls, of course) to the slow cooker. Cook on low for 5-6 hours. The texture will be very soft and stew-like, but it will still be delicious.
My filling is too watery. How can I fix it?
This usually happens if the peppers release more liquid than expected or if the sauce doesn’t reduce enough. The easiest fix is to remove the sausages, turn the heat up to medium-high, and let the pepper mixture bubble away uncovered for a few more minutes until the excess liquid evaporates. You can also mix a teaspoon of tomato paste into the simmering liquid to help it thicken up.


Sausage And Peppers Sandwiches
Make classic Sausage and Peppers Sandwiches with juicy sausage, sweet peppers & onions. A one-pan wonder perfect for weeknights. Get the easy recipe now!
Ingredients
For the Ingredients & Tools
-
4 large Italian sausage links (sweet, hot, or a mix)
-
2 large bell peppers (I like one red and one yellow for color)
-
1 large yellow onion
-
3 cloves garlic (minced)
-
2 tbsp olive oil
-
1/2 tsp dried oregano
-
1/4 tsp red pepper flakes (optional, for heat)
-
1/2 cup chicken or vegetable broth
-
Salt and black pepper (to taste)
-
4 sturdy hoagie or sub rolls
Instructions
-
Brown the Sausages. Start by heating one tablespoon of the olive oil in your large skillet over medium heat. Once the oil is shimmering, carefully add the sausages. You’ll want to cook them for about 4-5 minutes per side, turning them occasionally, until they’re nicely browned on all sides. Don’t worry about cooking them through completely at this stage—they’ll finish cooking later. The goal here is to develop that beautiful, caramelized color and render out some of the fat. Once browned, transfer the sausages to a clean plate. You should see lovely golden bits stuck to the bottom of the pan; that’s your flavor base.01
-
Sauté the Aromatics. Add the remaining tablespoon of olive oil to the same skillet. Toss in your sliced onions and a pinch of salt. The salt will help draw out their moisture and speed up the softening process. Cook, stirring occasionally, for about 5-6 minutes until the onions have started to turn translucent and soften. You’ll notice they’ll take on a slightly golden hue around the edges. Now, add the minced garlic, dried oregano, and red pepper flakes (if using). Stir constantly for just 30-60 seconds—until the garlic becomes incredibly fragrant. Be careful not to burn it!02
-
Cook Down the Peppers. Add all of your sliced bell peppers to the skillet. Give everything a good stir to coat the peppers in the oil and onion mixture. Cook for about 8-10 minutes, stirring every now and then. You’re looking for the peppers to soften significantly and wilt, losing their raw crunch. They’ll also brighten in color initially before deepening slightly. This step is all about developing their natural sweetness.03
-
Deglaze and Simmer. Pour the chicken or vegetable broth into the skillet. Use your spoon or spatula to scrape up all those browned bits from the bottom of the pan—this is called deglazing, and it’s a crucial step for building a flavorful sauce. Once the broth is bubbling, nestle the browned sausages back into the pan, right on top of the bed of peppers and onions. Reduce the heat to low, cover the skillet with a lid, and let it all simmer gently for 12-15 minutes. This allows the sausages to cook through completely and the flavors to meld beautifully.04
-
Reduce the Sauce. After simmering, uncover the skillet. If there’s still a fair amount of liquid, turn the heat up to medium and let it cook uncovered for another 3-5 minutes, allowing the sauce to reduce and thicken slightly. You’re not looking for a thick gravy, but you also don’t want a soupy filling for your sandwich. The mixture should look glossy and the peppers should be very tender. Give it a taste and season with more salt and black pepper as needed.05
-
Assemble the Sandwiches. While the filling is finishing up, you can lightly toast your hoagie rolls if you like—it adds a lovely texture and helps prevent sogginess. To assemble, place one sausage link into each roll, then generously pile the pepper and onion mixture on top, spooning over any remaining juices from the pan. Serve immediately while everything is hot and juicy. Get those napkins ready!06
Not what you're looking for?


