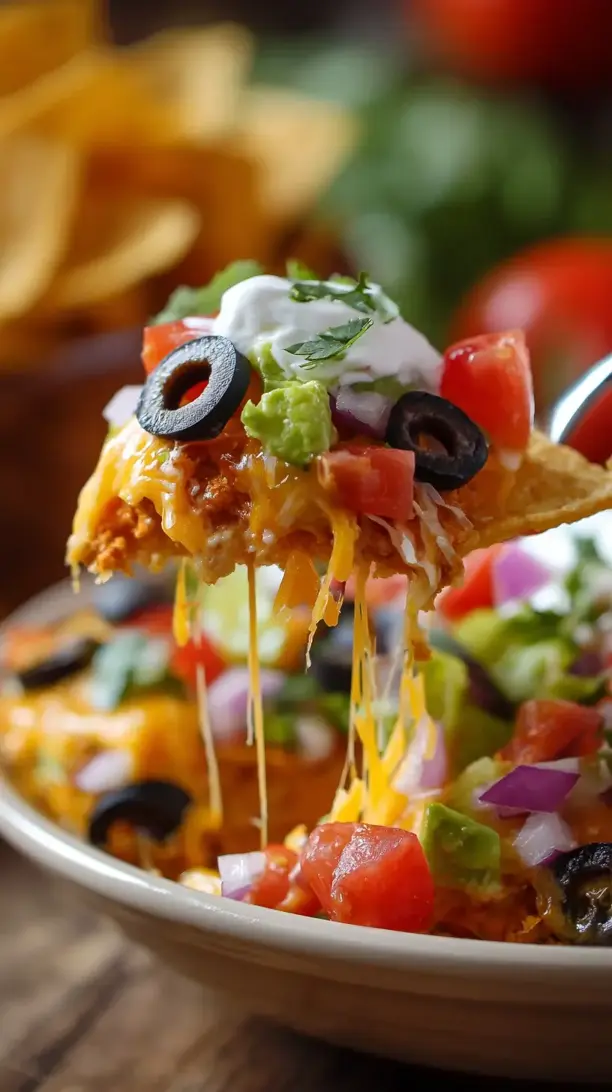
Seven Layer Dip is a vibrant, shareable masterpiece perfect for game days and parties. This colorful tower of textures and flavors delivers creamy, zesty, and fresh layers in every scoop. It’s incredibly simple to assemble and always a crowd favorite.
Craving a delicious Seven Layer Dip? You've come to the right spot! From Snacks favorites to amazing Appetizer Recipes recipes, there's something here for everyone.


Why You’ll Love This Seven Layer Dip
- Crowd-pleasing: Disappears fast at any gathering.
- Flavor journey: Cool, creamy, crunchy, and zesty in one bite.
- Easy assembly: No cooking, just layering.
- Customizable: Adapt the layers to your taste.
Ingredients & Tools
- 450 g refried beans
- 1 packet taco seasoning mix
- 475 ml sour cream
- 475 ml guacamole (store-bought or homemade)
- 475 ml chunky salsa, drained
- 225 g shredded cheddar cheese
- 115 g sliced black olives
- 4 green onions, thinly sliced
- 1 large tomato, diced
Tools: A 9×13-inch baking dish or similar serving platter, a few mixing bowls, a spatula, and a colander for draining the salsa.
Notes: The quality of your ingredients really shines here, so don’t be shy about using your favorite brand of salsa or taking the extra few minutes to make a quick, fresh guacamole.
Nutrition (per serving)
| Calories: | 210 kcal |
| Protein: | 8 g |
| Fat: | 14 g |
| Carbs: | 15 g |
| Fiber: | 4 g |
Serves: 10-12 | Prep Time: 25 minutes | Chill Time: 1 hour | Total Time: 1 hour 25 minutes
Before You Start: Tips & Ingredient Notes
- Drain your salsa well. This is arguably the most important step for structural integrity. Excess liquid will make your dip soupy and cause the layers to slide. Let it sit in a fine-mesh strainer for at least 10 minutes.
- Use full-fat dairy for the best texture. Full-fat sour cream and cheese hold up better and provide a richer, creamier mouthfeel that’s essential for a luxurious dip.
- Don’t skip the chilling time. I know it’s tempting to dig in right away, but letting the dip chill for at least an hour allows the flavors to meld beautifully and firms everything up for cleaner scoops.
- Consider your bean texture. If your refried beans are very thick, you can thin them with a tablespoon or two of water to make them easier to spread without tearing the layer beneath.
How to Make Seven Layer Dip
Step 1: In a medium bowl, combine the refried beans and the taco seasoning mix. Stir until they are completely and evenly incorporated. You’ll notice the beans take on a deeper, spicier aroma right away. This seasoned bean layer is your flavor foundation, so make sure it’s mixed well.
Step 2: Grab your 9×13-inch dish. Spread the bean mixture evenly across the bottom, using a spatula to create a smooth, compact layer. Try to get it as level as possible—this will help all the subsequent layers sit nicely and look gorgeous when served.
Step 3: Now, gently spread the sour cream over the bean layer. The trick here is to be patient. Drop dollops of sour cream across the surface first, then gently spread them together. This technique prevents you from pulling up the bean layer and creating a messy swirl.
Step 4: Carefully spread your guacamole over the sour cream. Again, use the dollop-and-spread method for a clean, distinct layer. You want a nice, bright green stripe running through your dip. If you’re making guacamole fresh, a squeeze of lime juice will help it stay vibrant.
Step 5: Remember that well-drained salsa? Now’s its time to shine. Spoon it over the guacamole and spread it into an even layer. You should see a beautiful contrast between the red salsa and the green guacamole. The dip is really starting to take shape now.
Step 6: Sprinkle the shredded cheddar cheese generously over the salsa. Cover the entire surface for a fantastic cheesy blanket. This layer adds a sharp, salty flavor and a wonderful textural contrast when you take a bite.
Step 7: It’s time for the confetti! Scatter the sliced black olives, followed by the diced tomato, and finally the sliced green onions. Distribute them evenly for color and flavor in every single scoop. The aroma of fresh vegetables is just incredible at this point.
Step 8: Your masterpiece is assembled! Now, cover the dish tightly with plastic wrap and refrigerate for at least one hour. This crucial resting time allows the layers to set and the flavors to become best friends. Trust me, it’s worth the wait.
Storage & Freshness Guide
- Fridge: Cover tightly and refrigerate for up to 2–3 days.
- Freezer: Not recommended, as layers will become watery upon thawing.
- Reviving: Stir gently if layers have mingled; top with fresh tomatoes before serving.
Serving Suggestions
Complementary Dishes
- Sheet Pan Chicken Fajitas — The smoky, savory flavors of the fajitas are a perfect protein-packed partner for the cool, creamy dip.
- Spicy Mexican Street Corn (Esquites) — The charred, cheesy corn provides a warm, textural counterpoint that elevates the entire spread.
- A simple Cilantro-Lime Rice — Its fresh, zesty notes help balance the richness of the dip and make for a more complete meal.
Drinks
- A classic Margarita — The tangy lime and tequila cut through the dip’s richness beautifully, creating a refreshing palate cleanser.
- An ice-cold Mexican Lager — Its crisp, light body is the ultimate thirst-quencher alongside the savory, spiced layers.
- Sparkling Water with Lime — A non-alcoholic option that provides effervescence and a citrusy zing to reset your taste buds between bites.
Something Sweet
- Churros with Chocolate Sauce — The warm, cinnamon-sugary crunch is a heavenly contrast to the cool, savory dip you just enjoyed.
- Tres Leches Cake — Its milky, moist sweetness is a classic and comforting way to end a fiesta-inspired meal.
- Mango Sorbet — A light, fruity, and refreshing dessert that cleanses the palate without feeling too heavy.
Top Mistakes to Avoid
- Mistake: Not draining the salsa. This is the number one reason for a watery, sloppy dip. The excess liquid will seep into the other layers, making the entire structure unstable and difficult to scoop.
- Mistake: Spreading layers too aggressively. If you try to spread a new layer like you’re frosting a cake, you’ll mix the layers beneath it. Always use a gentle hand and the dollop method for clean, defined strata.
- Mistake: Skipping the chill time. Serving it immediately means the flavors haven’t had a chance to meld, and the dip will be too soft. The chilling time is non-negotiable for the perfect texture and taste.
- Mistake: Using watery fresh tomatoes in the topping. If you’re using fresh tomatoes, remove the seeds and gelatinous pulp before dicing. This simple step prevents a puddle of tomato water from forming on top of your beautiful dip.
Expert Tips
- Tip: Create a “flavor barrier” with the cheese. For an extra-pro move, sprinkle a light layer of cheese directly onto the sour cream before adding the guacamole. This creates a fat barrier that helps prevent the guacamole from turning the sour cream green.
- Tip: Make it a day ahead. This dip is a fantastic make-ahead appetizer. Assemble it the night before, cover tightly, and refrigerate. The flavors will be even more developed and incredible the next day.
- Tip: Customize your layers. Feel free to get creative! A layer of seasoned ground beef or shredded chicken can make it a heartier meal. A can of drained and rinsed black beans or corn can add more texture and color.
- Tip: Serve with a variety of dippers. Don’t just stick to tortilla chips! Offer vegetable crudités like bell pepper strips and jicama sticks, or even sturdy pita chips for a different kind of crunch.
FAQs
Can I make Seven Layer Dip ahead of time?
Absolutely, and I highly recommend it! You can assemble the entire dip, cover it tightly with plastic wrap, and refrigerate it for up to 24 hours before serving. The flavors have more time to meld, making it even more delicious. Just add the fresh tomato topping right before you serve to keep it from getting soggy.
How long does leftover dip last in the fridge?
Leftovers will keep well for about 2-3 days in an airtight container in the refrigerator. The texture of the guacamole layer may darken a bit and soften, but it will still be perfectly safe and tasty to eat. Give it a quick stir if the layers have mingled.
My guacamole always turns brown. How can I prevent this?
The key is limiting its exposure to air. Make sure your guacamole layer is completely sealed by the layers above and below it. You can also press a piece of plastic wrap directly onto its surface before adding the next layer. Using plenty of lime juice in your guacamole also helps slow down oxidation.
Can I use Greek yogurt instead of sour cream?
You can, but be aware that Greek yogurt has a tangier flavor and a slightly different texture. For the best classic flavor and texture, sour cream is ideal. If you do substitute, use full-fat Greek yogurt for the closest consistency.
Is there a way to make this dip lighter?
Sure! You can use low-fat refried beans, light sour cream, and reduced-fat cheese. For the guacamole, you can even blend in some plain Greek yogurt to make it creamier with less avocado. Just know that the texture and richness will be slightly different from the original.


Seven Layer Dip
Make the perfect Seven Layer Dip for your next party! This easy, no-cook recipe is a guaranteed crowd-pleaser. Get the step-by-step guide now!
Ingredients
For the Ingredients
-
450 g refried beans
-
1 packet taco seasoning mix
-
475 ml sour cream
-
475 ml guacamole (store-bought or homemade)
-
475 ml chunky salsa (drained)
-
225 g shredded cheddar cheese
-
115 g sliced black olives
-
4 green onions (thinly sliced)
-
1 large tomato (diced)
Instructions
-
In a medium bowl, combine the refried beans and the taco seasoning mix. Stir until they are completely and evenly incorporated.01
-
Grab your 9x13-inch dish. Spread the bean mixture evenly across the bottom, using a spatula to create a smooth, compact layer.02
-
Now, gently spread the sour cream over the bean layer. The trick here is to be patient. Drop dollops of sour cream across the surface first, then gently spread them together.03
-
Carefully spread your guacamole over the sour cream. Again, use the dollop-and-spread method for a clean, distinct layer.04
-
Remember that well-drained salsa? Now’s its time to shine. Spoon it over the guacamole and spread it into an even layer.05
-
Sprinkle the shredded cheddar cheese generously over the salsa. Cover the entire surface for a fantastic cheesy blanket.06
-
It’s time for the confetti! Scatter the sliced black olives, followed by the diced tomato, and finally the sliced green onions.07
-
Your masterpiece is assembled! Now, cover the dish tightly with plastic wrap and refrigerate for at least one hour.08
Not what you're looking for?


