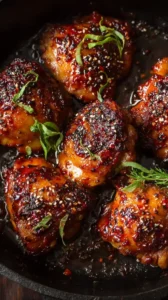
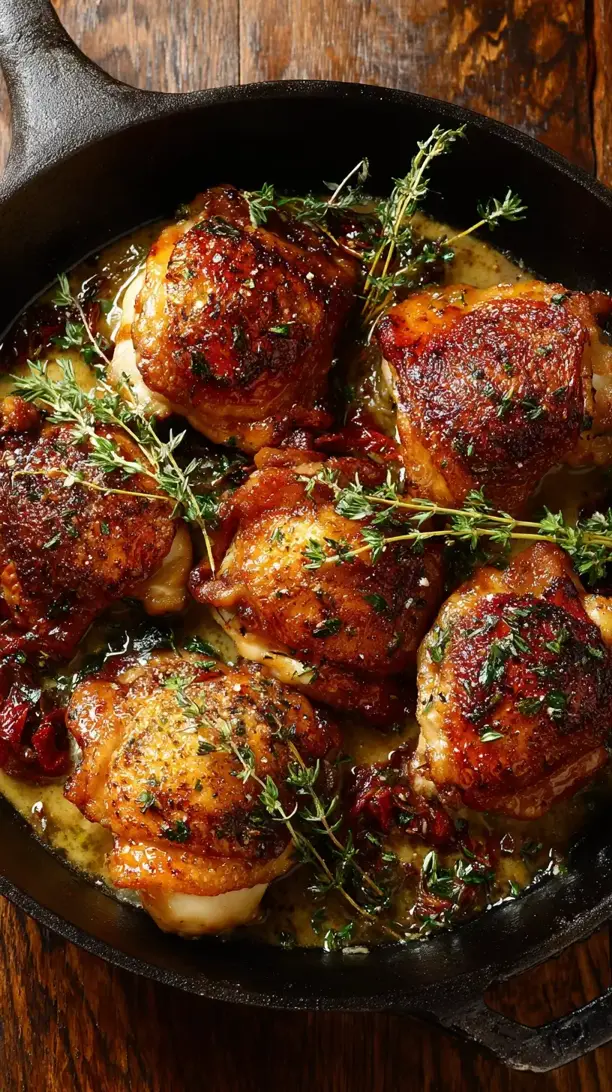
Skillet chicken thighs deliver rustic elegance with minimal effort. Their higher fat content ensures juicy, tender meat with irresistibly crispy skin. This one-pan method is reliable, deeply flavorful, and endlessly adaptable for any occasion.
Looking for Skillet Chicken Thighs inspiration? You'll love what we have! Explore more Chicken Thigh Recipes recipes or discover our Breakfast & Brunch favorites.


Why You’ll Love This Skillet Chicken Thighs
- Juicy results: Chicken thighs stay moist and tender even if slightly overcooked.
- Crispy skin: Slow rendering in a cold skillet delivers crackling-crisp perfection.
- One-pan ease: Everything cooks in one skillet for minimal cleanup.
- Endless versatility: Adapt with different rubs, herbs, and sauces to match any craving.
Ingredients & Tools
- 6 bone-in, skin-on chicken thighs (about 1.5–2 lbs total)
- 1½ tsp kosher salt
- 1 tsp freshly ground black pepper
- 2 tbsp olive oil or avocado oil
- 4 cloves garlic, lightly smashed
- 3–4 fresh thyme sprigs (or 1 tsp dried thyme)
- ½ cup dry white wine (like Sauvignon Blanc) or chicken broth
- 2 tbsp unsalted butter
- 1 tbsp fresh lemon juice
- 2 tbsp chopped fresh parsley (for garnish)
Tools: 1 large (12-inch) oven-safe skillet (cast iron is ideal), tongs, instant-read thermometer
Notes: Using bone-in, skin-on thighs is non-negotiable here—they deliver the deepest flavor and juiciest texture. And don’t skip the fresh herbs and garlic; they infuse the oil and create an aromatic base that makes the entire dish sing.
Nutrition (per serving)
| Calories: | 420 kcal |
| Protein: | 35 g |
| Fat: | 29 g |
| Carbs: | 2 g |
| Fiber: | 0.5 g |
Serves: 4 | Prep Time: 10 minutes | Cook Time: 30 minutes | Total Time: 40 minutes
Before You Start: Tips & Ingredient Notes
- Pat those thighs dry. This might seem like a small step, but it’s the secret to crispy skin. Use paper towels to thoroughly dry the skin—any moisture will steam the chicken instead of letting it sear and crisp up beautifully.
- Why an oven-safe skillet? Starting on the stovetop and finishing in the oven ensures the chicken cooks evenly. The hot, ambient heat of the oven gently cooks the meat through without burning the skin. A cast-iron skillet is perfect for this.
- Season generously and early. Don’t be shy with the salt and pepper, and season the chicken at least 15 minutes before cooking if you have time. This allows the seasoning to penetrate the meat, enhancing its natural flavor from the inside out.
- Let the chicken come to room temp. Taking the chicken out of the fridge 20–30 minutes before cooking helps it cook more evenly, preventing a cold center and an overcooked exterior.
How to Make Skillet Chicken Thighs
Step 1: First, prep your chicken. Pat the thighs completely dry with paper towels—this is non-negotiable for crispy skin. Season both sides generously with the salt and pepper, really working it into the skin and flesh. If you have time, let them sit at room temperature for about 20–30 minutes. You’ll notice they look less glossy and more matte when they’re properly dried.
Step 2: Preheat your oven to 400°F (200°C). Place your large, oven-safe skillet over medium-low heat and add the oil. Swirl it to coat the bottom. Carefully place the chicken thighs in the cold skillet, skin-side down. Yes, starting with a cold pan is the trick here! It slowly renders the fat, resulting in that perfectly crisp, unburnt skin we’re after.
Step 3: Now, be patient. Let the chicken cook undisturbed for about 12–15 minutes. You’ll hear it sizzling gently. Resist the urge to move it! The skin should become deep golden brown and release easily from the pan. If it sticks, it needs a little more time. You’ll know it’s ready when you can lift it with tongs without any resistance.
Step 4: Once the skin is gorgeously browned and crisp, flip the thighs over. Add the smashed garlic cloves and thyme sprigs to the rendered fat in the pan. The aroma will be incredible. Cook for just 2 more minutes on the second side to give it a little color.
Step 5: Transfer the entire skillet to the preheated oven. Roast for 12–15 minutes, or until the internal temperature of the thickest part of the thigh reads 165°F (74°C) on an instant-read thermometer. The juices should run clear.
Step 6: Carefully remove the skillet from the oven—remember, the handle will be extremely hot! Transfer the chicken thighs to a plate to rest. They need to rest for at least 5 minutes; this allows the juices to redistribute throughout the meat, ensuring every bite is succulent.
Step 7: While the chicken rests, make a quick pan sauce. Place the skillet back over medium heat on the stovetop. Add the white wine (or broth) to deglaze the pan, scraping up all those delicious browned bits with a wooden spoon. Let it simmer and reduce by half, which should take about 2–3 minutes.
Step 8: Turn off the heat and swirl in the cold butter and lemon juice. This will thicken the sauce slightly and give it a lovely, glossy sheen. Taste and adjust seasoning if needed. Stir in the chopped parsley. Spoon this incredible sauce over the rested chicken thighs right before serving.
Storage & Freshness Guide
- Fridge: Store leftovers in an airtight container for up to 3 days.
- Freezer: Freeze in a sealed bag for up to 2 months; note skin may soften upon thawing.
- Reviving: Reheat in a 350°F oven until warm to help recrisp the skin.
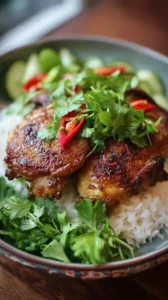
Serving Suggestions
Complementary Dishes
- Creamy Parmesan Polenta — The soft, cheesy polenta is a dreamy base that soaks up the rich pan sauce beautifully.
- Garlicky Sautéed Greens — Something like kale or spinach cooked with a bit of garlic cuts through the richness of the chicken.
- Roasted Root Vegetables — Carrots, parsnips, and potatoes roasted alongside the chicken make for a complete, hearty meal.
Drinks
- A Crisp Chardonnay — An unoaked or lightly oaked Chardonnay has the acidity to complement the dish without overpowering it.
- Sparkling Water with Lemon — The bubbles and citrus are a refreshing, non-alcoholic palate cleanser between bites.
- Amber Ale — The malty, caramel notes in a good amber ale pair wonderfully with the savory, crispy skin.
Something Sweet
- Lemon Sorbet — A scoop of bright, tart sorbet is the perfect light finish after a rich, savory meal.
- Upside-Down Pear Cake — The warm, spiced cake feels homey and comforting, continuing the cozy theme.
- Dark Chocolate Truffles — Just one or two pieces of intense, dark chocolate provide a sophisticated, not-too-sweet ending.
Top Mistakes to Avoid
- Moving the chicken too soon. If you try to lift or move the thighs before the skin has properly rendered and crisped, it will tear and stick to the pan. Patience is your best tool here.
- Crowding the skillet. If the pan is too full, the chicken will steam instead of sear. Work in batches if necessary to ensure each piece has enough space for proper browning.
- Skipping the rest time. Cutting into the chicken immediately after it comes out of the oven will cause all the precious juices to run out onto the cutting board, leaving you with drier meat. Let it rest!
- Using a non-oven-safe skillet. If your skillet has a plastic or wood handle, it can’t go in the oven. Finishing the cooking on the stovetop alone often leads to burnt skin and undercooked meat.
Expert Tips
- Tip: For extra-crispy skin, try a light dusting of baking powder (about ½ tsp mixed with the salt and pepper). It changes the pH of the skin and helps draw out moisture, resulting in an even crispier finish.
- Tip: If you don’t have wine for the pan sauce, you can use chicken broth with a teaspoon of lemon juice or even a splash of apple cider vinegar to provide the necessary acidity.
- Tip: To infuse even more flavor, gently lift the skin of each thigh and slide a thin slice of lemon and a small sprig of thyme underneath before seasoning. It perfumes the meat from the inside as it cooks.
- Tip: If the skin is browning too quickly in the oven, simply tent the skillet loosely with aluminum foil. This will slow down the browning while allowing the meat to continue cooking through.
FAQs
Can I use boneless, skinless chicken thighs?
You absolutely can, but the method and result will be different. Boneless, skinless thighs will cook much faster, so you’ll skip the long skin-rendering step and just sear them for a few minutes per side before finishing in the oven. You’ll miss out on that signature crispy skin, but the meat will still be incredibly juicy and flavorful. Just reduce the total cook time by about 5-7 minutes.
My chicken skin is rubbery, not crispy. What went wrong?
The most common culprit is moisture. If the skin wasn’t patted completely dry before cooking, it will steam instead of crisp up. Another reason could be that the heat was too high, causing the skin to contract and tighten before the fat had a chance to properly render out. Next time, make sure the skin is bone-dry and stick to that medium-low heat for the initial sear.
How can I tell when the chicken is done without a thermometer?
While a thermometer is the most reliable method, you can also pierce the thickest part of the thigh with a knife or skewer. The juices should run completely clear, not pink or red. Additionally, the meat should feel firm to the touch, and the leg joint should wiggle easily. When in doubt, just cut into one piece to check—it’s better to be safe!
Can I make this ahead of time?
You can season the chicken and keep it covered in the fridge for up to 24 hours ahead, which actually improves the flavor. I don’t recommend fully cooking it ahead, as the skin will lose its crispness upon reheating. For the best texture, cook it fresh. If you must, reheat it in a 350°F (175°C) oven until warmed through, which will help re-crisp the skin a bit.
What can I use instead of white wine in the pan sauce?
No problem! An equal amount of chicken broth is a great substitute. To mimic the acidity of wine, add a squeeze of fresh lemon juice or a teaspoon of white wine vinegar at the end with the butter. You could also use a dry vermouth or even a splash of apple cider for a slightly different, but still delicious, flavor profile.


Skillet Chicken Thighs
Learn how to make perfect Skillet Chicken Thighs with crispy skin and juicy meat in one pan. This easy, versatile recipe is your new go-to dinner. Get cooking now!
Ingredients
For the Ingredients
-
6 bone-in, skin-on chicken thighs (about 1.5–2 lbs total)
-
1.5 tsp kosher salt
-
1 tsp freshly ground black pepper
-
2 tbsp olive oil or avocado oil
-
4 cloves garlic (lightly smashed)
-
3–4 fresh thyme sprigs (or 1 tsp dried thyme)
-
0.5 cup dry white wine or chicken broth (like Sauvignon Blanc)
-
2 tbsp unsalted butter
-
1 tbsp fresh lemon juice
-
2 tbsp chopped fresh parsley (for garnish)
Instructions
-
First, prep your chicken. Pat the thighs completely dry with paper towels—this is non-negotiable for crispy skin. Season both sides generously with the salt and pepper, really working it into the skin and flesh. If you have time, let them sit at room temperature for about 20–30 minutes. You’ll notice they look less glossy and more matte when they’re properly dried.01
-
Preheat your oven to 400°F (200°C). Place your large, oven-safe skillet over medium-low heat and add the oil. Swirl it to coat the bottom. Carefully place the chicken thighs in the cold skillet, skin-side down. Yes, starting with a cold pan is the trick here! It slowly renders the fat, resulting in that perfectly crisp, unburnt skin we’re after.02
-
Now, be patient. Let the chicken cook undisturbed for about 12–15 minutes. You’ll hear it sizzling gently. Resist the urge to move it! The skin should become deep golden brown and release easily from the pan. If it sticks, it needs a little more time. You’ll know it’s ready when you can lift it with tongs without any resistance.03
-
Once the skin is gorgeously browned and crisp, flip the thighs over. Add the smashed garlic cloves and thyme sprigs to the rendered fat in the pan. The aroma will be incredible. Cook for just 2 more minutes on the second side to give it a little color.04
-
Transfer the entire skillet to the preheated oven. Roast for 12–15 minutes, or until the internal temperature of the thickest part of the thigh reads 165°F (74°C) on an instant-read thermometer. The juices should run clear.05
-
Carefully remove the skillet from the oven—remember, the handle will be extremely hot! Transfer the chicken thighs to a plate to rest. They need to rest for at least 5 minutes; this allows the juices to redistribute throughout the meat, ensuring every bite is succulent.06
-
While the chicken rests, make a quick pan sauce. Place the skillet back over medium heat on the stovetop. Add the white wine (or broth) to deglaze the pan, scraping up all those delicious browned bits with a wooden spoon. Let it simmer and reduce by half, which should take about 2–3 minutes.07
-
Turn off the heat and swirl in the cold butter and lemon juice. This will thicken the sauce slightly and give it a lovely, glossy sheen. Taste and adjust seasoning if needed. Stir in the chopped parsley. Spoon this incredible sauce over the rested chicken thighs right before serving.08
Not what you're looking for?


