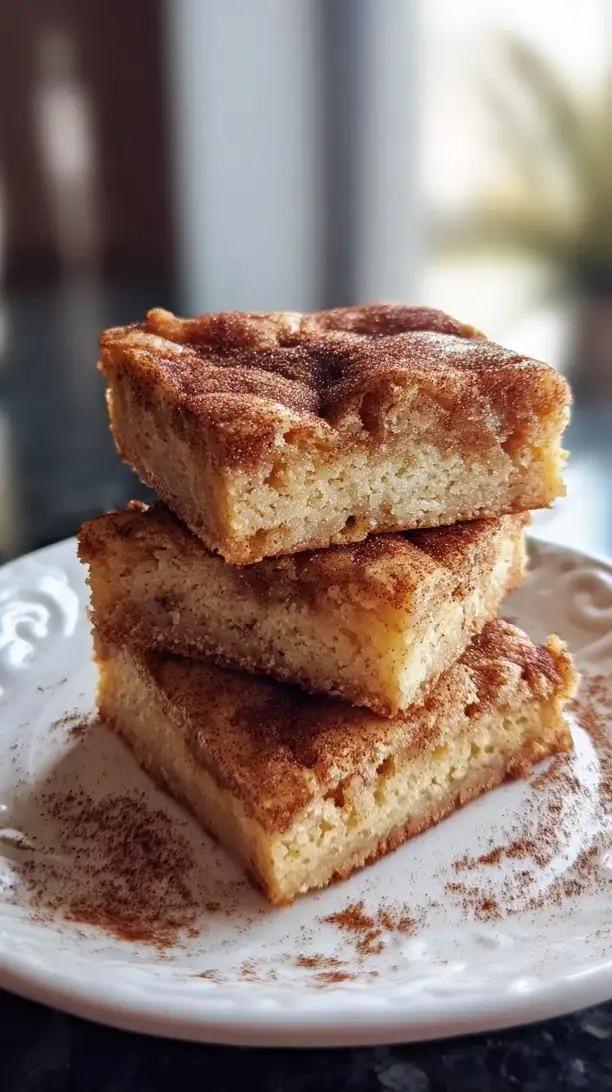
There’s a certain kind of kitchen magic that happens when you bake something that fills the whole house with a warm, cinnamon-sugar hug. For me, that magic is these Snickerdoodle Blondies. They take everything I love about the classic cookie—that cozy, comforting flavor—and bake it into one irresistibly chewy pan of bars. It’s the ultimate easy-bake treat, and that heavenly aroma is your first clue that a batch of pure comfort food is on the way.
I find this recipe is a star player in my lineup of holiday baking. Whenever I’m stuck on Christmas dessert ideas, I come back to these bars. They deliver all the nostalgic joy of Christmas sweets with almost no effort, making them a perfect fit for anyone compiling a list of easy Christmas treats. Whether you’re whipping up a last-minute plate for a gathering or just want a simple, satisfying project, these blondies never let you down.
So, if your search for Christmas baking ideas has you scrolling endlessly, let me suggest starting right here. These Snickerdoodle Blondies are truly delightful holiday treats. They marry the simplicity of a one-pan dessert with the beloved snickerdoodle taste, creating those perfect, chewy, cinnamon-swirled bars that are destined to become a seasonal favorite.
Love Snickerdoodle Blondies? So do we! If you're into Christmas Cookie or curious about Chicken Recipes, you'll find plenty of inspiration below.


Why You’ll Love This Snickerdoodle Blondies
One-Pan Bliss: No scooping or rolling—just mix, swirl, and bake.
Perfect Texture: Crisp top, chewy center, and molten cinnamon pockets.
Warm-Spice Flavor: Brown sugar, vanilla, and cinnamon create pure comfort.
Shareable Treat: Sturdy, travel-friendly bars perfect for gifting or gatherings.
Ingredients & Tools
For the Blondies
- 1 cup (2 sticks or 226 g) unsalted butter, melted and slightly cooled
- 1 ½ cups (300 g) light brown sugar, packed
- 2 large eggs, at room temperature
- 2 tsp pure vanilla extract
- 2 cups (250 g) all-purpose flour
- 1 tsp cream of tartar
- ½ tsp baking soda
- ½ tsp salt
For the Cinnamon Swirl
- ¼ cup (50 g) granulated sugar
- 1 tbsp ground cinnamon
Tools: 8×8 or 9×9 inch baking pan, parchment paper, mixing bowls, whisk, spatula
Notes: Using room temperature eggs ensures smooth blending. Cream of tartar adds signature tang and soft crumb—don’t skip it!
Nutrition (per serving)
| Calories: | 280 kcal |
| Protein: | 3 g |
| Fat: | 12 g |
| Carbs: | 41 g |
| Fiber: | 1 g |
Serves: 16 | Prep Time: 15 minutes | Cook Time: 25-30 minutes | Total Time: 45 minutes
Before You Start: Tips & Ingredient Notes
- Don’t Use Hot Butter. Melt your butter and let it cool for about 10-15 minutes. If it’s too hot, it can start cooking the eggs when you mix them in, which we definitely don’t want. You’re aiming for warm, not scorching.
- Pack That Brown Sugar. When measuring your brown sugar, really press it into the measuring cup. This ensures you get the correct amount for that deep molasses flavor and moist texture. A loose cup of brown sugar will throw off the balance.
- The Cream of Tartar is Non-Negotiable. I know it’s a specialty ingredient, but it’s what makes a snickerdoodle a snickerdoodle! It provides that slight tang and reacts with the baking soda to give the blondies a lovely lift. There isn’t a great substitute, so it’s worth hunting down.
- Line Your Pan for Easy Removal. Take two minutes to line your pan with parchment paper, leaving some overhang on two sides. This creates a “sling” that lets you lift the entire slab of blondies out for clean, easy cutting. No more wrestling with a stuck-on corner!
How to Make Snickerdoodle Blondies
Step 1: Preheat your oven to 350°F (175°C). Grab your 8×8 or 9×9 inch baking pan and line it with parchment paper, letting the edges overhang for easy removal later. A little spritz of cooking spray on the pan under the parchment helps it stay perfectly in place.
Step 2: In a medium bowl, whisk together the flour, cream of tartar, baking soda, and salt. You just want to combine them so the leavening is evenly distributed throughout the flour. Set this dry mixture aside for a moment.
Step 3: In a large mixing bowl, combine the melted (and slightly cooled) butter with the packed brown sugar. Whisk them together vigorously for a good minute until they’re completely combined and look smooth. You’ll notice the mixture thicken slightly as you whisk.
Step 4: Add the room-temperature eggs and vanilla extract to the butter-sugar mixture. Whisk again until the mixture is smooth, glossy, and well-emulsified. It should be a beautiful pale caramel color at this stage.
Step 5: Now, switch to a spatula. Add the dry flour mixture to the wet ingredients. Gently fold everything together until you no longer see any dry streaks of flour. Be careful not to overmix! A few tiny flour specks are better than a tough blondie.
Step 6: In a small, separate bowl, mix the 1/4 cup of granulated sugar with the 1 tablespoon of cinnamon. This is your glorious swirl mixture. Give it a stir with a fork to break up any clumps.
Step 7: Time to assemble! Spread about two-thirds of the blondie batter into your prepared pan. It will be thick, so use your spatula to press it into an even layer. Now, sprinkle about two-thirds of your cinnamon-sugar mixture evenly over this base layer.
Step 8: Dollop the remaining blondie batter over the top of the cinnamon sugar. Don’t worry about covering it completely—this is what creates the marbled effect. Gently spread the dollops as best you can. Finally, sprinkle the rest of the cinnamon sugar over the very top.
Step 9: Take a knife or a wooden skewer and gently swirl it through the batter. Make a few figure-eight motions or zig-zags—you’re aiming to marble the cinnamon sugar into the blondie batter, not mix it in completely. You should see beautiful ribbons of spice.
Step 10: Bake for 25-30 minutes. The top should be golden brown, set, and have a lovely crackly appearance. A toothpick inserted into the center should come out with a few moist crumbs attached, but not wet batter. The trick is to pull them out when they’re just set for the ultimate chewy texture.
Step 11: This is the hardest part: let the blondies cool completely in the pan on a wire rack. I know it’s tempting, but cutting into them while they’re warm will result in a gooey mess. They need time to set up for those perfect, clean squares. It’s worth the wait, I promise.
Storage & Freshness Guide
- Fridge: Store in an airtight container up to 5 days.
- Freezer: Wrap bars individually and freeze up to 3 months.
- Reviving: Warm briefly in microwave or oven to restore soft texture.
Serving Suggestions
Complementary Dishes
- A scoop of vanilla bean ice cream — The classic pairing. The cold, creamy ice cream melting into the warm, spiced blondie is a textural and temperature dream come true.
- A warm mug of apple cider — The bright, spiced notes of the cider echo the cinnamon in the blondies, creating a wonderfully cohesive and autumnal flavor experience.
- A sharp cheddar cheese plate — Don’t knock it ’til you try it! The sharp, salty cheese provides a fantastic contrast to the sweet, buttery blondie in a way that is surprisingly sophisticated.
Drinks
- Cold glass of milk — It’s a timeless combo for a reason. The milk cuts through the richness perfectly and just feels right.
- Hot coffee with a dash of cream — The bitterness of the coffee balances the sweetness of the blondie, making for a delightful afternoon pick-me-up.
- Chai latte — Double down on the cozy spices! The cardamom and ginger in the chai will harmonize beautifully with the cinnamon in your bake.
Something Sweet
- Simple cinnamon-dusted whipped cream — For an extra-indulgent treat, a dollop of lightly sweetened cream with a whisper of cinnamon on top elevates the whole experience.
- A drizzle of salted caramel sauce — Adds a deep, buttery sweetness and a hit of salt that makes the blondie’s flavors pop even more.
- A side of spiced poached pears — For a more elegant dessert, the soft, wine-poached fruit provides a light, fruity counterpoint to the dense, rich bar.
Top Mistakes to Avoid
- Mistake: Overmixing the batter after adding the flour. This develops the gluten in the flour and leads to tough, cakey blondies instead of the desired soft and chewy texture. Mix just until the flour disappears.
- Mistake: Using hot, freshly melted butter. I’ve messed this up before too… it partially cooks the eggs and can cause the batter to separate or become greasy. Let that butter cool down for a bit first.
- Mistake: Overbaking. The number one killer of a fudgy blondie! They continue to cook as they cool. Take them out when the edges are set and a toothpick has a few moist crumbs. A clean toothpick means they’re overdone.
- Mistake: Skipping the parchment paper sling. Trying to dig these out of the pan with a spatula is a recipe for broken, crumbly blondies. The parchment sling is a tiny step that guarantees perfect, photogenic bars.
Expert Tips
- Tip: Brown your butter for a nutty, complex flavor. Simply melt the butter in a saucepan over medium heat, swirling the pan, until it turns a golden amber color and smells nutty. Let it cool completely before using. It adds a whole new dimension of flavor.
- Tip: Add a handful of white chocolate chips. They provide little pockets of creamy sweetness that pair amazingly well with the cinnamon. Just fold them in at the very end with the flour.
- Tip: For a super-crackly top, let the batter rest. After you’ve mixed everything, let the batter sit in the pan for 15-20 minutes before baking. This allows the sugar to hydrate more fully, which can lead to that beautiful, shiny, crackly crust.
- Tip: Use a plastic knife for cutting. It sounds strange, but a plain plastic knife glides through dense, sticky bars like these without dragging and tearing, giving you the cleanest cuts imaginable.
FAQs
Can I make these Snickerdoodle Blondies ahead of time?
Absolutely! They are actually even better the next day. The flavors have more time to meld, and the texture becomes even more fudgy. Just store them in an airtight container at room temperature for up to 3 days. You can also freeze them for up to 3 months—just wrap individual bars tightly in plastic wrap and place them in a freezer bag.
What can I use if I don’t have cream of tartar?
This is a tough one, as cream of tartar is key for the authentic flavor. In a true pinch, you can substitute it with 2 teaspoons of fresh lemon juice or white vinegar, added to the wet ingredients. However, this will slightly alter the texture and the distinct “tang” won’t be as pronounced. It’s best to use the real thing if you can.
Why did my blondies turn out cakey instead of chewy?
This usually happens for one of two reasons: either you overmixed the batter after adding the flour, or you overbaked them. Remember, fold just until combined, and pull them from the oven when the center is still a tiny bit soft. They firm up a lot as they cool on the counter.
Can I double this recipe?
Yes, you can easily double all the ingredients. Pour the batter into a 9×13 inch baking pan and increase the baking time by about 5-10 minutes. Keep a close eye on them and use the toothpick test to determine doneness. This is perfect for feeding a larger crowd.
My cinnamon sugar sunk to the bottom. What did I do wrong?
This can happen if the bottom layer of batter is too thin or if the batter is too warm and loose. Make sure your first layer is a good, thick base (about 2/3 of the batter) to support the swirl. Also, ensuring your butter is properly cooled will give you a thicker batter that holds the swirl in place better.


Snickerdoodle Blondies: An Easy One-Pan Dessert
Snickerdoodle Blondies are the ultimate easy blondie recipe, offering chewy cinnamon-sugar comfort in every bite. A perfect, fuss-free holiday treat for your Christmas dessert table.
Ingredients
For the Blondies:
-
1 cup unsalted butter (2 sticks or 226 g, melted and slightly cooled)
-
1 ½ cups light brown sugar (300 g, packed)
-
2 large eggs (at room temperature)
-
2 tsp pure vanilla extract
-
2 cups all-purpose flour (250 g)
-
1 tsp cream of tartar
-
½ tsp baking soda
-
½ tsp salt
For the Cinnamon Swirl:
-
¼ cup granulated sugar (50 g)
-
1 tbsp ground cinnamon
Instructions
-
Preheat your oven to 350°F (175°C). Grab your 8x8 or 9x9 inch baking pan and line it with parchment paper, letting the edges overhang for easy removal later. A little spritz of cooking spray on the pan under the parchment helps it stay perfectly in place.01
-
In a medium bowl, whisk together the flour, cream of tartar, baking soda, and salt. You just want to combine them so the leavening is evenly distributed throughout the flour. Set this dry mixture aside for a moment.02
-
In a large mixing bowl, combine the melted (and slightly cooled) butter with the packed brown sugar. Whisk them together vigorously for a good minute until they’re completely combined and look smooth. You’ll notice the mixture thicken slightly as you whisk.03
-
Add the room-temperature eggs and vanilla extract to the butter-sugar mixture. Whisk again until the mixture is smooth, glossy, and well-emulsified. It should be a beautiful pale caramel color at this stage.04
-
Now, switch to a spatula. Add the dry flour mixture to the wet ingredients. Gently fold everything together until you no longer see any dry streaks of flour. Be careful not to overmix! A few tiny flour specks are better than a tough blondie.05
-
In a small, separate bowl, mix the 1/4 cup of granulated sugar with the 1 tablespoon of cinnamon. This is your glorious swirl mixture. Give it a stir with a fork to break up any clumps.06
-
Time to assemble! Spread about two-thirds of the blondie batter into your prepared pan. It will be thick, so use your spatula to press it into an even layer. Now, sprinkle about two-thirds of your cinnamon-sugar mixture evenly over this base layer.07
-
Dollop the remaining blondie batter over the top of the cinnamon sugar. Don't worry about covering it completely—this is what creates the marbled effect. Gently spread the dollops as best you can. Finally, sprinkle the rest of the cinnamon sugar over the very top.08
-
Take a knife or a wooden skewer and gently swirl it through the batter. Make a few figure-eight motions or zig-zags—you’re aiming to marble the cinnamon sugar into the blondie batter, not mix it in completely. You should see beautiful ribbons of spice.09
-
Bake for 25-30 minutes. The top should be golden brown, set, and have a lovely crackly appearance. A toothpick inserted into the center should come out with a few moist crumbs attached, but not wet batter. The trick is to pull them out when they're just set for the ultimate chewy texture.10
-
This is the hardest part: let the blondies cool completely in the pan on a wire rack. I know it's tempting, but cutting into them while they're warm will result in a gooey mess. They need time to set up for those perfect, clean squares. It’s worth the wait, I promise.11
Not what you're looking for?


