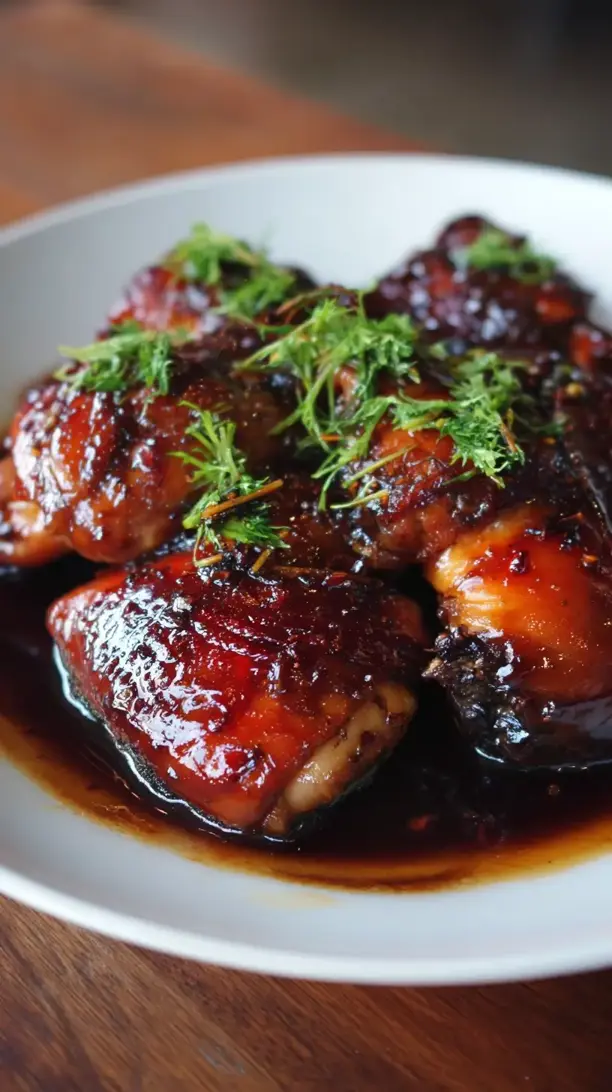
Soy Sauce Chicken is a comforting, aromatic classic that fills your kitchen with an incredible savory-sweet fragrance. This recipe yields tender, juicy chicken bathed in a glossy soy-based sauce infused with star anise and ginger. It’s a humble yet impressive dish perfect for weeknights or entertaining.
Looking for Soy Sauce Chicken inspiration? You'll love what we have! Explore more Chicken Breast Recipes recipes or discover our Crockpot Recipes favorites.


Why You’ll Love This Soy Sauce Chicken
- Forgiving method: A few extra minutes of simmering only makes it more tender.
- Liquid gold sauce: The glossy braising liquid is packed with umami and perfect over rice or noodles.
- Fantastic leftovers: Flavors deepen overnight for even better meals the next day.
- Rustic yet elegant: Impressive enough for guests but humble enough for family dinners.
Ingredients & Tools
- 1 whole chicken (about 1.5 kg / 3-4 lbs), preferably at room temperature
- 1 cup light soy sauce
- 1/2 cup dark soy sauce
- 1/2 cup Shaoxing wine
- 100 g rock sugar (or 3/4 cup brown sugar)
- 1.2 litres water
- 5–6 slices ginger (about 2-inch piece, sliced)
- 4 spring onions, cut into 2-inch lengths
- 4 star anise
- 1 cinnamon stick
- 1 teaspoon Sichuan peppercorns (optional, for a subtle numbing aroma)
Tools: A large pot or Dutch oven (big enough to submerge the chicken), tongs, a fine-mesh skimmer or slotted spoon, and a pastry brush for basting.
Notes: Don’t worry if you can’t find rock sugar—brown sugar works beautifully. The dark soy sauce is key for that deep color and a more mellow, malty flavor, while the light soy sauce provides the primary salty base. Using a whole chicken gives you the most flavor, but you can absolutely use a mix of bone-in, skin-on thighs and drumsticks if that’s easier.
Nutrition (per serving)
| Calories: | 380 kcal |
| Protein: | 45 g |
| Fat: | 18 g |
| Carbs: | 8 g |
| Fiber: | 0.5 g |
Serves: 4-6 | Prep Time: 15 minutes | Cook Time: 45 minutes | Total Time: 1 hour (plus optional resting time)
Before You Start: Tips & Ingredient Notes
- Why use a whole chicken? Cooking the chicken whole, on the bone, yields incredibly moist and flavorful meat. The bones and skin contribute immense depth to the braising liquid. If you’re short on time, bone-in, skin-on pieces are a great alternative, but the cooking time will be slightly less.
- What’s the deal with the two soy sauces? Light soy sauce is saltier and provides the main seasoning. Dark soy sauce is less salty, thicker, and adds that beautiful dark mahogany color and a hint of caramel sweetness. Using both gives you a perfectly balanced and visually stunning dish.
- Can I substitute the Shaoxing wine? Shaoxing wine is a key flavor component, but if you can’t find it, a dry sherry is the best substitute. In a real pinch, you could use a non-alcoholic stock, but you’ll lose a layer of that distinctive, aromatic complexity.
- Don’t skip the aromatics. The ginger, spring onions, and spices aren’t just for show—they create the fragrant backbone of the dish. Toasting the star anise and cinnamon for a minute in a dry pan before adding them can really make their flavors pop.
How to Make Soy Sauce Chicken
Step 1: First, prepare your chicken. If it’s tied, remove any string. Pat the chicken completely dry, inside and out, with paper towels. This is a small but crucial step—a dry skin will help it achieve a nicer texture and color. Let the chicken sit at room temperature for about 20-30 minutes while you prepare the braising liquid; a cold chicken going into hot liquid can result in tough meat.
Step 2: Now, let’s build the braising liquid, or the master sauce. In your large pot, combine the light and dark soy sauces, Shaoxing wine, water, and rock sugar. Add the ginger slices, spring onion pieces, star anise, cinnamon stick, and Sichuan peppercorns (if using). Give it a good stir and bring it to a gentle boil over medium-high heat. You’ll notice the sugar will dissolve and the most incredible aroma will start to fill your kitchen.
Step 3: Carefully lower the whole chicken into the pot, breast-side up. The liquid should almost completely cover the chicken—if it doesn’t, you can add a bit more hot water. Once the liquid returns to a boil, immediately reduce the heat to low. You want a very gentle simmer, with just small bubbles breaking the surface. Cover the pot with a lid.
Step 4: Now for the gentle cook. Let the chicken simmer gently for about 30-35 minutes. About halfway through, use your tongs to carefully flip the chicken over. This ensures even color and flavor penetration. The trick is to keep the heat low—a rolling boil will make the meat tough and the skin could split. You’re looking for tender, not shredded.
Step 5: After 30-35 minutes, turn off the heat. To check for doneness, pierce the thickest part of the thigh with a skewer or small knife; the juices should run clear, not pink. Now, here’s a pro-move: leave the chicken in the hot liquid, with the lid on, for another 20-30 minutes. This residual heat continues to cook it gently and allows it to soak up even more flavor without overcooking.
Step 6: Carefully remove the chicken from the pot and place it on a cutting board. Let it rest for at least 10-15 minutes before carving. This allows the juices to redistribute, ensuring every bite is succulent. While it rests, you can skim off any excess fat from the surface of the braising liquid and bring it to a rapid boil for 5-10 minutes to reduce and thicken it slightly into a gorgeous, glossy sauce.
Step 7: Carve the chicken into serving pieces. I like to use a cleaver to chop it through the bone into sections, but you can also carve it Western-style. Arrange the pieces on a warm serving platter. Using a pastry brush, generously brush the reduced sauce all over the chicken. This gives it an incredible shine and an extra layer of flavor right at the end.
Storage & Freshness Guide
- Fridge: Store leftover chicken and sauce in an airtight container for up to 3–4 days.
- Freezer: Freeze shredded chicken and strained sauce separately for up to 3 months.
- Reviving: Gently reheat in the sauce over low heat or bring to room temperature before serving.
Serving Suggestions
Complementary Dishes
- Steamed Jasmine Rice — The plain, fluffy rice is the perfect canvas for that incredible soy sauce. It soaks up every last drop and balances the savory richness of the chicken beautifully.
- Stir-fried Bok Choy with Garlic — The slight bitterness and crisp texture of the greens provide a refreshing contrast to the tender, deeply flavored chicken. A little garlicky oil drizzled on top is divine.
- Simple Cucumber Salad — Thinly sliced cucumbers with a splash of rice vinegar and a pinch of salt offer a cool, crunchy, and acidic counterpoint that cleanses the palate between bites.
Drinks
- Jasmine Tea (hot or cold) — Its floral notes and slight astringency cut through the richness of the dish and refresh your taste buds, making each mouthful taste new again.
- Light Lager or Pilsner — A crisp, cold beer with its carbonation and mild bitterness is a classic pairing that works wonderfully to balance the umami and slight sweetness of the sauce.
Something Sweet
- Mango Pudding — The tropical, creamy sweetness of mango pudding is a fantastic way to end the meal. It’s light, fragrant, and provides a lovely, smooth finish after the savory main course.
- Lychee Sorbet — This is a brilliantly refreshing option. The floral, fruity notes of lychee and the icy-cold texture are a perfect, palate-cleansing finale.
Top Mistakes to Avoid
- Mistake: Boiling the chicken aggressively. A rolling boil will cause the proteins to contract violently, squeezing out all the moisture and leaving you with a tough, stringy texture. A gentle, lazy simmer is the only way to go.
- Mistake: Not letting the chicken rest after cooking. If you carve it straight from the pot, all those precious juices will just run out onto the cutting board. Letting it rest ensures the moisture stays locked in the meat.
- Mistake: Using only one type of soy sauce. If you only use light soy sauce, the chicken will be too salty and pale. If you only use dark, it will lack depth of flavor and be overly sweet and dark. The magic is in the combination.
- Mistake: Throwing away the braising liquid. This is a cardinal sin! That liquid is a master sauce—strain it, let it cool, and freeze it. You can use it again for another batch of chicken, for braising eggs or tofu, or as a base for noodle soups.
Expert Tips
- Tip: Make Soy Sauce Eggs. While the chicken is resting, lower a few room-temperature eggs (in their shells) into the hot braising liquid. Let them cook for 8-9 minutes for a soft-set jammy yolk, or 12 minutes for fully set. Peel and enjoy the most incredible savory snacks.
- Tip: Use the master sauce again. This is a traditional Chinese technique. After you’ve made your chicken, strain the liquid and freeze it. The next time you make this dish, use this frozen block as the base for your new braising liquid, adding a bit of fresh soy sauce and aromatics. The flavor compounds over time, making each batch more complex than the last.
- Tip: For super-crispy skin (a variation). After the chicken is cooked and brushed with sauce, pop it under a hot broiler for 3-4 minutes, watching it carefully. This will caramelize the sugars in the sauce and give you a slightly sticky, crispy skin that’s absolutely addictive.
- Tip: Butterfly the chicken for faster, more even cooking. Using kitchen shears, cut out the backbone and flatten the chicken. This “spatchcocking” technique reduces the cooking time and ensures the breast and thighs finish at the same time.
FAQs
Can I make this with chicken pieces instead of a whole chicken?
Absolutely! Bone-in, skin-on thighs and drumsticks are a great alternative. The cooking principle is the same, but the time will be shorter—start checking for doneness at around 20-25 minutes of simmering. The meat should be tender and pulling away from the bone easily. Just be mindful that the flavor penetration might be slightly different, but it will still be utterly delicious.
How long can I store the leftover braising liquid (master sauce)?
You can treat it like a rich stock. Let it cool completely, then strain it into an airtight container. It will keep in the fridge for up to a week, or you can freeze it for several months. Every time you use it, it gets better. Just be sure to bring it to a full boil again when you reuse it to ensure food safety.
My sauce isn’t very thick or glossy. What did I do wrong?
You likely didn’t reduce it enough after removing the chicken. Don’t worry, it’s an easy fix! Simply remove the chicken, turn the heat to high, and let the braising liquid boil rapidly for 10-15 minutes until it reduces by about a third and coats the back of a spoon. The sugar and natural gelatin from the chicken will help it thicken into that beautiful, glossy consistency.
Can I make this dish ahead of time?
It’s actually fantastic made ahead. You can cook the chicken completely, let it cool in the sauce, and then store them together in the fridge overnight. The flavors meld and intensify. Gently reheat the chicken in the sauce over low heat, or bring it to room temperature and serve. The texture might be even more tender the next day.
Is there a way to make this less salty?
Yes, a few tweaks can help. You can reduce the amount of light soy sauce slightly and replace it with an equal amount of water. Alternatively, using low-sodium soy sauce is a great option. Remember, you’re serving this with plain rice, which is designed to balance the saltiness, so it shouldn’t taste overly salty in the context of the full meal.


Soy Sauce Chicken
Learn how to make classic Soy Sauce Chicken with this easy recipe. Tender, juicy chicken in a glossy, aromatic sauce. Get the step-by-step guide now!
Ingredients
For the Chicken & Braising Liquid
-
1 whole chicken (about 1.5 kg / 3-4 lbs, preferably at room temperature)
-
1 cup light soy sauce
-
1/2 cup dark soy sauce
-
1/2 cup Shaoxing wine
-
100 g rock sugar (or 3/4 cup brown sugar)
-
1.2 litres water
-
5–6 slices ginger (about 2-inch piece, sliced)
-
4 spring onions (cut into 2-inch lengths)
-
4 star anise
-
1 cinnamon stick
-
1 teaspoon Sichuan peppercorns (optional, for a subtle numbing aroma)
Instructions
-
First, prepare your chicken. If it’s tied, remove any string. Pat the chicken completely dry, inside and out, with paper towels. This is a small but crucial step—a dry skin will help it achieve a nicer texture and color. Let the chicken sit at room temperature for about 20-30 minutes while you prepare the braising liquid; a cold chicken going into hot liquid can result in tough meat.01
-
Now, let’s build the braising liquid, or the master sauce. In your large pot, combine the light and dark soy sauces, Shaoxing wine, water, and rock sugar. Add the ginger slices, spring onion pieces, star anise, cinnamon stick, and Sichuan peppercorns (if using). Give it a good stir and bring it to a gentle boil over medium-high heat. You’ll notice the sugar will dissolve and the most incredible aroma will start to fill your kitchen.02
-
Carefully lower the whole chicken into the pot, breast-side up. The liquid should almost completely cover the chicken—if it doesn’t, you can add a bit more hot water. Once the liquid returns to a boil, immediately reduce the heat to low. You want a very gentle simmer, with just small bubbles breaking the surface. Cover the pot with a lid.03
-
Now for the gentle cook. Let the chicken simmer gently for about 30-35 minutes. About halfway through, use your tongs to carefully flip the chicken over. This ensures even color and flavor penetration. The trick is to keep the heat low—a rolling boil will make the meat tough and the skin could split. You’re looking for tender, not shredded.04
-
After 30-35 minutes, turn off the heat. To check for doneness, pierce the thickest part of the thigh with a skewer or small knife; the juices should run clear, not pink. Now, here’s a pro-move: leave the chicken in the hot liquid, with the lid on, for another 20-30 minutes. This residual heat continues to cook it gently and allows it to soak up even more flavor without overcooking.05
-
Carefully remove the chicken from the pot and place it on a cutting board. Let it rest for at least 10-15 minutes before carving. This allows the juices to redistribute, ensuring every bite is succulent. While it rests, you can skim off any excess fat from the surface of the braising liquid and bring it to a rapid boil for 5-10 minutes to reduce and thicken it slightly into a gorgeous, glossy sauce.06
-
Carve the chicken into serving pieces. I like to use a cleaver to chop it through the bone into sections, but you can also carve it Western-style. Arrange the pieces on a warm serving platter. Using a pastry brush, generously brush the reduced sauce all over the chicken. This gives it an incredible shine and an extra layer of flavor right at the end.07
Not what you're looking for?


