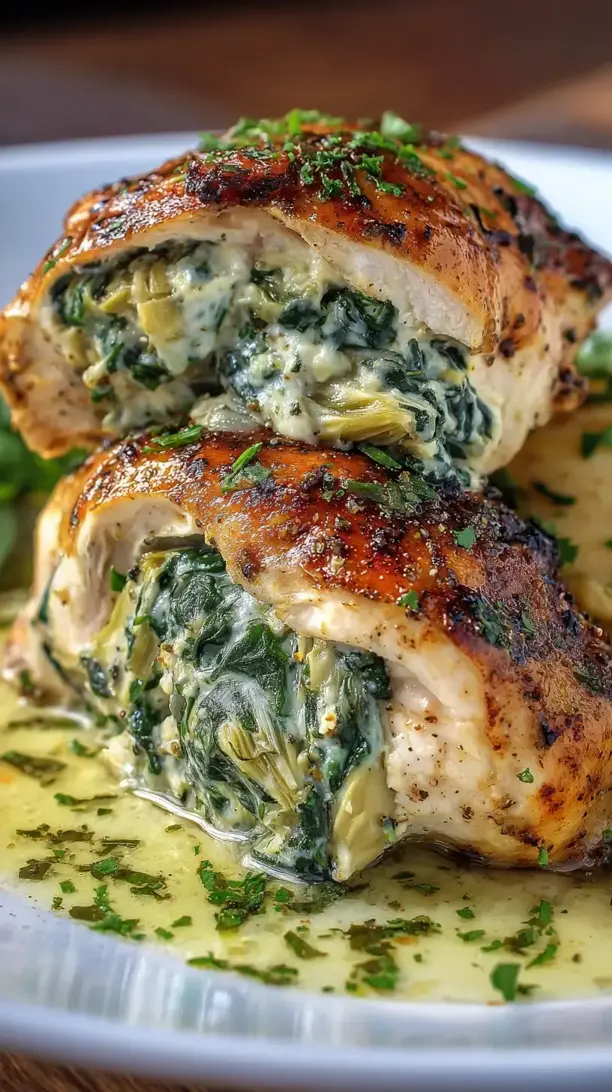
This Spinach Artichoke Stuffed Chicken turns the classic dip into an impressive main course. It’s surprisingly simple to prepare yet delivers a stunning presentation and incredible flavor. Perfect for a special dinner, this dish is a guaranteed crowd-pleaser.
If you're looking for the perfect Spinach Artichoke Stuffed Chicken, you're in the right place. Whether you love Dinner Ideas or want to explore our Burgers collection, we've got you covered.


Why You’ll Love This Spinach Artichoke Stuffed Chicken
- Crowd-pleasing flavor: Everyone loves the classic spinach-artichoke combo.
- Impressive presentation: Slicing into the creamy filling never gets old.
- Versatile pairing: It works with many different sides and salads.
- Make-ahead friendly: Assemble ahead for an easy, luxurious meal.
Ingredients & Tools
- 4 large boneless, skinless chicken breasts (about 6 oz / 170 g each)
- 10 oz frozen chopped spinach, thawed and thoroughly squeezed dry
- 1 (14 oz) can artichoke hearts, drained and finely chopped
- 4 oz full-fat cream cheese, softened
- 1/2 cup grated Parmesan cheese
- 1/2 cup shredded mozzarella cheese
- 1/2 cup mayonnaise
- 2 cloves garlic, minced
- 1 tsp onion powder
- 1/2 tsp dried oregano
- 1/4 tsp red pepper flakes (optional, for a little heat)
- 1 tbsp olive oil
- Salt and black pepper to taste
Notes: Squeeze spinach thoroughly to prevent a watery filling. Full-fat cream cheese and mayo ensure a creamy, stable filling.
Tools: A sharp knife, a mixing bowl, toothpicks, a meat mallet or rolling pin, a skillet that is oven-safe, and kitchen twine (helpful but not essential).
Nutrition (per serving)
| Calories: | 485 kcal |
| Protein: | 42 g |
| Fat: | 31 g |
| Carbs: | 8 g |
| Fiber: | 3 g |
Serves: 4 | Prep Time: 20 minutes | Cook Time: 25 minutes | Total Time: 45 minutes
Before You Start: Tips & Ingredient Notes
- Dry that spinach! This might be the most important step. After thawing, squeeze the spinach in a clean kitchen towel or with your hands over the sink until no more water comes out. A wet filling will steam the chicken from the inside and make it soggy.
- Pound the chicken evenly. You want the breasts to be about 1/2-inch thick all over. This makes them much easier to roll, and they’ll cook evenly so you don’t end up with a dry exterior and a raw interior.
- Don’t skip the sear. Taking a few minutes to brown the outside of the chicken rolls in a hot skillet before baking does two things: it creates a gorgeous, flavorful crust, and it helps seal the chicken, keeping all that delicious filling inside.
- Let it rest. I know it’s tempting to dig right in, but letting the stuffed chicken rest for 5-7 minutes after it comes out of the oven allows the juices to redistribute. This means you’ll get a clean, beautiful slice instead of all the filling gushing out immediately.
How to Make Spinach Artichoke Stuffed Chicken
Step 1: Prepare the Chicken. Place one chicken breast on a cutting board and cover it with a piece of plastic wrap. Using the flat side of a meat mallet or a heavy rolling pin, gently pound the chicken until it’s an even 1/2-inch thickness. Be careful not to tear it. You’re just tenderizing and flattening it, not pulverizing it! Repeat with all the chicken breasts. Season both sides generously with salt and pepper.
Step 2: Make the Filling. In a medium bowl, combine the thoroughly squeezed-dry spinach, chopped artichoke hearts, softened cream cheese, Parmesan, mozzarella, mayonnaise, minced garlic, onion powder, oregano, and red pepper flakes if using. Mix everything together until it’s well-combined and creamy. Give it a taste and adjust the seasoning with a little more salt or pepper if you think it needs it.
Step 3: Stuff and Roll. Lay the pounded chicken breasts flat. Divide the spinach-artichoke mixture evenly among them, placing a good mound in the center of each piece. Now, carefully fold the sides of the chicken over the filling and roll it up tightly, starting from the thinner end. Secure the seam with 2-3 toothpicks. If you have kitchen twine, you can tie it around the middle for extra security, but toothpicks work just fine.
Step 4: Sear to Perfection. Preheat your oven to 400°F (200°C). Heat the olive oil in a large, oven-safe skillet over medium-high heat. Once the oil is shimmering, carefully place the chicken rolls seam-side down into the hot skillet. You’ll hear a nice sizzle. Sear for 2-3 minutes on each side, until you have a beautiful golden-brown crust all over. Don’t move them around too much—let that crust form!
Step 5: Bake to Juicy Doneness. Once all sides are seared, transfer the entire skillet to the preheated oven. Bake for 18-22 minutes, or until the internal temperature of the chicken reaches 165°F (74°C) when checked with a meat thermometer. The outside will be a deep golden brown, and the cheese might be bubbling out a little bit—that’s a good sign!
Step 6: Rest and Serve. Carefully remove the skillet from the oven—remember, the handle is hot! Transfer the chicken rolls to a cutting board and let them rest for at least 5 minutes. This is crucial. Then, gently remove the toothpicks and twine. Use a sharp knife to slice each roll into 1-inch thick medallions, revealing that stunning swirl of filling inside.
Storage & Freshness Guide
- Fridge: Store leftovers in an airtight container for up to 3 days.
- Freezer: Freeze uncooked, secured rolls for up to 2 months.
- Reviving: Reheat in oven or air fryer at 350°F until warmed through.
Serving Suggestions
Complementary Dishes
- Cauliflower Mash — Its creamy, buttery texture is the perfect neutral base to soak up any juices and complements the rich chicken without competing for attention.
- A Simple Arugula Salad — The peppery bite of arugula with a light lemon vinaigrette cuts through the richness of the dish beautifully and adds a fresh, crisp element.
- Roasted Asparagus — Tossed in olive oil and garlic, roasted asparagus adds a lovely green vegetable component and its earthy flavor pairs wonderfully with the artichokes.
Drinks
- A Crisp Sauvignon Blanc — The bright acidity and citrus notes in this wine act like a squeeze of lemon, cleansing the palate between bites of the creamy, savory chicken.
- Sparkling Water with Lemon — For a non-alcoholic option, the bubbles and citrus are incredibly refreshing and help balance the decadent, cheesy filling.
- A Light Pale Ale — The slight bitterness and carbonation from a pale ale can stand up to the strong flavors and cut through the fat, making for a very satisfying pairing.
Something Sweet
- Dark Chocolate Avocado Mousse — It’s rich and chocolatey but not overly heavy, providing a smooth, cool, and decadent finish that feels just right after the savory main course.
- Mixed Berry Compote — The bright, tangy sweetness of warmed berries is a fantastic flavor contrast and feels light and elegant alongside the stuffed chicken.
- Cheesecake Fat Bombs — A few bites of a creamy, vanilla-or-lemon flavored fat bomb continue the creamy theme but in a sweet, bite-sized package that ends the meal on a high note.
Top Mistakes to Avoid
- Overstuffing the chicken. It’s tempting to use all the filling, but if you pack in too much, the chicken won’t seal properly and the filling will leak out during cooking. A moderate, tight roll is better than a bursting one.
- Not using an oven-safe skillet. If you sear the chicken in a regular skillet, you’ll have to transfer the rolls to a baking dish, which can be messy and you lose all the delicious browned bits from the pan. Using an oven-safe skillet from the start is a game-changer.
- Skipping the meat thermometer. Guessing if chicken is done is a risky business. Undercooked chicken is unsafe, and overcooked chicken is dry. A quick check with a thermometer takes the guesswork out and guarantees perfect, juicy results every single time.
- Cutting immediately after baking. I’ve messed this up before too… if you slice into the chicken the second it’s out of the oven, the hot filling will just run everywhere. Letting it rest allows the proteins to relax and reabsorb the juices.
Expert Tips
- Tip: For an extra flavor boost, mix a tablespoon of grated Pecorino Romano into the filling. It’s a bit saltier and sharper than Parmesan and adds a wonderful depth of flavor that really makes the filling pop.
- Tip: If you’re prepping ahead, you can assemble the stuffed and rolled chicken breasts, place them on a plate, cover tightly, and refrigerate for up to 8 hours. Just let them sit at room temperature for 15-20 minutes before searing and baking.
- Tip: To get a super crispy, golden exterior, you can brush the seared chicken rolls very lightly with a little melted butter or mayonnaise before they go into the oven. It helps the skin brown beautifully.
- Tip: If you don’t have an oven-safe skillet, don’t worry! Just sear the chicken rolls in any skillet, then transfer them snugly into a baking dish that you’ve lightly greased. You might need to add a minute or two to the baking time since you’re starting with a cold dish.
FAQs
Can I use fresh spinach instead of frozen?
You absolutely can! You’ll need about 5-6 cups of fresh spinach. Just wilt it down in a pan with a tiny bit of water or oil, let it cool, and then squeeze it just as dry as you would the frozen stuff. The key is removing as much moisture as possible, no matter which type you start with.
My filling is leaking out. What did I do wrong?
This usually happens for one of two reasons: either the chicken wasn’t rolled tightly enough, or it was overstuffed. Next time, make sure you’re really tucking and rolling firmly, and don’t feel like you have to use every last bit of filling. A little leftover filling can be baked in a small ramekin alongside the chicken for a tasty cook’s treat!
Can I make this with chicken thighs?
Yes, boneless, skinless chicken thighs would work wonderfully! They’re actually more forgiving and harder to overcook. You’d just lay them flat, place a smaller amount of filling in the center, and fold the sides over. You might not even need toothpicks as they tend to hold their shape well. The cooking time will be roughly the same.
How do I store and reheat leftovers?
Store any leftovers in an airtight container in the fridge for up to 3 days. To reheat, the oven or an air fryer is your best friend. Place the slices on a baking sheet and warm at 350°F (175°C) for about 10 minutes, until heated through. The microwave will work in a pinch, but it can make the chicken a bit rubbery and the filling oily.
Can I freeze the stuffed chicken before cooking?
For sure! This is a great meal-prep hack. After you’ve rolled and secured the chicken, place the rolls on a parchment-lined baking sheet and freeze until solid. Then, transfer them to a freezer bag. They’ll keep for up to 2 months. When you’re ready to cook, you can bake them from frozen—just add 10-15 minutes to the baking time, and always check the internal temperature.


Spinach Artichoke Stuffed Chicken
Make this easy Spinach Artichoke Stuffed Chicken for a delicious and impressive dinner. Creamy filling, juicy chicken, and perfect for any occasion. Get the recipe now!
Ingredients
For the Ingredients
-
4 large boneless, skinless chicken breasts (about 6 oz / 170 g each)
-
10 oz frozen chopped spinach (thawed and thoroughly squeezed dry)
-
1 can artichoke hearts (14 oz, drained and finely chopped)
-
4 oz full-fat cream cheese (softened)
-
1/2 cup grated Parmesan cheese
-
1/2 cup shredded mozzarella cheese
-
1/2 cup mayonnaise
-
2 cloves garlic (minced)
-
1 tsp onion powder
-
1/2 tsp dried oregano
-
1/4 tsp red pepper flakes (optional, for a little heat)
-
1 tbsp olive oil
-
Salt and black pepper (to taste)
Instructions
-
Place one chicken breast on a cutting board and cover it with a piece of plastic wrap. Using the flat side of a meat mallet or a heavy rolling pin, gently pound the chicken until it’s an even 1/2-inch thickness. Be careful not to tear it. You’re just tenderizing and flattening it, not pulverizing it! Repeat with all the chicken breasts. Season both sides generously with salt and pepper.01
-
In a medium bowl, combine the thoroughly squeezed-dry spinach, chopped artichoke hearts, softened cream cheese, Parmesan, mozzarella, mayonnaise, minced garlic, onion powder, oregano, and red pepper flakes if using. Mix everything together until it’s well-combined and creamy. Give it a taste and adjust the seasoning with a little more salt or pepper if you think it needs it.02
-
Lay the pounded chicken breasts flat. Divide the spinach-artichoke mixture evenly among them, placing a good mound in the center of each piece. Now, carefully fold the sides of the chicken over the filling and roll it up tightly, starting from the thinner end. Secure the seam with 2-3 toothpicks. If you have kitchen twine, you can tie it around the middle for extra security, but toothpicks work just fine.03
-
Preheat your oven to 400°F (200°C). Heat the olive oil in a large, oven-safe skillet over medium-high heat. Once the oil is shimmering, carefully place the chicken rolls seam-side down into the hot skillet. You’ll hear a nice sizzle. Sear for 2-3 minutes on each side, until you have a beautiful golden-brown crust all over. Don’t move them around too much—let that crust form!04
-
Once all sides are seared, transfer the entire skillet to the preheated oven. Bake for 18-22 minutes, or until the internal temperature of the chicken reaches 165°F (74°C) when checked with a meat thermometer. The outside will be a deep golden brown, and the cheese might be bubbling out a little bit—that’s a good sign!05
-
Carefully remove the skillet from the oven—remember, the handle is hot! Transfer the chicken rolls to a cutting board and let them rest for at least 5 minutes. This is crucial. Then, gently remove the toothpicks and twine. Use a sharp knife to slice each roll into 1-inch thick medallions, revealing that stunning swirl of filling inside.06
Not what you're looking for?


