This Stuffed Pepper Chicken recipe cleverly combines the beloved flavors of classic stuffed peppers with juicy chicken breasts for a one-pan weeknight dinner. You get tender chicken filled with sweet bell peppers, savory beef, tangy tomato sauce, and melted cheese without the long bake time. It’s a vibrant, comforting masterpiece that feels special yet is simple enough for any night.
Nothing beats a great Stuffed Pepper Chicken. Whether you're a fan of Chicken Breast Recipes or want to try something from our Dessert Recipes selection, keep scrolling!


Why You’ll Love This Stuffed Pepper Chicken
Brilliant flavor mashup: All the cozy stuffed pepper tastes packed into juicy chicken.
Surprisingly simple: A quick sear and the oven does the rest for a restaurant-quality meal.
All-in-one meal: Each breast is a complete package of protein, veggies, and sauce.
Irresistible cheesy finish: Melty mozzarella over savory tomato sauce creates a bubbly, comforting top.
Ingredients & Tools
- 4 boneless, skinless chicken breasts (about 6 oz / 170 g each)
- 1 tbsp olive oil
- 1 small yellow onion, finely diced
- 2 cloves garlic, minced
- 1 medium green bell pepper, finely diced
- ½ lb lean ground beef
- 1 cup cooked long-grain white rice
- 1 (15 oz / 425 g) can tomato sauce
- 1 tsp dried oregano
- ½ tsp paprika
- 1 cup shredded mozzarella cheese
- Salt and black pepper to taste
Tools: A large, oven-safe skillet is essential here, along with a sharp knife and a mixing bowl.
Notes: Don’t skip finely dicing the onion and pepper—it ensures they meld into the filling. A flavorful tomato sauce base makes a big difference.
Nutrition (per serving)
| Calories: | 480 kcal |
| Protein: | 42 g |
| Fat: | 18 g |
| Carbs: | 32 g |
| Fiber: | 4 g |
Serves: 4 | Prep Time: 20 minutes | Cook Time: 30 minutes | Total Time: 50 minutes
Before You Start: Tips & Ingredient Notes
- Pound your chicken evenly. This is the single most important step for even cooking. You want the breasts to be a uniform ½-inch thickness so the center cooks through at the same rate as the edges, preventing a dry exterior and a raw middle.
- Use cold, cooked rice. Freshly cooked, warm rice can become a bit mushy and sticky when mixed into the filling. Cold rice, straight from the fridge, holds its shape and texture much better, giving you a perfect, distinct grain in every bite.
- Don’t skip searing the chicken. That initial golden-brown crust you get from searing in a hot skillet does more than just look good—it locks in the chicken’s juices and creates a ton of fond (those browned bits at the bottom of the pan) that will enrich your sauce later.
- Choose an oven-safe skillet. Since this recipe moves seamlessly from the stovetop to the oven, using a skillet that can handle both is non-negotiable. If you only have a regular skillet, you’ll need to carefully transfer the seared chicken to a baking dish before adding the sauce and cheese.
How to Make Stuffed Pepper Chicken
Step 1: Begin by preparing your chicken. Place each chicken breast between two sheets of plastic wrap or in a large zip-top bag. Using the flat side of a meat mallet, a rolling pin, or even a heavy skillet, gently pound the thicker parts of the breast until the entire piece is an even ½-inch thickness. This might feel like a small step, but it’s crucial for ensuring your chicken cooks evenly and stays wonderfully juicy. Season both sides generously with salt and black pepper.
Step 2: Now, let’s make that incredible filling. Heat the olive oil in your large, oven-safe skillet over medium heat. Add the diced onion and green pepper and cook, stirring occasionally, for about 5-7 minutes, until they’ve softened and the onion is becoming translucent. You’ll notice the kitchen starting to smell amazing already. Add the minced garlic and cook for just one more minute until fragrant—be careful not to let it burn.
Step 3: Push the vegetables to one side of the skillet and add the ground beef to the empty space. Use a wooden spoon to break up the meat as it cooks, browning it thoroughly. Once the beef is no longer pink, you can mix it all together with the cooked vegetables. Drain off any excess grease from the skillet.
Step 4: Transfer the beef and vegetable mixture to a mixing bowl. To this, add the cold cooked rice, half of the tomato sauce, the dried oregano, and paprika. Stir everything together until it’s beautifully combined. Give it a taste and adjust the seasoning with more salt and pepper if needed. This is your stuffing—it should be savory, a little sweet from the peppers, and deeply flavorful.
Step 5: Carefully pat the pounded chicken breasts dry with a paper towel (this helps with browning). Spoon a generous amount of the filling onto one half of each chicken breast. You’re aiming for a good mound, but leave a small border around the edges. Gently fold the other half of the chicken over the filling, creating a little packet. It’s okay if a little filling peeks out.
Step 6: Wipe out your skillet and place it back over medium-high heat. Add a tiny drizzle of oil if needed. Once hot, carefully place the stuffed chicken breasts in the skillet. You’ll hear a satisfying sizzle. Sear them for about 3-4 minutes on the first side, until a gorgeous golden-brown crust forms. Don’t move them around too much—let the heat do its work. Flip them over and sear for another 2-3 minutes on the other side.
Step 7: Pour the remaining tomato sauce around (not directly on top of) the chicken in the skillet. This will create a lovely sauce base and help to deglaze the pan, picking up all those delicious browned bits. Let it come to a gentle simmer for a minute.
Step 8: Now for the cheesy finale! Sprinkle the shredded mozzarella cheese evenly over the top of each chicken breast. The sauce bubbling around the edges will keep everything moist. Carefully transfer the entire skillet to your preheated oven.
Step 9: Bake for 15-18 minutes, or until the chicken is cooked through (an internal thermometer should read 165°F / 74°C) and the cheese is melted, bubbly, and starting to get those irresistible golden spots. Let the chicken rest in the skillet for about 5 minutes before serving—this allows the juices to redistribute, ensuring every bite is moist and tender.
Storage & Freshness Guide
- Fridge: Cool completely, store in an airtight container with sauce for up to 3 days.
- Freezer: Freeze cooked chicken with sauce in an airtight container for up to 2 months.
- Reviving: Thaw overnight in fridge if frozen. Reheat gently in a covered skillet in the oven until warmed through.
Serving Suggestions
Complementary Dishes
- Garlic Bread or a Crusty Baguette — Absolutely essential for mopping up every last bit of that incredible tomato sauce that pools in the skillet. The crisp, buttery texture is the perfect contrast to the tender chicken.
- A Simple Green Salad with a Light Vinaigrette — The fresh, crisp, and slightly acidic notes of a simple salad help to cut through the richness of the cheesy, meaty chicken, balancing the whole meal out beautifully.
- Sautéed Green Beans with Garlic — Their slight crunch and savory flavor make them a fantastic vegetable side that complements the dish without competing with its robust flavors.
Drinks
- A Medium-Bodied Red Wine like a Merlot — The soft tannins and notes of dark fruit in a Merlot pair wonderfully with the tomato sauce and beef, enhancing the savory depth without overpowering it.
- Sparkling Water with a Squeeze of Lime — For a non-alcoholic option, the effervescence and citrus zing are incredibly refreshing and act as a palate cleanser between bites of the rich, cheesy chicken.
Something Sweet
- Lemon Sorbet — After a hearty and savory meal, a few scoops of bright, tart, and clean lemon sorbet are the perfect way to finish. It’s light, refreshing, and feels like a reset for your taste buds.
Top Mistakes to Avoid
- Mistake: Overfilling the chicken breasts. It’s tempting to pack in as much filling as possible, but this will almost certainly cause it to spill out during cooking and can prevent the chicken from cooking evenly. A moderate, well-contained mound is the way to go.
- Mistake: Skipping the sear. I’ve been tempted to rush this step before, too, but it’s a game-changer. Searing creates a flavorful crust and helps seal in the juices. If you just bake it, the chicken can steam and become pale and less tasty.
- Mistake: Using a raw, watery tomato sauce. If you’re using a simple crushed tomato or purée, make sure to simmer it with a pinch of salt and your herbs first to concentrate the flavor. A watery sauce will make your filling soggy and dilute the final dish.
- Mistake: Not letting it rest. Slicing into the chicken straight from the oven will cause all those precious, flavorful juices to run straight out onto the cutting board. A brief 5-minute rest allows the fibers to relax and reabsorb the moisture.
Expert Tips
- Tip: Secure with toothpicks for neatness. If you’re worried about your chicken packets staying closed, you can use 2-3 toothpicks to pin the edges together. Just remember to remove them before serving—a little pro-hack for a perfect presentation.
- Tip: Customize your filling. Feel free to get creative! Add a handful of frozen corn or a pinch of red pepper flakes for a little heat. You could even swap the ground beef for Italian sausage or ground turkey to mix things up.
- Tip: Grate your own cheese. Pre-shredded bags contain anti-caking agents that can prevent the cheese from melting as smoothly and beautifully as a block you grate yourself. The extra minute of effort is totally worth it for that perfect, stretchy cheese pull.
- Tip: Use a thermometer for perfect doneness. The safest and most reliable way to know your chicken is done is to use an instant-read thermometer. Insert it into the thickest part of the meat (avoiding the filling) and look for 165°F (74°C). No more guesswork or dry chicken!
FAQs
Can I make Stuffed Pepper Chicken ahead of time?
Absolutely! You can assemble the entire dish up to the point of baking, cover it tightly, and refrigerate it for up to 24 hours. When you’re ready, you may need to add a few extra minutes to the baking time since you’ll be starting with a cold skillet. It’s a fantastic make-ahead meal for busy days or entertaining.
What can I use instead of ground beef?
You have several great options. Ground turkey or Italian sausage (casings removed) work wonderfully and will give you a different flavor profile. For a vegetarian version, you could use a plant-based ground “meat” or even lentils. Just make sure to adjust your seasonings accordingly to match the base ingredient you choose.
My filling keeps falling out. What am I doing wrong?
This usually happens for one of two reasons: either the chicken wasn’t pounded thin enough to fold over easily, or it was overfilled. Make sure your chicken is a uniform ½-inch thick, and don’t be too generous with the stuffing—a heaping ¼ cup per breast is usually plenty. You can also use toothpicks to help hold everything together during cooking.
Can I freeze cooked Stuffed Pepper Chicken?
Yes, but with a caveat. The texture of the cooked chicken and the saucy cheese can become a little watery upon thawing and reheating. For best results, freeze the cooked chicken in an airtight container with the sauce for up to 2 months. Thaw in the refrigerator overnight and reheat gently in a covered skillet in the oven until warmed through.
Why is my chicken dry?
Dry chicken is almost always a result of overcooking. The most common culprits are chicken breasts that weren’t pounded evenly (so the thin parts cook faster than the thick) or simply leaving it in the oven for too long. Using a meat thermometer is the best defense—pull it out as soon as it hits 165°F and let it rest. The carryover cooking will finish the job without drying it out.


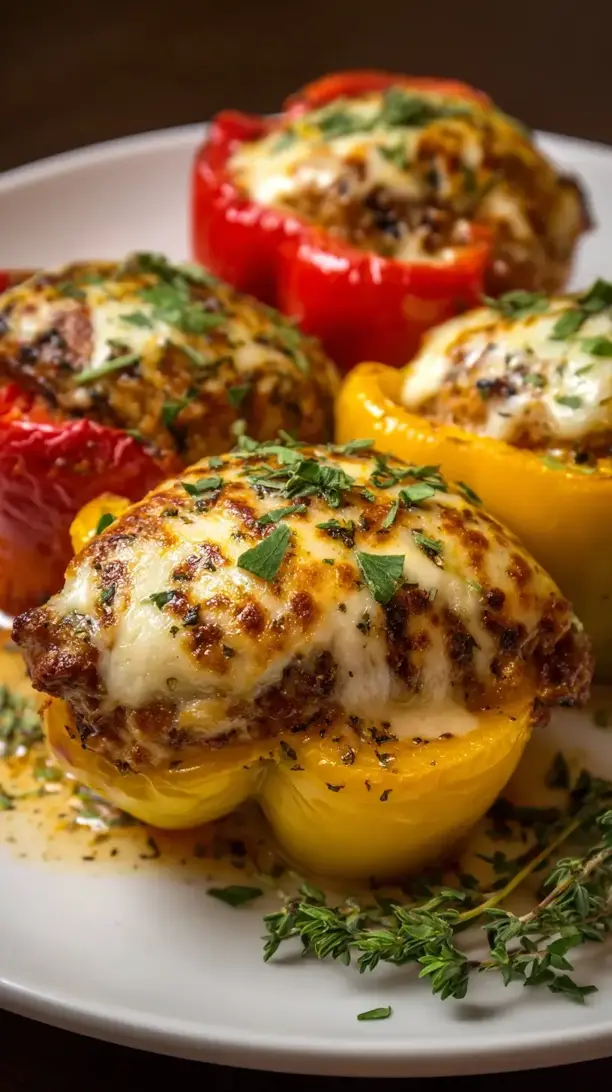
Stuffed Pepper Chicken
Make this easy Stuffed Pepper Chicken recipe for a one-pan dinner. All the classic flavors in a juicy, cheesy chicken dish. Get the simple recipe now!
Ingredients
For the chicken and filling:
-
4 boneless, skinless chicken breasts (about 6 oz / 170 g each)
-
1 tbsp olive oil
-
1 small yellow onion (finely diced)
-
2 cloves garlic (minced)
-
1 medium green bell pepper (finely diced)
-
½ lb lean ground beef
-
1 cup cooked long-grain white rice
-
1 can tomato sauce (15 oz / 425 g)
-
1 tsp dried oregano
-
½ tsp paprika
-
1 cup shredded mozzarella cheese
-
Salt and black pepper (to taste)
Instructions
-
Begin by preparing your chicken. Place each chicken breast between two sheets of plastic wrap or in a large zip-top bag. Using the flat side of a meat mallet, a rolling pin, or even a heavy skillet, gently pound the thicker parts of the breast until the entire piece is an even ½-inch thickness. This might feel like a small step, but it’s crucial for ensuring your chicken cooks evenly and stays wonderfully juicy. Season both sides generously with salt and black pepper.01
-
Now, let’s make that incredible filling. Heat the olive oil in your large, oven-safe skillet over medium heat. Add the diced onion and green pepper and cook, stirring occasionally, for about 5-7 minutes, until they’ve softened and the onion is becoming translucent. You’ll notice the kitchen starting to smell amazing already. Add the minced garlic and cook for just one more minute until fragrant—be careful not to let it burn.02
-
Push the vegetables to one side of the skillet and add the ground beef to the empty space. Use a wooden spoon to break up the meat as it cooks, browning it thoroughly. Once the beef is no longer pink, you can mix it all together with the cooked vegetables. Drain off any excess grease from the skillet.03
-
Transfer the beef and vegetable mixture to a mixing bowl. To this, add the cold cooked rice, half of the tomato sauce, the dried oregano, and paprika. Stir everything together until it’s beautifully combined. Give it a taste and adjust the seasoning with more salt and pepper if needed. This is your stuffing—it should be savory, a little sweet from the peppers, and deeply flavorful.04
-
Carefully pat the pounded chicken breasts dry with a paper towel (this helps with browning). Spoon a generous amount of the filling onto one half of each chicken breast. You’re aiming for a good mound, but leave a small border around the edges. Gently fold the other half of the chicken over the filling, creating a little packet. It’s okay if a little filling peeks out.05
-
Wipe out your skillet and place it back over medium-high heat. Add a tiny drizzle of oil if needed. Once hot, carefully place the stuffed chicken breasts in the skillet. You’ll hear a satisfying sizzle. Sear them for about 3-4 minutes on the first side, until a gorgeous golden-brown crust forms. Don’t move them around too much—let the heat do its work. Flip them over and sear for another 2-3 minutes on the other side.06
-
Pour the remaining tomato sauce around (not directly on top of) the chicken in the skillet. This will create a lovely sauce base and help to deglaze the pan, picking up all those delicious browned bits. Let it come to a gentle simmer for a minute.07
-
Now for the cheesy finale! Sprinkle the shredded mozzarella cheese evenly over the top of each chicken breast. The sauce bubbling around the edges will keep everything moist. Carefully transfer the entire skillet to your preheated oven.08
-
Bake for 15-18 minutes, or until the chicken is cooked through (an internal thermometer should read 165°F / 74°C) and the cheese is melted, bubbly, and starting to get those irresistible golden spots. Let the chicken rest in the skillet for about 5 minutes before serving—this allows the juices to redistribute, ensuring every bite is moist and tender.09
Not what you're looking for?


