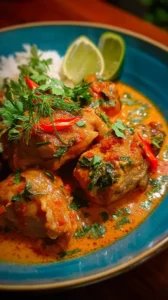
This Sweet and Sour Chicken delivers crispy, golden-brown chicken in a glossy, perfectly balanced sauce. The secret is a double-fry method for incredible crunch and a homemade sauce that clings beautifully. It’s a celebratory dish that’s far better than takeout.
Craving a delicious Sweet and Sour Chicken? You've come to the right spot! From Chicken Recipes favorites to amazing Chicken Breast Recipes recipes, there's something here for everyone.


Why You’ll Love This Sweet and Sour Chicken
- Better than takeout: You control the ingredients for a fresh, vibrant taste.
- Dreamy texture: Double-fried chicken stays shatteringly crisp even after saucing.
- Versatile & customizable: Easy to add your favorite veggies or adjust the sweet-sour ratio.
- Special occasion feel: A stunning, colorful crowd-pleaser without being complicated.
Ingredients & Tools
For the Chicken:
- 500 g boneless, skinless chicken thighs or breasts, cut into 1-inch pieces
- 120 g cornstarch
- 2 large eggs, lightly beaten
- 1/2 tsp salt
- 1/4 tsp white pepper
- Vegetable or peanut oil for frying
For the Sweet and Sour Sauce:
- 150 ml pineapple juice (from the can of chunks is perfect)
- 80 ml rice vinegar
- 60 ml ketchup
- 50 g light brown sugar
- 2 tbsp soy sauce
- 1 tbsp cornstarch mixed with 2 tbsp water (slurry)
- 2 tsp minced fresh ginger
- 2 garlic cloves, minced
- 1 small red bell pepper, cut into 1-inch pieces
- 1 small green bell pepper, cut into 1-inch pieces
- 225 g can pineapple chunks, drained (reserve juice for the sauce)
Tools: A large wok or deep skillet, a spider strainer or slotted spoon, a medium saucepan, and two large bowls.
Notes: The quality of your sauce ingredients really matters here—using fresh ginger and garlic makes a world of difference in aroma, and good rice vinegar gives that clean tang without being too harsh.
Nutrition (per serving)
| Calories: | 480 kcal |
| Protein: | 28 g |
| Fat: | 18 g |
| Carbs: | 52 g |
| Fiber: | 2 g |
Serves: 4 | Prep Time: 25 minutes | Cook Time: 20 minutes | Total Time: 45 minutes
Before You Start: Tips & Ingredient Notes
- Chicken thighs or breasts? Thighs will give you a more flavorful, juicier bite, but breasts work perfectly well if that’s what you have. Just be careful not to overcook them.
- Why double-fry the chicken? The first fry cooks the chicken through, and the second fry at a higher temperature creates that incredible, lasting crispiness. It’s the secret to takeout-style texture.
- Don’t skip the cornstarch slurry. This is what thickens your sauce to a glossy, clingy consistency. If you add it directly to the hot sauce, you’ll get lumps, so always mix it with cold water first.
- Have all your sauce ingredients measured and ready. Once you start cooking the sauce, it comes together quickly. Having everything prepped and within arm’s reach—the minced garlic, ginger, and your slurry—makes the process smooth and stress-free.
How to Make Sweet and Sour Chicken
Step 1: Prepare the Chicken for Frying. Pat your chicken pieces completely dry with paper towels—this is crucial for the coating to stick properly. In one large bowl, place the cornstarch, salt, and white pepper. In another bowl, add the lightly beaten eggs. Now, working in batches, toss the chicken pieces in the cornstarch mixture first, shaking off any excess. Then, dip them into the egg, letting the extra drip off. Finally, give them one last coat in the cornstarch. You’ll notice it creates a shaggy, uneven coating—that’s perfect for extra crispiness. Place the coated pieces on a wire rack while you heat the oil.
Step 2: First Fry for the Chicken. Pour oil into your wok or deep skillet until it’s about 1.5 inches deep. Heat it over medium-high heat until it reaches 175°C (350°F). If you don’t have a thermometer, test it by dropping a small piece of coated chicken in—it should sizzle actively but not burn. Carefully add the chicken in batches, making sure not to overcrowd the pan. Fry for about 3-4 minutes, until the chicken is cooked through and a pale golden color. Remove with a spider strainer and let it drain on a wire rack set over a baking sheet. Repeat with all the chicken.
Step 3: Make the Sweet and Sour Sauce. While the chicken rests, pour out the oil from the wok, leaving about a tablespoon behind. Return the wok to medium heat. Add the minced ginger and garlic and stir-fry for just 30 seconds until incredibly fragrant—be careful not to let it burn. Now, add the pineapple juice, rice vinegar, ketchup, brown sugar, and soy sauce. Whisk everything together and bring it to a gentle simmer. Let it bubble for 2 minutes so the flavors meld.
Step 4: Thicken the Sauce. Give your cornstarch and water slurry a quick stir (it settles fast!) and then drizzle it into the simmering sauce while whisking constantly. You’ll see the sauce transform almost immediately, turning from thin and watery to thick and glossy. Let it cook for another minute while whisking, then remove it from the heat. The sauce should coat the back of a spoon nicely.
Step 5: Second Fry and Combine. Now, reheat your oil to 190°C (375°F). Working in batches again, fry the par-cooked chicken for a second time, about 1-2 minutes, until it’s a deep, golden brown and super crispy. Drain on the wire rack again. In the last minute of frying, add the bell pepper pieces to the hot oil and blanch them for just 30 seconds to soften slightly and brighten in color. Drain them with the chicken.
Step 6: Bring It All Together. Return the empty wok to the stove over medium-high heat. Add the crispy chicken, blanched bell peppers, and the drained pineapple chunks. Pour the glossy sweet and sour sauce over everything. Toss gently but thoroughly for about a minute, just until everything is heated through and beautifully coated. The trick is to do this quickly so the chicken retains its crunch. Serve immediately over a bed of fluffy rice.
Storage & Freshness Guide
- Fridge: Store in an airtight container for up to 3 days.
- Freezer: Freeze sauced chicken for up to 1 month; texture may soften upon thawing.
- Reviving: Reheat in an air fryer or oven at 200°C (400°F) for 5-10 minutes to restore crispiness.
Serving Suggestions
Complementary Dishes
- Steamed Jasmine Rice — Its delicate floral aroma and fluffy texture are the perfect neutral base to soak up all that glorious sauce.
- Simple Stir-Fried Greens — A quick garlicky bok choy or gai lan adds a fresh, slightly bitter counterpoint to the sweet and tangy chicken.
- Vegetable Spring Rolls — They add a different, lighter crunch and make the whole meal feel more like a festive banquet.
Drinks
- Iced Jasmine Green Tea — Its subtle, fragrant notes cleanse the palate beautifully between bites without competing with the dish’s bold flavors.
- A Light Lager or Pilsner — The crisp, effervescent quality of the beer cuts through the richness of the fried chicken and refreshes


Sweet And Sour Chicken
Make the best Sweet and Sour Chicken at home! This recipe features double-fried crispy chicken and a glossy homemade sauce. Skip the takeout and cook it tonight!
Ingredients
For the Chicken
-
500 g boneless, skinless chicken thighs or breasts (cut into 1-inch pieces)
-
120 g cornstarch
-
2 large eggs (lightly beaten)
-
1/2 tsp salt
-
1/4 tsp white pepper
-
Vegetable or peanut oil (for frying)
For the Sweet and Sour Sauce
-
150 ml pineapple juice (from the can of chunks is perfect)
-
80 ml rice vinegar
-
60 ml ketchup
-
50 g light brown sugar
-
2 tbsp soy sauce
-
1 tbsp cornstarch (mixed with 2 tbsp water (slurry))
-
2 tsp minced fresh ginger
-
2 garlic cloves (minced)
-
1 small red bell pepper (cut into 1-inch pieces)
-
1 small green bell pepper (cut into 1-inch pieces)
-
225 g can pineapple chunks (drained (reserve juice for the sauce))
Instructions
-
Pat your chicken pieces completely dry with paper towels—this is crucial for the coating to stick properly. In one large bowl, place the cornstarch, salt, and white pepper. In another bowl, add the lightly beaten eggs. Now, working in batches, toss the chicken pieces in the cornstarch mixture first, shaking off any excess. Then, dip them into the egg, letting the extra drip off. Finally, give them one last coat in the cornstarch. You’ll notice it creates a shaggy, uneven coating—that’s perfect for extra crispiness. Place the coated pieces on a wire rack while you heat the oil.01
-
Pour oil into your wok or deep skillet until it’s about 1.5 inches deep. Heat it over medium-high heat until it reaches 175°C (350°F). If you don’t have a thermometer, test it by dropping a small piece of coated chicken in—it should sizzle actively but not burn. Carefully add the chicken in batches, making sure not to overcrowd the pan. Fry for about 3-4 minutes, until the chicken is cooked through and a pale golden color. Remove with a spider strainer and let it drain on a wire rack set over a baking sheet. Repeat with all the chicken.02
-
While the chicken rests, pour out the oil from the wok, leaving about a tablespoon behind. Return the wok to medium heat. Add the minced ginger and garlic and stir-fry for just 30 seconds until incredibly fragrant—be careful not to let it burn. Now, add the pineapple juice, rice vinegar, ketchup, brown sugar, and soy sauce. Whisk everything together and bring it to a gentle simmer. Let it bubble for 2 minutes so the flavors meld.03
-
Give your cornstarch and water slurry a quick stir (it settles fast!) and then drizzle it into the simmering sauce while whisking constantly. You’ll see the sauce transform almost immediately, turning from thin and watery to thick and glossy. Let it cook for another minute while whisking, then remove it from the heat. The sauce should coat the back of a spoon nicely.04
-
Now, reheat your oil to 190°C (375°F). Working in batches again, fry the par-cooked chicken for a second time, about 1-2 minutes, until it’s a deep, golden brown and super crispy. Drain on the wire rack again. In the last minute of frying, add the bell pepper pieces to the hot oil and blanch them for just 30 seconds to soften slightly and brighten in color. Drain them with the chicken.05
-
Return the empty wok to the stove over medium-high heat. Add the crispy chicken, blanched bell peppers, and the drained pineapple chunks. Pour the glossy sweet and sour sauce over everything. Toss gently but thoroughly for about a minute, just until everything is heated through and beautifully coated. The trick is to do this quickly so the chicken retains its crunch. Serve immediately over a bed of fluffy rice.06
Not what you're looking for?


