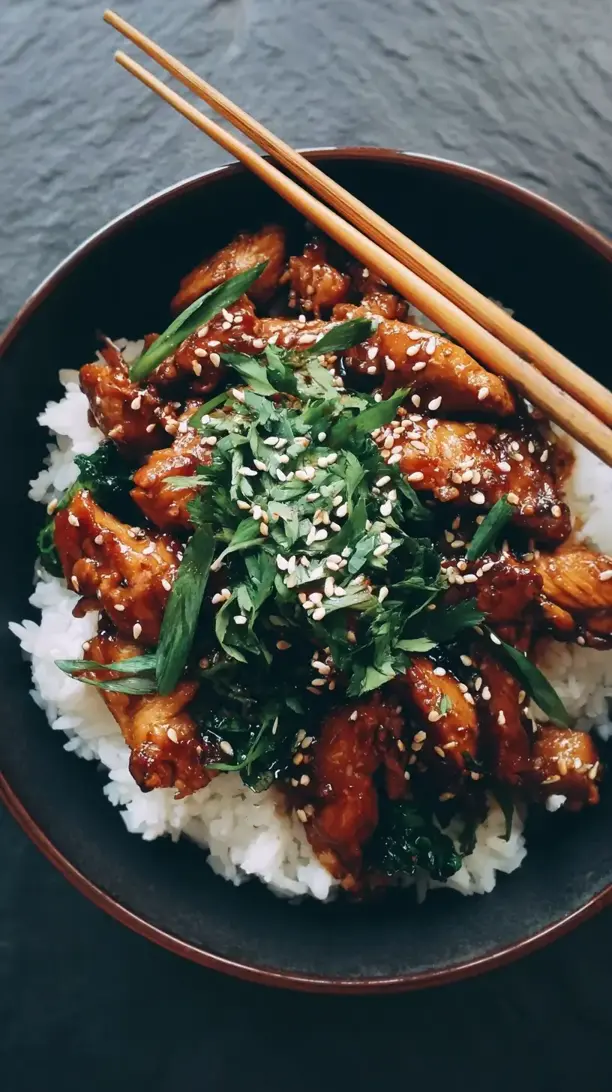
These Teriyaki Chicken Bowls deliver the perfect harmony of sweet and savory with tender chicken and fluffy rice. The homemade sauce is a game-changer, offering a glossy, complex glaze that clings to juicy, caramelized chicken. It’s a versatile, complete meal that’s ideal for busy weeknights or meal prep.
Looking for Teriyaki Chicken Bowls inspiration? You'll love what we have! Explore more Dinner Ideas recipes or discover our Drinks favorites.


Why You’ll Love This Teriyaki Chicken Bowls
- Versatile base: Swap veggies or protein to suit your taste.
- Homemade sauce: Balanced, glossy, and better than store-bought.
- Complete meal: Protein, carbs, and veggies in one satisfying bowl.
- Great leftovers: Flavors deepen overnight for easy next-day lunches.
Ingredients & Tools
For the Chicken & Marinade:
- 600 g boneless, skinless chicken thighs, cut into bite-sized pieces
- 2 tbsp vegetable oil
- 1 tbsp cornstarch
For the Teriyaki Sauce:
- 120 ml soy sauce (use reduced-sodium if preferred)
- 80 ml mirin
- 3 tbsp brown sugar
- 2 tbsp rice vinegar
- 3 cloves garlic, minced
- 1 tbsp fresh ginger, grated
- 1 tbsp cornstarch mixed with 2 tbsp water (slurry)
For the Bowls:
- 300 g jasmine or sushi rice, cooked
- 1 large head of broccoli, cut into florets
- 2 medium carrots, julienned or grated
- 2 spring onions, thinly sliced
- 1 tbsp sesame seeds, for garnish
Tools: A large skillet or wok, a small saucepan, a whisk, and a microplane or fine grater for the ginger.
Notes: Don’t skip the fresh ginger and garlic—they provide the aromatic backbone. Using chicken thighs is key for moist, flavorful results.
Nutrition (per serving)
| Calories: | 580 kcal |
| Protein: | 38 g |
| Fat: | 14 g |
| Carbs: | 72 g |
| Fiber: | 5 g |
Serves: 4 | Prep Time: 20 minutes | Cook Time: 25 minutes | Total Time: 45 minutes
Before You Start: Tips & Ingredient Notes
- Chicken thighs vs. breasts? I strongly recommend thighs for this recipe. They have more flavor and are much more forgiving when cooked over high heat, staying juicy where breasts can easily dry out. If you must use breasts, cut them smaller and reduce the cooking time by a minute or two.
- What if I don’t have mirin? Mirin adds a specific sweet complexity, but in a pinch, you can substitute it with a dry white wine mixed with a teaspoon of sugar, or even just use a little extra rice vinegar and brown sugar. The flavor profile will shift slightly, but it’ll still be delicious.
- Get your mise en place ready. This recipe comes together fast once you start cooking. Having your sauce mixed, your veggies prepped, and your cornstarch slurry ready to go will make the process smooth and stress-free.
- Don’t overcrowd the pan. This is the golden rule for getting a good sear on your chicken. If you put too much in the pan at once, it will steam instead of sauté. If your skillet is small, cook the chicken in two batches.
How to Make Teriyaki Chicken Bowls
Step 1: Prep the Chicken and Make the Sauce. Start by patting your chicken thighs dry with a paper towel—this is a small step that makes a huge difference in getting a good sear. Cut them into uniform, bite-sized pieces and toss them in a bowl with the 1 tablespoon of cornstarch. In a separate small saucepan, combine the soy sauce, mirin, brown sugar, rice vinegar, minced garlic, and grated ginger. Give it a quick whisk to dissolve the sugar.
Step 2: Cook the Chicken to Perfection. Heat the vegetable oil in a large skillet or wok over medium-high heat. Once the oil is shimmering, add the chicken in a single layer, making sure not to overcrowd the pan. Let it cook undisturbed for 2-3 minutes to get a beautiful golden-brown crust. Flip and cook for another 2-3 minutes until cooked through. You’ll notice the chicken will have a nice color and the edges will look firm. Remove the chicken from the skillet and set it aside on a plate.
Step 3: Whip Up the Glaze. Pour the teriyaki sauce mixture you made earlier into the same skillet (no need to wash it—those browned bits are flavor gold!). Bring it to a simmer over medium heat, stirring occasionally. Let it bubble gently for about 2 minutes to let the flavors meld and the alcohol from the mirin cook off.
Step 4: Thicken the Sauce. This is where the magic happens. Give your cornstarch and water slurry a quick stir (the cornstarch settles quickly) and then drizzle it into the simmering sauce while whisking constantly. You’ll see the sauce transform almost immediately, turning from thin and watery to glossy and thick enough to coat the back of a spoon. This should only take about 30-60 seconds.
Step 5: Combine and Glaze. Return the cooked chicken to the skillet with the thickened teriyaki sauce. Toss everything together until every piece of chicken is generously and gloriously coated in that sticky, shiny glaze. Let it cook together for just another minute so the chicken reheats and soaks up some of that saucy goodness.
Step 6: Prepare Your Veggies and Assemble. While the chicken is cooking, you can quickly steam your broccoli florets until they are bright green and tender-crisp—about 4-5 minutes. Fluff your cooked rice with a fork. Now, it’s assembly time! Divide the fluffy rice among four bowls. Top with a generous portion of the glazed teriyaki chicken, then arrange the steamed broccoli and fresh, crunchy carrots around it. Finish with a sprinkle of sliced spring onions and a generous pinch of sesame seeds for that final touch.
Storage & Freshness Guide
- Fridge: Store in airtight containers for up to 3–4 days; keep sauce and rice separate if possible.
- Freezer: Freeze chicken and sauce (without fresh veggies) for up to 2 months; thaw overnight in fridge.
- Reviving: Reheat with a splash of water or a damp paper towel to restore moisture and loosen sauce.
Serving Suggestions
Complementary Dishes
- A simple cucumber salad — The cool, crisp, and slightly acidic bite of a quick-pickled cucumber salad provides a fantastic contrast to the rich, savory-sweet flavors of the bowl.
- Steamed or roasted asparagus — Their earthy flavor and tender texture make them a wonderful green addition that pairs beautifully with the teriyaki glaze.
- Vegetable gyoza (potstickers) — Pan-fried until crispy on the bottom, these add a delightful textural variation and make the meal feel extra special.
Drinks
- Iced green tea — Its clean, slightly bitter notes help cleanse the palate between bites and complement the umami flavors without overpowering them.
- A light lager or pilsner — The crisp, effervescent quality of a cold beer cuts through the richness of the sauce perfectly, making each bite taste fresh again.
- Ginger ale or a ginger beer — The spicy-sweet flavor profile echoes the ginger in the sauce, creating a harmonious and refreshing pairing.
Something Sweet
- Mochi ice cream — The chewy, sweet rice flour exterior and cold, creamy center are a classic and delightful way to end a Japanese-inspired meal.
- A slice of matcha cheesecake — The earthy, slightly bitter notes of matcha provide a sophisticated and delicious counterpoint to the meal’s sweetness.
- Fresh orange slices drizzled with honey — Sometimes simple is best. The bright, citrusy freshness is a light and palate-cleansing finish.
Top Mistakes to Avoid
- Mistake: Adding the cornstarch directly to the sauce. This will almost guaranteed create lumps. You must always mix cornstarch with a cold liquid (like water) first to create a smooth slurry before adding it to a hot liquid.
- Mistake: Boiling the sauce after adding the slurry. Once you’ve added the cornstarch slurry and the sauce has thickened, take it off the heat. A vigorous boil can break down the starch molecules, causing your beautiful glossy sauce to become thin again.
- Mistake: Using bottled, pre-minced garlic and ginger. I know it’s convenient, but the flavor is simply not as bright or potent. Freshly grated ginger and minced garlic make a world of difference in the final aroma and taste of your teriyaki glaze.
- Mistake: Skipping the sear on the chicken. If you just toss raw chicken into the sauce to cook, you’ll miss out on the deep, caramelized flavor that a good sear provides. That browning reaction is foundational to the dish’s depth.
Expert Tips
- Tip: Double the sauce. Honestly, you won’t regret it. Make a double batch of the teriyaki sauce and keep the extra in a jar in the fridge. It’s fantastic on salmon, as a stir-fry sauce, or as a glaze for meatballs.
- Tip: Let the chicken marinate. For even more flavor, toss the cubed chicken in about a quarter of the teriyaki sauce (before you thicken it) and let it sit for 30 minutes in the fridge. You’ll get flavor all the way through the meat.
- Tip: Toast your sesame seeds. It takes one extra minute but elevates the garnish immensely. Just toss them in a dry pan over medium heat for 1-2 minutes until they become fragrant and turn a light golden color.
- Tip: Use leftover sauce on rice. Any extra glaze left in the pan after you’ve plated the chicken? Don’t you dare wash it down the drain! Drizzle it right over the rice in your bowls for an extra flavor boost.
FAQs
Can I make this recipe ahead of time for meal prep?
Absolutely, it’s a meal prep superstar! Cook the chicken and sauce, and steam the broccoli. Let everything cool completely before dividing it into airtight containers, keeping the components separate from the rice if you can to prevent the rice from getting soggy. It will keep well in the fridge for 3-4 days. The sauce might thicken when chilled, but it will loosen up again when reheated.
My sauce didn’t thicken. What went wrong?
This usually happens for one of two reasons. First, the cornstarch slurry might have been added to a sauce that wasn’t hot enough—it needs to be at a simmer to activate properly. Second, you might not have simmered it long enough after adding the slurry; it needs a good 30-60 seconds of constant whisking to reach its full thickening potential. If it’s still thin, you can mix another half-tablespoon of cornstarch with a tablespoon of water and try again.
Is there a way to make this gluten-free?
Yes, easily! Simply ensure you use a certified gluten-free soy sauce or tamari. All the other core ingredients—mirin, rice vinegar, etc.—are naturally gluten-free, but always double-check the labels on pre-packaged items just to be safe.
Can I use frozen vegetables?
You can, but be mindful of the extra water they release. For frozen broccoli, I’d recommend roasting it from frozen or sautéing it separately in a hot pan to drive off as much moisture as possible before adding it to your bowl. Using frozen veggies can sometimes make your bowl a bit watery if you’re not careful.
How can I store and reheat leftovers?
Store any leftovers in an airtight container in the refrigerator for up to 3 days. The best way to reheat is in the microwave with a damp paper towel placed over the bowl to reintroduce moisture and prevent the rice from drying out. You can also reheat it gently in a skillet on the stove with a tiny splash of water to loosen the sauce.


Teriyaki Chicken Bowls
Make easy Teriyaki Chicken Bowls with a homemade glaze in under 45 minutes. Perfect for a quick dinner or meal prep. Get the recipe now!
Ingredients
For the Chicken & Marinade
-
600 g boneless, skinless chicken thighs (cut into bite-sized pieces)
-
2 tbsp vegetable oil
-
1 tbsp cornstarch
For the Teriyaki Sauce
-
120 ml soy sauce (use reduced-sodium if preferred)
-
80 ml mirin
-
3 tbsp brown sugar
-
2 tbsp rice vinegar
-
3 cloves garlic (minced)
-
1 tbsp fresh ginger (grated)
-
1 tbsp cornstarch mixed with 2 tbsp water (slurry)
For the Bowls
-
300 g jasmine or sushi rice (cooked)
-
1 large head broccoli (cut into florets)
-
2 medium carrots (julienned or grated)
-
2 spring onions (thinly sliced)
-
1 tbsp sesame seeds (for garnish)
Instructions
-
Start by patting your chicken thighs dry with a paper towel—this is a small step that makes a huge difference in getting a good sear. Cut them into uniform, bite-sized pieces and toss them in a bowl with the 1 tablespoon of cornstarch. In a separate small saucepan, combine the soy sauce, mirin, brown sugar, rice vinegar, minced garlic, and grated ginger. Give it a quick whisk to dissolve the sugar.01
-
Heat the vegetable oil in a large skillet or wok over medium-high heat. Once the oil is shimmering, add the chicken in a single layer, making sure not to overcrowd the pan. Let it cook undisturbed for 2-3 minutes to get a beautiful golden-brown crust. Flip and cook for another 2-3 minutes until cooked through. You’ll notice the chicken will have a nice color and the edges will look firm. Remove the chicken from the skillet and set it aside on a plate.02
-
Pour the teriyaki sauce mixture you made earlier into the same skillet (no need to wash it—those browned bits are flavor gold!). Bring it to a simmer over medium heat, stirring occasionally. Let it bubble gently for about 2 minutes to let the flavors meld and the alcohol from the mirin cook off.03
-
Give your cornstarch and water slurry a quick stir (the cornstarch settles quickly) and then drizzle it into the simmering sauce while whisking constantly. You’ll see the sauce transform almost immediately, turning from thin and watery to glossy and thick enough to coat the back of a spoon. This should only take about 30-60 seconds.04
-
Return the cooked chicken to the skillet with the thickened teriyaki sauce. Toss everything together until every piece of chicken is generously and gloriously coated in that sticky, shiny glaze. Let it cook together for just another minute so the chicken reheats and soaks up some of that saucy goodness.05
-
While the chicken is cooking, you can quickly steam your broccoli florets until they are bright green and tender-crisp—about 4-5 minutes. Fluff your cooked rice with a fork. Now, it's assembly time! Divide the fluffy rice among four bowls. Top with a generous portion of the glazed teriyaki chicken, then arrange the steamed broccoli and fresh, crunchy carrots around it. Finish with a sprinkle of sliced spring onions and a generous pinch of sesame seeds for that final touch.06
Not what you're looking for?


