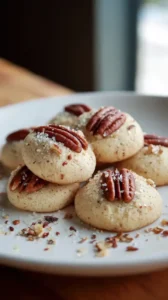
There’s something magical about a cookie that feels like a hug. For me, these Vegan Cherry Chocolate Cookies are exactly that—a perfect little moment where sweet meets tart, with chewy centers, melty chocolate chunks, and a joyful fruity burst in every bite. They’re my go-to when I want a plant-based treat that’s both indulgent and wholesome, the kind of comfort food recipe that makes any afternoon feel special.
And speaking of special, they’ve become a star of my holiday baking. Whenever I’m brainstorming Christmas dessert ideas or compiling my list of holiday treats, this simple one-bowl recipe always makes the cut. They bring such a festive, fruity twist to a tray of classic Christmas cookies recipes. Honestly, whether you’re deep in planning your holiday cookies Christmas lineup or need a last-minute sweet, these are a standout choice for any gathering.
So if you, like me, are searching for delicious Christmas baking ideas this season, I truly hope you try these. They’re a wonderful way to create beautiful Christmas sweets that everyone can enjoy, making your holiday baking feel both effortless and full of heart.
Love Vegan Cherry Chocolate Cookies? So do we! If you're into Christmas Cookie or curious about Chicken Breast Recipes, you'll find plenty of inspiration below.


Why You’ll Love These Vegan Cherry Chocolate Cookies
- Flavor & Texture: Chewy, soft-baked base with rich chocolate and tangy cherries.
- Simple to Make: One-bowl wonder, no mixer needed, straightforward for any baker.
- Plant-Based: Dairy-free and egg-free, yet bakery-style perfect.
- Crowd-Pleaser: Universally appealing flavor contrast that disappears fast.
Ingredients & Tools
- 120 ml refined coconut oil, melted and cooled
- 150 g light brown sugar, packed
- 50 g granulated sugar
- 80 ml plant-based milk (unsweetened almond or oat work best)
- 2 tsp vanilla extract
- 240 g all-purpose flour
- 1/2 tsp baking soda
- 1/2 tsp baking powder
- 1/2 tsp salt
- 150 g vegan dark chocolate, roughly chopped
- 100 g dried tart cherries
Tools: A large mixing bowl, a whisk or spatula, a baking sheet, and parchment paper.
Notes: Quality matters—chopping your own chocolate bar creates melty pockets, and dried tart cherries provide essential zing.
Nutrition (per serving)
| Calories: | 185 kcal |
| Protein: | 2 g |
| Fat: | 8 g |
| Carbs: | 28 g |
| Fiber: | 1 g |
Serves: 18 | Prep Time: 15 minutes | Cook Time: 10-12 minutes | Total Time: 27 minutes
Before You Start: Tips & Ingredient Notes
- Melted & Cooled Coconut Oil is Key. You want the oil to be liquid, but not hot. If it’s too warm, it will melt the sugars and make the dough greasy. Let it sit for 5-10 minutes after melting until it’s just warm to the touch.
- Don’t Skip the Chill Time. I know it’s tempting to bake them right away, but chilling the dough for at least 30 minutes is non-negotiable. It prevents the cookies from spreading too much and allows the flavors to deepen, resulting in a much thicker, chewier cookie.
- Chop Your Own Chocolate. While vegan chocolate chips are convenient, chopping a bar of high-quality dark chocolate creates a variety of sizes—from tiny shards that melt into the dough to larger chunks that create glorious pools of chocolate.
- The Right Kind of Cherries. Look for “dried tart cherries” or “dried Montmorency cherries.” They have a sharper, more complex flavor than sweetened dried cherries, which provides a much-needed contrast to the rich chocolate and sweet cookie dough.
How to Make Vegan Cherry Chocolate Cookies
Step 1: Start by preheating your oven to 175°C (350°F) and lining your baking sheet with parchment paper. In your large mixing bowl, combine the melted (and cooled!) coconut oil with the light brown and granulated sugars. Whisk them together for a good minute—you’ll notice the mixture will look a bit grainy but also slightly thickened. This is exactly what you want.
Step 2: Now, pour in the plant-based milk and vanilla extract. Whisk again until the mixture is smooth and fully emulsified. It should have a lovely, glossy appearance and all the oil should be incorporated, not separated. This is your wet ingredient base, and it’s the secret to a perfectly textured cookie.
Step 3: Time for the dry ingredients. Add the all-purpose flour, baking soda, baking powder, and salt directly into the same bowl. Switch to a spatula and gently fold everything together. The trick is to stop mixing the very moment you no longer see dry streaks of flour. A few tiny lumps are totally fine—overmixing is the enemy of a tender cookie.
Step 4: Once your dough is just combined, fold in the chopped vegan dark chocolate and the dried tart cherries. Make sure they’re evenly distributed throughout the dough. You’ll get a beautiful, studded dough that’s just bursting with goodies. At this stage, the dough might be a bit soft and sticky, which is perfect.
Step 5: This is the most important step for the perfect shape: chilling. Cover the bowl and pop it into the refrigerator for at least 30 minutes. If you have more time, an hour is even better. This solidifies the fat, which prevents the cookies from spreading into thin puddles in the oven.
Step 6: After chilling, use a cookie scoop or a tablespoon to portion out mounds of dough, rolling them gently between your palms to form rough balls. Place them on your prepared baking sheet, leaving about 5 cm (2 inches) between each one, as they will spread a little. For a bakery-style look, press a few extra chocolate chunks and cherries onto the tops of the dough balls.
Step 7: Bake for 10-12 minutes. You’re looking for the edges to be lightly golden and set, while the centers still appear soft and slightly underdone. They will continue to cook on the hot baking sheet after you take them out. Don’t wait for them to look fully “done” in the center, or you’ll lose that wonderful chewiness.
Step 8: As soon as you remove the baking sheet from the oven, give it a firm tap on the countertop. This helps deflate the cookies just slightly, creating those lovely crinkles. Let the cookies cool on the baking sheet for a full 10 minutes before transferring them to a wire rack to cool completely. This resting time is crucial for them to set up properly.
Storage & Freshness Guide
- Fridge: Not recommended; store at room temperature for best texture.
- Freezer: Freeze baked cookies up to 3 months, or freeze dough balls and bake from frozen.
- Reviving: Warm in microwave for 10 seconds or in oven at 150°C (300°F) for 3–5 minutes.
Serving Suggestions
Complementary Dishes
- A scoop of vegan vanilla bean ice cream — The classic à la mode treatment is unbeatable. The cold, creamy ice cream melting into the warm, chewy cookie is a textural dream come true.
- A small bowl of fresh mixed berries — The bright, fresh acidity of berries like raspberries and blueberries cleanses the palate and highlights the fruity notes of the cherries in the cookie.
Drinks
- Oat milk latte — The creamy, slightly sweet coffee is a perfect partner for the rich chocolate and provides a lovely bitter counterpoint to the cookie’s sweetness.
- Earl Grey tea — The bergamot in the tea has a beautiful citrusy-floral quality that somehow makes both the cherry and the chocolate flavors pop even more.
Something Sweet
- Vegan chocolate-dipped orange segments — This is a simple, elegant way to extend the chocolate theme while introducing a bright, zesty citrus note that cuts through the richness beautifully.
Top Mistakes to Avoid
- Using hot coconut oil. If your oil is too hot when you mix it with the sugars, it can “cook” them and create a greasy, separated dough that bakes up oily and flat. Always let it cool first.
- Skipping the chill time. I’ve messed this up before too, in a moment of impatient baking. The result is a cookie that spreads way too thin and bakes up crispy instead of soft and chewy. The wait is truly worth it.
- Overbaking the cookies. They continue to cook on the hot tray after being removed from the oven. Pull them out when the edges are set but the centers still look a bit puffy and underdone for the perfect, fudgy texture.
- Overmixing the dough. Once you add the flour, mix just until combined. Overworking the gluten in the flour will make your cookies tough and cakey, rather than tender and delicate.
Expert Tips
- Tip: For an extra flavor boost, toast your coconut oil. Gently heat it in a pan until it just starts to smell nutty and fragrant, then let it cool. This adds a subtle, delicious depth that makes the cookies taste even more complex.
- Tip: If your dough is too sticky to handle after chilling, don’t add more flour. Just wet your hands slightly with water before rolling the dough balls. This prevents sticking without altering the dough’s composition.
- Tip: Make the dough ahead of time! You can keep it, covered, in the fridge for up to 3 days. This not only improves the flavor but also means you can have freshly baked cookies anytime a craving strikes.
- Tip: For a truly professional finish, flaky sea salt is your best friend. Sprinkle a tiny pinch on top of each cookie right when they come out of the oven. It enhances every single flavor in the most incredible way.
FAQs
Can I use a different type of oil?
You can, but the results will vary. Refined coconut oil is ideal because it’s solid at room temperature, which helps the cookies hold their shape. If you use a liquid oil like canola or sunflower, your cookies will likely spread more and have a cakier, less chewy texture. The coconut flavor in refined coconut oil is very neutral, so don’t worry about your cookies tasting like coconut!
My cookies came out flat. What happened?
This is almost always due to the dough not being chilled enough, or your oven temperature being off. The chilled fat in the dough takes longer to melt in the oven, giving the structure time to set. Next time, ensure your dough is properly chilled and consider using an oven thermometer to verify your oven’s temperature is accurate. Also, double-check that your baking soda and powder are fresh!
Can I use frozen cherries instead of dried?
I wouldn’t recommend it for this specific recipe. Frozen cherries contain a lot of water, which will release during baking and make the cookies soggy and prevent them from setting properly. Dried cherries provide concentrated flavor and chewy texture without adding extra moisture. If you’re desperate, you could try patting thawed frozen cherries very dry and chopping them, but dried is truly best.
How should I store these cookies?
To keep them soft and chewy, store them in an airtight container at room temperature. They’ll be perfect for about 4-5 days. If you want to keep them longer, you can freeze the baked cookies for up to 3 months, or freeze the portioned dough balls and bake them straight from the freezer, adding a minute or two to the baking time.
Can I make these cookies gluten-free?
Absolutely! I’ve had great success using a 1:1 gluten-free all-purpose flour blend. Just make sure the blend contains a binder like xanthan gum. The texture might be a tiny bit more crumbly, but they will still be delicious. All other steps and ingredients remain exactly the same.


Vegan Cherry Chocolate Cookies: An Easy One-Bowl Dessert
Whip up a batch of Vegan Cherry Chocolate Cookies with this easy vegan cookie recipe. These chewy, festive treats are perfect for holiday baking and make a delightful plant-based dessert.
Ingredients
For the Ingredients
-
120 ml refined coconut oil (melted and cooled)
-
150 g light brown sugar (packed)
-
50 g granulated sugar
-
80 ml plant-based milk (unsweetened almond or oat work best)
-
2 tsp vanilla extract
-
240 g all-purpose flour
-
1/2 tsp baking soda
-
1/2 tsp baking powder
-
1/2 tsp salt
-
150 g vegan dark chocolate (roughly chopped)
-
100 g dried tart cherries
Not what you're looking for?


