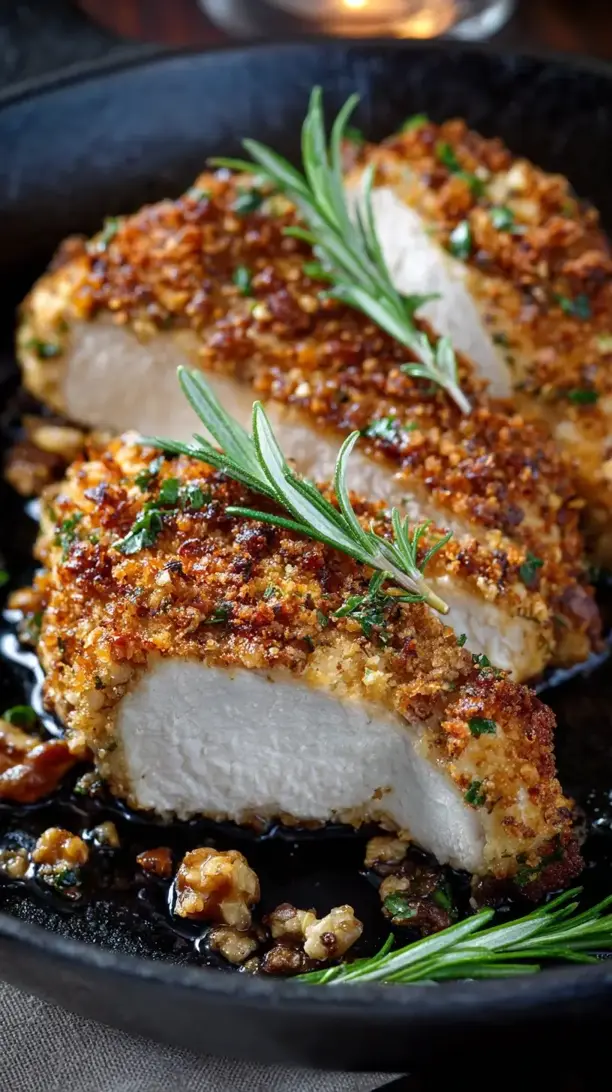
This walnut crusted chicken turns a simple chicken breast into something truly special. The nutty, crunchy crust seals in the juices for a meal that’s both elegant and easy. It’s a showstopper for any night of the week.
Looking for Walnut Crusted Chicken inspiration? You'll love what we have! Explore more Chicken Breast Recipes recipes or discover our Desserts favorites.


Why You’ll Love This Walnut Crusted Chicken
- Incredible texture: A crunchy, shattery crust gives way to juicy, tender chicken inside.
- Rich, toasty flavor: Walnuts and Parmesan create a savory, umami-packed coating.
- Gourmet look, minimal effort: Impress guests with a bistro-style dish that’s simple to make.
- Gluten-free & adaptable: Naturally gluten-free and easy to customize with your favorite herbs or spices.
Ingredients & Tools
- 4 boneless, skinless chicken breasts (about 150-180g each)
- 120 g walnuts, finely chopped
- 50 g grated Parmesan cheese
- 60 g all-purpose flour (or gluten-free 1:1 substitute)
- 2 large eggs
- 2 tbsp Dijon mustard
- 1 tsp dried thyme
- 1/2 tsp garlic powder
- 1/2 tsp sweet paprika
- 1/2 tsp fine sea salt
- 1/4 tsp freshly ground black pepper
- 2 tbsp olive oil or avocado oil
Tools: A food processor for chopping the walnuts, a set of three shallow bowls for your dredging station, a baking sheet, and parchment paper.
Notes: Use fresh walnuts for the best flavor. Dijon mustard acts as a glue for the crust and adds a subtle tang.
Nutrition (per serving)
| Calories: | 485 kcal |
| Protein: | 42 g |
| Fat: | 28 g |
| Carbs: | 12 g |
| Fiber: | 2 g |
Serves: 4 | Prep Time: 20 minutes | Cook Time: 25 minutes | Total Time: 45 minutes
Before You Start: Tips & Ingredient Notes
- Get your chicken to an even thickness. This is the single most important step for even cooking. Place the chicken breasts between two pieces of plastic wrap and gently pound the thicker ends with a rolling pin or meat mallet until they’re a uniform 2-3 cm thick. This prevents the thin ends from drying out while the thick center cooks through.
- Don’t skip the toasting step for the walnuts. Toasting the walnuts before you chop them is a non-negotiable flavor booster. It wakes up their natural oils and deepens their nutty character, transforming the entire crust from good to unforgettable. Just a few minutes in a dry pan until fragrant makes all the difference.
- Why use Dijon mustard instead of just egg? The Dijon adds a layer of flavor that plain egg wash just can’t provide. Its slight acidity and complexity complement the walnuts and Parmesan perfectly. It also creates a slightly thicker, more adhesive layer, which helps a heavier nut crust stick much better.
- Consider a quick brine for ultra-juicy chicken. If you have an extra 30 minutes, soaking your chicken in a simple brine of 1 litre water and 2 tablespoons salt will plump the meat with moisture, guaranteeing a juicy result even if you accidentally overcook it a little. It’s a fantastic insurance policy.
How to Make Walnut Crusted Chicken
Step 1: Prepare Your Chicken and Toast the Walnuts. Start by preheating your oven to 200°C (400°F). Place a piece of parchment paper on a baking sheet and set it aside. Now, take your chicken breasts and, if they aren’t already, pound them to an even thickness—this is crucial for even cooking. Pat them completely dry with paper towels; a dry surface helps the coating stick. For the walnuts, spread them in a single layer in a dry skillet over medium heat. Toast for 3-5 minutes, shaking the pan often, until they become fragrant and take on a slightly darker color. Be careful not to burn them! Let them cool for a few minutes before moving on.
Step 2: Create Your Dredging Station. This is where the magic of assembly happens. You’ll need three shallow bowls or plates. In the first bowl, place your all-purpose flour, seasoned with a pinch of salt and pepper. In the second bowl, whisk the two eggs together with the Dijon mustard until the mixture is smooth and fully combined. You’ll notice it has a pale yellow, creamy consistency. In the third bowl, combine your finely chopped, toasted walnuts, grated Parmesan, dried thyme, garlic powder, paprika, salt, and pepper. Mix it all together with a fork until it’s a uniform, fragrant coating.
Step 3: Coat the Chicken Thoroughly. Now for the fun, slightly messy part. Take one chicken breast and dredge it in the flour, shaking off any excess. You just want a very light, even dusting. Next, dip it into the egg and mustard mixture, making sure it’s fully coated on all sides. Let any excess drip off. Finally, press the chicken firmly into the walnut and Parmesan mixture. Really use your hands to pack the crust onto the chicken, ensuring every nook and cranny is covered. A good, solid press here ensures the crust won’t fall off during baking. Place the finished chicken on your prepared baking sheet and repeat with the remaining breasts.
Step 4: Bake to Golden-Brown Perfection. Just before the chicken goes in the oven, drizzle or lightly brush the top of each piece with a little olive oil. This will help the crust achieve a beautiful, deep golden color and extra crispiness. Bake for 20-25 minutes. You’ll know it’s done when the crust is a rich brown and the internal temperature of the chicken reaches 74°C (165°F) when tested with a meat thermometer in the thickest part. The smell in your kitchen will be absolutely irresistible at this point.
Step 5: Rest and Serve. This might be the hardest step—you have to let the chicken rest! Once out of the oven, transfer the chicken to a clean plate or cutting board and let it sit for 5 minutes before slicing or serving. This allows the juices to redistribute throughout the meat. If you cut into it immediately, all those precious juices will run out, leaving you with drier chicken. The wait is worth it, I promise.
Storage & Freshness Guide
- Fridge: Store leftovers in an airtight container for up to 3 days.
- Freezer: Freeze baked chicken in a single layer, then transfer to a freezer bag for up to 2 months.
- Reviving: Reheat in the oven or air fryer at 350°F until warm and crispy.
Serving Suggestions
Complementary Dishes
- Garlic Mashed Potatoes — The creamy, smooth texture is a dreamy contrast to the crunchy chicken, and the mild garlic flavor complements the nuttiness without overpowering it.
- Simple Arugula Salad with Lemon Vinaigrette — The peppery arugula and bright, acidic dressing cut through the richness of the dish perfectly, balancing out each bite.
- Roasted Green Beans with Almonds — Staying in the nut family creates a lovely thematic harmony, and the tender-crisp beans add a fresh, earthy component to the plate.
Drinks
- A Crisp Chardonnay — Look for an unoaked or lightly oaked version; its bright acidity and notes of apple and citrus will cleanse the palate and highlight the savory notes in the crust.
- Sparkling Water with a Lemon Twist — The bubbles and citrus are a non-alcoholic way to achieve the same palate-cleansing effect, making each bite of chicken taste fresh and new.
- An Amber Ale — The maltiness and slight caramel notes in the beer mirror the toasty flavors of the walnuts, creating a surprisingly harmonious pairing.
Something Sweet
- Warm Apple Crumble — The comforting, spiced fruit and buttery oat topping continue the theme of delightful textures and warm, autumnal flavors that pair so well with the walnut chicken.
- Dark Chocolate Pots de Crème — A rich, silky chocolate dessert provides a decadent, smooth finish that contrasts beautifully with the meal’s main event.
- Lemon Sorbet — This is the ultimate palate cleanser. Its sharp, refreshing citrus zing is the perfect light ending to a meal that’s rich in flavor and texture.
Top Mistakes to Avoid
- Mistake: Not pounding the chicken to an even thickness. This is the fastest route to a disappointing dinner. The thin parts will be overcooked and dry long before the thick center is done. A few minutes with a rolling pin ensures every bite is perfectly cooked.
- Mistake: Using a wire rack on the baking sheet. It might seem like a good idea for air circulation, but it can prevent the bottom crust from crisping up properly and can make the coating stick. A parchment-lined baking sheet is your best bet.
- Mistake: Skipping the rest time after baking. I know, I know—it’s tempting to dig right in. But slicing into that chicken the second it leaves the oven will cause all the lovely juices to pool on your plate instead of staying in the meat, leading to a drier result.
- Mistake: Chopping the walnuts too coarsely. Large chunks of walnut won’t adhere well to the chicken and can burn more easily in the oven. You want a fine, almost sand-like texture with some small bits for the best adhesion and even browning.
Expert Tips
- Tip: Use a food processor for the perfect walnut texture. Pulse your toasted, cooled walnuts with the Parmesan and dried herbs. This not only chops them perfectly but also combines the ingredients, ensuring every bit of the crust is perfectly seasoned.
- Tip: Get a head start with mise en place. Set up your dredging station in order before you even touch the chicken. Having your flour, egg wash, and nut mixture lined up and ready to go makes the coating process smooth, clean, and efficient.
- Tip: For extra crispiness, use a light touch of oil. Brushing the top of the coated chicken with a thin layer of oil before baking encourages deep, even browning and adds an extra layer of crunch to the finished crust.
- Tip: Don’t crowd the baking sheet. Make sure there’s plenty of space between each piece of chicken. If they’re too close, they’ll steam each other instead of baking, resulting in a softer, less crispy coating.
FAQs
Can I make this walnut crusted chicken ahead of time?
You can prepare it up to a day in advance! Assemble the chicken completely—coat it in the flour, egg, and walnut crust—then place it on the baking sheet, cover tightly with plastic wrap, and refrigerate. When you’re ready to eat, just pop it straight into the preheated oven. You might need to add 2-3 extra minutes to the baking time since it’s going in cold. I don’t recommend freezing the assembled raw chicken, as the crust can become soggy upon thawing.
What’s the best way to reheat leftovers?
To keep the crust crispy, the oven or an air fryer is your best friend. Avoid the microwave, as it will turn the beautiful crust soft and soggy. Reheat in a 175°C (350°F) oven or air fryer for about 8-12 minutes, until warmed through. This method will help re-crisp the exterior while gently heating the chicken inside without drying it out.
Can I use a different type of nut?
Absolutely! Pecans or almonds would be wonderful substitutes. Pecans will give you a slightly sweeter, buttery flavor, while almonds will provide a lighter, more delicate crunch. Just make sure to toast whatever nut you choose first—it’s a universal rule for unlocking maximum flavor. The process and measurements will remain the same.
My crust is falling off. What did I do wrong?
This usually comes down to two things: moisture or not packing it on firmly enough. First, make sure your chicken is patted completely dry before you start the dredging process. Second, when you get to the walnut stage, really press the mixture onto the chicken with the palms of your hands. You want to compact it and make it adhere, not just sprinkle it on.
Is there a good dairy-free alternative for the Parmesan?
For a dairy-free version, you can replace the Parmesan with an equal amount of nutritional yeast. It will provide that same savory, umami, cheesy flavor that complements the walnuts so well. Alternatively, you could just use a few extra tablespoons of finely ground walnuts to make up the volume, though you’ll lose a bit of the savory depth.


Walnut Crusted Chicken
Make this easy Walnut Crusted Chicken with a crunchy Parmesan-walnut crust. Perfectly juicy inside, gluten-free adaptable, and ready in 45 minutes. Get the recipe now!
Ingredients
For the Ingredients
-
4 boneless, skinless chicken breasts (about 150-180g each)
-
120 g walnuts (finely chopped)
-
50 g grated Parmesan cheese
-
60 g all-purpose flour (or gluten-free 1:1 substitute)
-
2 large eggs
-
2 tbsp Dijon mustard
-
1 tsp dried thyme
-
0.5 tsp garlic powder
-
0.5 tsp sweet paprika
-
0.5 tsp fine sea salt
-
0.25 tsp freshly ground black pepper
-
2 tbsp olive oil or avocado oil
Instructions
-
Start by preheating your oven to 200°C (400°F). Place a piece of parchment paper on a baking sheet and set it aside. Now, take your chicken breasts and, if they aren't already, pound them to an even thickness—this is crucial for even cooking. Pat them completely dry with paper towels; a dry surface helps the coating stick. For the walnuts, spread them in a single layer in a dry skillet over medium heat. Toast for 3-5 minutes, shaking the pan often, until they become fragrant and take on a slightly darker color. Be careful not to burn them! Let them cool for a few minutes before moving on.01
-
This is where the magic of assembly happens. You’ll need three shallow bowls or plates. In the first bowl, place your all-purpose flour, seasoned with a pinch of salt and pepper. In the second bowl, whisk the two eggs together with the Dijon mustard until the mixture is smooth and fully combined. You’ll notice it has a pale yellow, creamy consistency. In the third bowl, combine your finely chopped, toasted walnuts, grated Parmesan, dried thyme, garlic powder, paprika, salt, and pepper. Mix it all together with a fork until it’s a uniform, fragrant coating.02
-
Now for the fun, slightly messy part. Take one chicken breast and dredge it in the flour, shaking off any excess. You just want a very light, even dusting. Next, dip it into the egg and mustard mixture, making sure it’s fully coated on all sides. Let any excess drip off. Finally, press the chicken firmly into the walnut and Parmesan mixture. Really use your hands to pack the crust onto the chicken, ensuring every nook and cranny is covered. A good, solid press here ensures the crust won’t fall off during baking. Place the finished chicken on your prepared baking sheet and repeat with the remaining breasts.03
-
Just before the chicken goes in the oven, drizzle or lightly brush the top of each piece with a little olive oil. This will help the crust achieve a beautiful, deep golden color and extra crispiness. Bake for 20-25 minutes. You’ll know it’s done when the crust is a rich brown and the internal temperature of the chicken reaches 74°C (165°F) when tested with a meat thermometer in the thickest part. The smell in your kitchen will be absolutely irresistible at this point.04
-
This might be the hardest step—you have to let the chicken rest! Once out of the oven, transfer the chicken to a clean plate or cutting board and let it sit for 5 minutes before slicing or serving. This allows the juices to redistribute throughout the meat. If you cut into it immediately, all those precious juices will run out, leaving you with drier chicken. The wait is worth it, I promise.05
Not what you're looking for?


