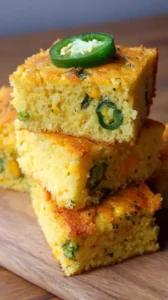
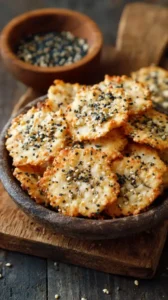
Homemade Cheddar Cheese Straws deliver a perfect flaky crunch and sharp cheesy aroma. They’re surprisingly simple to make yet feel special—ideal for parties or snacking. These versatile Cheddar Cheese Straws come together quickly and disappear even faster.
If you're looking for the perfect Cheddar Cheese Straws, you're in the right place. Whether you love Savory Snacks or want to explore our Burgers collection, we've got you covered.

Why You’ll Love This Cheddar Cheese Straws
Irresistibly addictive: Sharp cheddar and buttery pastry create a savory snack you can’t stop eating.
Surprisingly easy: No fancy skills needed—just grate, roll, and bake.
Perfect for any occasion: Fits holiday parties, game days, or casual couch snacking.
Endlessly customizable: Tweak spices or add heat with cayenne to match your mood.
Ingredients & Tools
- 200 g sharp cheddar cheese, freshly grated
- 115 g unsalted butter, cold and cubed
- 120 g all-purpose flour
- 1/2 tsp smoked paprika
- 1/4 tsp garlic powder
- 1/4 tsp salt
- 1-2 tbsp ice water, as needed
- 1 large egg, for egg wash (optional)
- Extra paprika or sesame seeds for sprinkling (optional)
Tools: food processor (or pastry cutter), baking sheet, parchment paper, rolling pin
Notes: Freshly grated cheddar works best—pre-shredded can affect texture. Cold butter creates flaky layers.
Nutrition (per serving)
| Calories: | 98 kcal |
| Protein: | 3 g |
| Fat: | 7 g |
| Carbs: | 5 g |
| Fiber: | 0.5 g |
Serves: 8 | Prep Time: 15 minutes | Cook Time: 12-15 minutes | Total Time: 30 minutes
Before You Start: Tips & Ingredient Notes
- Why cold butter matters. Keeping your butter cold ensures that it creates steam as it bakes, which gives the straws their signature flakiness. If the butter melts before baking, you’ll end up with a denser, less crispy texture.
- Grate your own cheese. I know it’s tempting to use pre-shredded, but trust me on this one. Freshly grated cheddar melts and incorporates into the dough much more evenly, giving you a better consistency and richer flavor.
- Don’t overwork the dough. You want to mix just until everything comes together. Overmixing can develop the gluten and make the straws tough instead of tender and crumbly.
- Chill if needed. If your dough feels too soft or sticky after mixing, pop it in the fridge for 15-20 minutes. This makes it easier to roll and cut, and it helps the straws hold their shape in the oven.
How to Make Cheddar Cheese Straws
Step 1: Start by preheating your oven to 200°C (400°F) and lining a baking sheet with parchment paper. In a food processor, combine the flour, cold cubed butter, grated cheddar, smoked paprika, garlic powder, and salt. Pulse until the mixture resembles coarse crumbs with some pea-sized bits of butter still visible. You’ll notice the dough starting to clump together—that’s exactly what you want.
Step 2: If the dough seems too dry, add ice water one tablespoon at a time, pulsing briefly after each addition. Stop as soon as the dough holds together when pressed. Turn it out onto a lightly floured surface and gently knead it just enough to form a cohesive ball. Be careful not to overwork it—you’re aiming for tenderness, not toughness.
Step 3: Roll the dough out into a rectangle about 1/4-inch thick. If it sticks, sprinkle a little more flour on your surface and rolling pin. Try to keep the thickness even so all your straws bake at the same rate. You should see little specks of butter and cheese throughout—that’s a good sign!
Step 4: Using a sharp knife or a pizza cutter, cut the dough into strips about 1/2-inch wide and 4-5 inches long. You can make them straight or give them a gentle twist—the twisting creates those lovely nooks and crannies that get extra crispy. If the dough becomes too soft, chill it for a few minutes before continuing.
Step 5: Arrange the straws on your prepared baking sheet, leaving about an inch between them since they’ll expand slightly. For extra shine and crunch, brush them lightly with beaten egg and sprinkle with additional paprika or sesame seeds if you like. This step is optional, but it does give them that professional bakery look.
Step 6: Bake for 12-15 minutes, or until the straws are golden brown and firm to the touch. Keep an eye on them toward the end—they can go from perfectly golden to overbaked surprisingly quickly. The aroma filling your kitchen will be absolutely heavenly.
Step 7: Let the straws cool on the baking sheet for a few minutes before transferring them to a wire rack. They’ll continue to crisp up as they cool. Resist the temptation to eat them straight from the oven—they need a minute to set properly, and that first bite will be worth the wait.
Storage & Freshness Guide
- Fridge: Store in an airtight container for up to 3 days.
- Freezer: Freeze unbaked straws on a tray, then bag for up to 1 month; bake from frozen.
- Reviving: Warm in a 350°F oven for 3–5 minutes to restore crispness.
Serving Suggestions
Complementary Dishes
- Tomato soup — The classic pairing! These cheese straws are perfect for dipping into a warm, velvety tomato soup. The sharp cheddar and flaky texture contrast beautifully with the soup’s acidity and creaminess.
- Charcuterie board — Add a handful of these straws to your next cheese and meat platter. They provide a lovely crunchy element that balances softer cheeses and cured meats beautifully.
- Fresh garden salad — Serve them alongside a simple green salad with a tangy vinaigrette. The crispness of the straws complements the fresh, leafy greens wonderfully.
Drinks
- Dry white wine — A crisp Sauvignon Blanc or Pinot Grigio cuts through the richness of the cheese beautifully. The acidity cleanses your palate between bites, making each straw taste as delicious as the first.
- Sparkling apple cider — For a non-alcoholic option, the slight sweetness and bubbles of apple cider provide a refreshing contrast to the savory, cheesy flavor of the straws.
- Bloody Mary — The spicy, savory notes of a well-made Bloody Mary pair exceptionally well with these cheesy treats. It’s like having the best parts of a brunch in one bite and sip.
Something Sweet
- Lemon bars — The bright, citrusy tang of lemon bars provides a perfect palate cleanser after the rich, savory cheese straws. The contrast between tart and savory is simply divine.
- Dark chocolate truffles — A few pieces of high-quality dark chocolate or simple cocoa-dusted truffles make for an elegant finish. The bitterness of the chocolate balances the saltiness of the cheese beautifully.
- Vanilla bean panna cotta — The creamy, delicate flavor of vanilla panna cotta is a lovely way to end your meal without overwhelming your taste buds after all that cheesy goodness.
Top Mistakes to Avoid
- Using warm butter. If your butter isn’t properly chilled, it will melt into the dough rather than creating steam pockets during baking. This results in dense, greasy straws instead of light, flaky ones. I’ve learned this the hard way—cold butter is non-negotiable!
- Overmixing the dough.


Cheddar Cheese Straws
Make easy, flaky Cheddar Cheese Straws at home with this simple recipe. Perfect for parties or snacking. Get the step-by-step guide and bake them today!
Ingredients
For the Ingredients
-
200 g sharp cheddar cheese (freshly grated)
-
115 g unsalted butter (cold and cubed)
-
120 g all-purpose flour
-
1/2 tsp smoked paprika
-
1/4 tsp garlic powder
-
1/4 tsp salt
-
1-2 tbsp ice water (as needed)
-
1 large egg (for egg wash (optional))
-
Extra paprika or sesame seeds (for sprinkling (optional))
Instructions
-
Start by preheating your oven to 200°C (400°F) and lining a baking sheet with parchment paper. In a food processor, combine the flour, cold cubed butter, grated cheddar, smoked paprika, garlic powder, and salt. Pulse until the mixture resembles coarse crumbs with some pea-sized bits of butter still visible. You’ll notice the dough starting to clump together—that’s exactly what you want.01
-
If the dough seems too dry, add ice water one tablespoon at a time, pulsing briefly after each addition. Stop as soon as the dough holds together when pressed. Turn it out onto a lightly floured surface and gently knead it just enough to form a cohesive ball. Be careful not to overwork it—you’re aiming for tenderness, not toughness.02
-
Roll the dough out into a rectangle about 1/4-inch thick. If it sticks, sprinkle a little more flour on your surface and rolling pin. Try to keep the thickness even so all your straws bake at the same rate. You should see little specks of butter and cheese throughout—that’s a good sign!03
-
Using a sharp knife or a pizza cutter, cut the dough into strips about 1/2-inch wide and 4-5 inches long. You can make them straight or give them a gentle twist—the twisting creates those lovely nooks and crannies that get extra crispy. If the dough becomes too soft, chill it for a few minutes before continuing.04
-
Arrange the straws on your prepared baking sheet, leaving about an inch between them since they’ll expand slightly. For extra shine and crunch, brush them lightly with beaten egg and sprinkle with additional paprika or sesame seeds if you like. This step is optional, but it does give them that professional bakery look.05
-
Bake for 12-15 minutes, or until the straws are golden brown and firm to the touch. Keep an eye on them toward the end—they can go from perfectly golden to overbaked surprisingly quickly. The aroma filling your kitchen will be absolutely heavenly.06
-
Let the straws cool on the baking sheet for a few minutes before transferring them to a wire rack. They’ll continue to crisp up as they cool. Resist the temptation to eat them straight from the oven—they need a minute to set properly, and that first bite will be worth the wait.07
Not what you're looking for?


