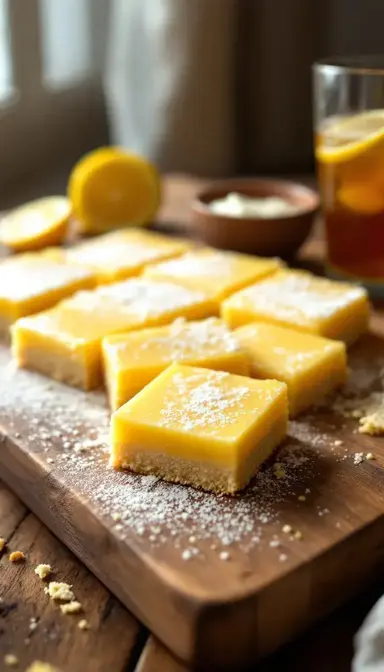
These classic lemon bars balance a sweet shortbread crust with a bright, creamy lemon filling. This recipe delivers the perfect texture and vibrant flavor that makes them a beloved dessert. With a few simple steps, you can create unforgettable lemon bars that are both elegant and easy.
Craving a delicious Lemon Bars? You've come to the right spot! From Snacks favorites to amazing Chicken Recipes recipes, there's something here for everyone.


Why You’ll Love This Lemon Bars
- Perfectly Balanced Flavor: Sweet crust and puckery lemon filling complement each other perfectly.
- Creamy, Velvety Texture: Firm yet lush custard layer—never rubbery or jiggly.
- Surprisingly Simple: No fancy techniques; great for bakers of all levels.
- Total Crowd-Pleaser: Sunny, classic appeal wins over any gathering.
Ingredients & Tools
For the Shortbread Crust:
- 225 g (1 cup) unsalted butter, softened
- 120 g (1/2 cup) granulated sugar
- 1/2 tsp vanilla extract
- 1/4 tsp salt
- 240 g (2 cups) all-purpose flour
For the Lemon Filling:
- 4 large eggs, at room temperature
- 400 g (2 cups) granulated sugar
- 65 g (1/2 cup) all-purpose flour
- 1 tbsp lemon zest (from about 2 lemons)
- 180 ml (3/4 cup) freshly squeezed lemon juice (from about 4-5 lemons)
- Powdered sugar, for dusting
Tools: 9×13 inch baking pan, parchment paper, electric mixer (hand or stand), medium bowl, whisk, zester/microplane, juicer, fine-mesh sieve
Notes: Using room temperature ingredients is key here—it helps the crust cream together beautifully and ensures the filling emulsifies smoothly without any lumps. And please, for the love of all that is lemony, use fresh juice! The flavor is so much brighter and more complex than anything from a bottle.
Nutrition (per serving)
| Calories: | 280 kcal |
| Protein: | 3 g |
| Fat: | 11 g |
| Carbs: | 44 g |
| Fiber: | 0.5 g |
Serves: 16 | Prep Time: 20 minutes | Cook Time: 45 minutes | Chill Time: 2 hours | Total Time: 3 hours 5 minutes
Before You Start: Tips & Ingredient Notes
- Zest First, Juice Second. Always zest your lemons before you juice them. It’s nearly impossible to zest a floppy, juiced lemon half, and the zest holds so much of the potent, aromatic lemon oil that defines this dessert.
- The Butter Temperature Matters. Your butter for the crust should be softened, meaning you can press a finger into it easily, but it’s not greasy or melted. This creates the perfect texture for a crumbly, shortbread-like base.
- Don’t Skip the Parchment Paper. Lining your pan with parchment paper, with some overhang on the sides, is a non-negotiable step for easy, clean removal of the entire slab of lemon bars. It’s your best friend for getting perfect, uncracked slices.
- Room Temp Eggs are a Must. Cold eggs can cause the butter in your crust to firm up unevenly and can make your filling harder to mix smoothly. Taking them out about 30 minutes before you bake makes a world of difference.
How to Make Lemon Bars
Step 1: Preheat your oven to 350°F (175°C). Take your 9×13 inch baking pan and line it with parchment paper, leaving some overhang on the two long sides. This will act as your sling to lift the bars out later. Give the parchment a light spritz with cooking spray to help it stick to the pan—it makes pressing the crust in much easier.
Step 2: Now, let’s make the shortbread crust. In a medium bowl, use an electric mixer to cream together the softened butter and 1/2 cup of sugar. You’ll want to beat it for about 2-3 minutes until it becomes pale and fluffy. Mix in the vanilla extract and salt. Then, gradually add the 2 cups of flour on low speed, mixing just until the dough comes together and no dry streaks remain. It will be a little crumbly, but should hold together when you press it.
Step 3: Transfer the dough crumbles into your prepared pan. Using your fingers or the flat bottom of a measuring cup, press the dough into a firm, even layer across the bottom of the pan. You want to make sure it’s compact so it bakes into a solid base. Pop the pan into the preheated oven and bake for 18-20 minutes, or until the edges are just barely starting to turn a light golden brown.
Step 4: While the crust is baking, whisk together the lemon filling. In your medium bowl, whisk the eggs until they are just combined—you don’t want to whip in a lot of air. Add the 2 cups of sugar and 1/2 cup of flour, and whisk vigorously until the mixture is smooth and has thickened slightly. Finally, whisk in the fresh lemon juice and lemon zest. The mixture will be thin and liquidy, which is exactly what you want.
Step 5: As soon as the crust comes out of the oven, reduce the oven temperature to 325°F (160°C). Pour the lemon filling directly onto the hot crust. It’s okay if the crust is still hot—this is intentional! Carefully slide the pan back into the oven and bake for 23-28 minutes. The filling is done when the edges are set, but the center still has a slight, gentle jiggle when you tap the pan. It will firm up as it cools.
Step 6: This is the hardest part: patience. Remove the pan from the oven and place it on a wire rack to cool completely to room temperature. This will take about an hour. Once it’s room temp, transfer the entire pan to the refrigerator and chill for at least 2 hours, or ideally overnight. This chilling step is crucial for getting clean, perfect slices.
Step 7: Time for the grand reveal! Use the parchment paper sling to carefully lift the entire block of lemon bars out of the pan and onto a cutting board. Place a fine-mesh sieve over the top and dust generously with powdered sugar. Use a sharp knife to slice into bars, wiping the blade clean between each cut for the prettiest edges.
Storage & Freshness Guide
- Fridge: Store in an airtight container for up to 3 days.
- Freezer: Freeze undusted block wrapped in plastic + foil up to 1 month; thaw in fridge.
- Reviving: Dust with powdered sugar just before serving for a fresh look.
Serving Suggestions
Complementary Dishes
- A Simple Fruit Salad — The fresh, clean flavors of berries and melon provide a lovely, light counterpoint to the rich, tangy lemon bars, making the whole dessert spread feel more balanced.
- A Cheese Board with Mild Cheeses — A few slices of brie or a creamy goat cheese offer a savory, sophisticated note that surprisingly enhances the citrus notes in the bars without overpowering them.
Drinks
- Iced Earl Grey Tea — The bergamot in the tea has a natural citrusy flair that harmonizes beautifully with the lemon, creating a refreshing and elegant pairing.
- A Crisp Prosecco or Moscato d’Asti — The bubbles and slight sweetness of these sparkling wines cut through the richness of the dessert and make the whole experience feel like a celebration.
Something Sweet
- Vanilla Bean Ice Cream — Serving a small scoop alongside a warm (or even cold) lemon bar creates an incredible hot-and-cold, creamy-and-tart sensation that is just divine.
- Raspberry Sorbet — The berry tartness is a classic partner for lemon, and the sorbet’s light, icy texture is a perfect palate cleanser if you’re serving these as part of a larger dessert table.
Top Mistakes to Avoid
- Over-baking the Filling. If you bake it until the center is completely firm, it will continue to cook as it cools and become rubbery and tough. That slight jiggle in the center is your signal to pull it out for a creamy texture.
- Using Cold Eggs. I’ve messed this up before too… Cold eggs don’t incorporate as well into the sugar and flour, which can lead to a lumpy filling and can even affect how the custard sets during baking.
- Not Letting Them Chill. I know it’s tempting to dive right in, but slicing into warm lemon bars is a recipe for a gooey, messy disaster. The chilling time is what gives the filling its perfect, sliceable structure.
- Skipping the Parchment Sling. Trying to pry these out of the pan with a spatula will almost certainly crack the beautiful top and ruin your clean cuts. The parchment sling is a simple step that guarantees a perfect presentation.
Expert Tips
- Tip: For an extra layer of flavor, add a tablespoon of fresh thyme or lavender leaves to the crust along with the flour. The herbal notes create a wonderfully complex and gourmet twist that will impress any foodie.
- Tip: If you find your powdered sugar dissolves or gets absorbed after a few hours, just dust the bars a second time right before you serve them. This ensures that beautiful, snowy-white finish that makes them so photogenic.
- Tip: For the absolute cleanest cuts, place the entire block of chilled bars in the freezer for 15-20 minutes before slicing. A slightly frozen bar cuts like a dream, giving you razor-sharp edges every single time.
- Tip: When zesting your lemons, be careful to only remove the bright yellow outer layer. The white pith underneath is bitter, and you don’t want that flavor sneaking into your otherwise perfectly balanced filling.
FAQs
Can I use bottled lemon juice instead of fresh?
Honestly, I really don’t recommend it. Freshly squeezed lemon juice has a vibrant, bright acidity that bottled juice just can’t replicate. Bottled juice often has a flat, slightly metallic taste that will dull the flavor of your entire dessert. The extra few minutes it takes to juice fresh lemons is the single biggest factor in making these bars taste incredible.
Why did my filling crack on top?
This usually happens from over-baking. The filling continues to set as it cools, so if you bake it until it looks completely solid in the oven, it will over-set and contract, leading to cracks. Remember, you want that slight jiggle in the center! Another cause can be a drastic temperature change—letting it cool gradually on a wire rack is key.
How far in advance can I make lemon bars?
They are a fantastic make-ahead dessert! Once completely cooled, you can store them in an airtight container in the refrigerator for up to 3 days. Hold off on the final dusting of powdered sugar until just before you serve them to keep it from dissolving into the filling.
Can I freeze lemon bars?
You can, but with a caveat. The texture of the filling can become a little grainy after thawing. For best results, freeze the undusted, uncut block tightly wrapped in plastic and then foil for up to a month. Thaw overnight in the refrigerator and then dust with powdered sugar before slicing and serving.
My crust shrank a lot from the sides, what happened?
This is typically caused by over-mixing the dough once the flour was added. When you mix the flour too much, you develop the gluten in the flour, which causes it to contract as it bakes. Mix the flour in just until it’s incorporated and no dry spots remain to prevent this from happening.


Lemon Bars
Make the perfect Lemon Bars with this easy recipe! A buttery shortbread crust and creamy lemon filling create a classic, crowd-pleasing dessert. Get the recipe now!
Ingredients
For the Shortbread Crust:
-
225 g unsalted butter (softened)
-
120 g granulated sugar
-
1/2 tsp vanilla extract
-
1/4 tsp salt
-
240 g all-purpose flour
For the Lemon Filling:
-
4 large eggs (at room temperature)
-
400 g granulated sugar
-
65 g all-purpose flour
-
1 tbsp lemon zest (from about 2 lemons)
-
180 ml freshly squeezed lemon juice (from about 4-5 lemons)
-
Powdered sugar (for dusting)
Instructions
-
Preheat your oven to 350°F (175°C). Take your 9x13 inch baking pan and line it with parchment paper, leaving some overhang on the two long sides. This will act as your sling to lift the bars out later. Give the parchment a light spritz with cooking spray to help it stick to the pan—it makes pressing the crust in much easier.01
-
Now, let's make the shortbread crust. In a medium bowl, use an electric mixer to cream together the softened butter and 1/2 cup of sugar. You’ll want to beat it for about 2-3 minutes until it becomes pale and fluffy. Mix in the vanilla extract and salt. Then, gradually add the 2 cups of flour on low speed, mixing just until the dough comes together and no dry streaks remain. It will be a little crumbly, but should hold together when you press it.02
-
Transfer the dough crumbles into your prepared pan. Using your fingers or the flat bottom of a measuring cup, press the dough into a firm, even layer across the bottom of the pan. You want to make sure it’s compact so it bakes into a solid base. Pop the pan into the preheated oven and bake for 18-20 minutes, or until the edges are just barely starting to turn a light golden brown.03
-
While the crust is baking, whisk together the lemon filling. In your medium bowl, whisk the eggs until they are just combined—you don't want to whip in a lot of air. Add the 2 cups of sugar and 1/2 cup of flour, and whisk vigorously until the mixture is smooth and has thickened slightly. Finally, whisk in the fresh lemon juice and lemon zest. The mixture will be thin and liquidy, which is exactly what you want.04
-
As soon as the crust comes out of the oven, reduce the oven temperature to 325°F (160°C). Pour the lemon filling directly onto the hot crust. It’s okay if the crust is still hot—this is intentional! Carefully slide the pan back into the oven and bake for 23-28 minutes. The filling is done when the edges are set, but the center still has a slight, gentle jiggle when you tap the pan. It will firm up as it cools.05
-
This is the hardest part: patience. Remove the pan from the oven and place it on a wire rack to cool completely to room temperature. This will take about an hour. Once it's room temp, transfer the entire pan to the refrigerator and chill for at least 2 hours, or ideally overnight. This chilling step is crucial for getting clean, perfect slices.06
-
Time for the grand reveal! Use the parchment paper sling to carefully lift the entire block of lemon bars out of the pan and onto a cutting board. Place a fine-mesh sieve over the top and dust generously with powdered sugar. Use a sharp knife to slice into bars, wiping the blade clean between each cut for the prettiest edges.07
Not what you're looking for?


