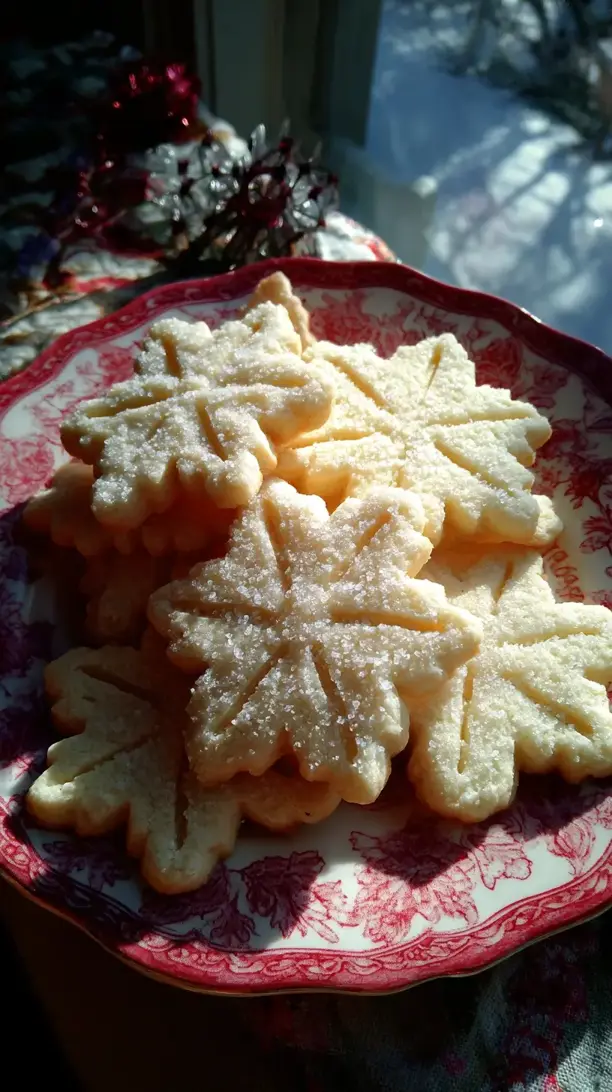
There’s a special kind of magic in holiday baking, isn’t there? For me, it’s found in a batch of these Gluten Free Almond Sugar Cookies. They’re my little secret for creating a moment of pure comfort—delicate, melt-in-your-mouth, and with a rich, nutty flavor that feels like an edible hug. I love how their tender, shortbread-like texture makes them a perfect, elegant treat for any gathering.
If you’re like me, searching through Christmas cookies recipes for something special, let these be your find. They are truly delightful Christmas sweets and a wonderful answer to your Christmas dessert ideas. Simple to make and so forgiving, they are my go-to for stress-free holiday cookies and Christmas traditions. Honestly, they’ve become a non-negotiable part of my own Christmas baking ideas.
So, whether you’re creating a platter for guests or simply craving a festive comfort food recipe, I hope these Gluten Free Almond Sugar Cookies bring as much warmth and joy to your kitchen as they do to mine.
Nothing beats a great Gluten-Free Almond Sugar Cookies. Whether you're a fan of Christmas Cookie or want to try something from our Breakfast & Brunch selection, keep scrolling!


Why You’ll Love This Gluten-Free Almond Sugar Cookies
- Tender texture: Delicately crumbly and soft like shortbread.
- Nutty flavor: Rich, toasty taste that’s far from bland.
- Simple to make: One-bowl mix, roll, and bake process.
- Versatile canvas: Perfect plain, sugared, or drizzled with chocolate.
Ingredients & Tools
- 280 g blanched almond flour
- 45 g tapioca flour or arrowroot starch
- 1/4 tsp fine sea salt
- 1/2 tsp baking powder
- 115 g unsalted butter, softened
- 100 g granulated sugar
- 1 large egg, at room temperature
- 1 tsp pure vanilla extract
- 1/4 tsp almond extract (optional, but recommended)
- Extra sugar for rolling (about 50 g)
Tools: A medium mixing bowl, a hand mixer or a sturdy whisk, a rubber spatula, parchment paper, and a baking sheet.
Notes: Blanched almond flour gives a pale color and fine crumb. Room temperature butter and egg ensure a smooth, emulsified dough. Almond extract enhances the nutty flavor.
Nutrition (per serving)
| Calories: | 145 kcal |
| Protein: | 3 g |
| Fat: | 11 g |
| Carbs: | 10 g |
| Fiber: | 1 g |
Serves: 18 | Prep Time: 15 minutes | Cook Time: 10-12 minutes | Total Time: 27 minutes (plus chilling)
Before You Start: Tips & Ingredient Notes
- Why blanched almond flour? Blanched almond flour is made from almonds with their skins removed. This results in a finer texture and a lighter-colored cookie, which is what we’re going for. Almond meal, which includes the skins, will work but will give a denser, grainier cookie.
- Room temperature ingredients are non-negotiable. Seriously, this is the secret to a perfectly creamed dough. If your butter is too cold, it won’t incorporate properly with the sugar; if it’s melted, your cookies will spread too much. The egg should also be room temp to avoid seizing up the butter.
- Don’t skip the tapioca flour. While almond flour is the star, it needs a little help to create the right cookie structure. The tapioca flour (or arrowroot) acts as a binder and gives the cookies a lovely chewy-tender quality, preventing them from being too crumbly.
- The power of chilling. This dough absolutely needs some time to firm up in the fridge. It prevents excessive spreading in the oven and allows the flavors to meld, resulting in a much tastier, better-textured cookie.
How to Make Gluten-Free Almond Sugar Cookies
Step 1: Start by whisking your dry ingredients. In a medium bowl, whisk together the almond flour, tapioca flour, salt, and baking powder. You’ll want to do this for a good 30 seconds to make sure the baking powder is evenly distributed—this ensures every cookie rises uniformly. Set this bowl aside for now.
Step 2: Now, let’s cream the butter and sugar. In a separate, larger bowl, add the softened butter and granulated sugar. Using a hand mixer on medium speed (or a lot of elbow grease with a whisk), beat them together for about 2-3 minutes. You’re looking for the mixture to become pale, fluffy, and well-combined. This step is crucial for creating a light texture, so don’t rush it!
Step 3: Incorporate the wet ingredients. Beat in the room-temperature egg, followed by the vanilla and almond extracts. Scrape down the sides of the bowl with a rubber spatula to make sure everything is fully incorporated. The mixture might look a little curdled at this point—that’s perfectly normal and will come together once you add the dry ingredients.
Step 4: Combine wet and dry. Gradually add the whisked dry ingredients to the wet mixture, mixing on low speed just until a soft dough forms. You’ll notice it will come together quickly. As soon as there are no more dry streaks of flour, stop mixing. Overworking the dough can make the cookies tough.
Step 5: Chill the dough. This is the most important step for perfect cookies! Divide the dough in half and shape each half into a log about 1.5 inches in diameter. Wrap each log tightly in plastic wrap and refrigerate for at least 2 hours, or ideally overnight. The dough needs to be firm to the touch. This chilling period solidifies the butter, which is what gives you cookies that hold their shape.
Step 6: Preheat and prepare. When you’re ready to bake, preheat your oven to 175°C (350°F) and line a baking sheet with parchment paper. Place your extra sugar for rolling in a shallow bowl.
Step 7: Slice and sugar the cookies. Take one log of dough out of the fridge. Unwrap it and roll the entire log in the granulated sugar, pressing gently so the sugar adheres. Then, using a sharp knife, slice the log into 1/2-inch thick rounds. If the dough cracks, it might be too cold—let it sit for 5-10 minutes. Place the rounds about 2 inches apart on the prepared baking sheet.
Step 8: Bake to perfection. Bake for 10-12 minutes. You’ll know they’re done when the edges are just barely starting to turn a light golden brown. The centers should still look soft and slightly puffed. They will firm up a tremendous amount as they cool, so resist the urge to overbake them for a crispier cookie—that will lead to dryness.
Step 9: Cool completely. Let the cookies cool on the baking sheet for 5 minutes before transferring them to a wire rack to cool completely. This is the hardest part—waiting! But it’s essential for their texture to set properly.
Storage & Freshness Guide
- Fridge: Store dough logs wrapped tightly for up to 3 days before slicing and baking.
- Freezer: Freeze baked cookies for up to 2 months, or dough logs for up to 3 months.
- Reviving: Refresh cookies in a 300°F oven for 3–5 minutes to restore crispness.
Serving Suggestions
Complementary Dishes
- A simple fruit platter — The bright, fresh acidity of berries or citrus segments provides a lovely contrast to the rich, sweet cookies, cleansing the palate between bites.
- A cheese board with soft cheeses — A sliver of creamy brie or a tangy goat cheese alongside one of these cookies is a surprisingly sophisticated and delightful flavor pairing.
Drinks
- Earl Grey tea — The bergamot in the tea complements the nutty almond flavor beautifully, creating a cozy and aromatic experience that feels both elegant and comforting.
- Cold brew coffee — The smooth, low-acidity profile of cold brew won’t overpower the delicate cookies, making for a perfect afternoon pick-me-up that isn’t too heavy.
Something Sweet
- Lemon sorbet — The sharp, zingy flavor of a high-quality lemon sorbet is the ultimate palate-cleanser and provides a burst of freshness that contrasts wonderfully with the cookie’s richness.
- Dark chocolate-dipped strawberries — For a truly decadent treat, these cookies pair wonderfully with the classic combination of bitter chocolate and sweet, juicy fruit.
Top Mistakes to Avoid
- Mistake: Using melted butter. If your butter is liquid, it won’t be able to hold air when creamed with the sugar. This will result in cookies that spread excessively in the oven and become greasy and flat instead of tender and tall.
- Mistake: Skipping the chill time. I know it’s tempting to bake them right away, but this step is non-negotiable. Chilling the dough solidifies the fat, which controls spreading. Without it, you’ll have cookie puddles instead of perfectly round discs.
- Mistake: Overbaking. Because they’re so pale, it’s easy to think they’re not done. But these cookies continue to cook and firm up on the hot baking sheet after they come out of the oven. Take them out when the edges are just lightly golden for the perfect soft texture.
- Mistake: Using a different type of almond flour. As mentioned, almond meal will not yield the same result. It’s coarser and more oily, leading to a denser, grainier cookie that can burn more easily.
Expert Tips
- Tip: Weigh your ingredients. For gluten-free baking, especially with flours like almond flour that can be packed down, using a kitchen scale is the best way to ensure perfect, consistent results every single time.
- Tip: Grate cold butter if you’re in a hurry. Forgot to soften your butter? No problem! Use a box grater to grate cold butter directly into your bowl. It will come to room temperature in just a few minutes.
- Tip: Add a flavor twist. Before chilling the dough logs, you can roll them in a mixture of sugar and a spice like cinnamon or cardamom for a warm, spiced version. A little citrus zest mixed into the dough is also fantastic.
- Tip: Freeze the dough logs for future cookies. These dough logs freeze beautifully for up to 3 months. Just wrap them tightly in plastic wrap and then foil. You can slice and bake them straight from the freezer, just adding a minute or two to the baking time.
FAQs
Can I make these cookies dairy-free?
Absolutely! You can substitute the butter with an equal amount of a high-quality, firm vegan butter. Look for one that has a similar fat content to dairy butter for the best results. I don’t recommend using coconut oil as a direct substitute here, as it melts at a different temperature and can drastically alter the texture and spread of the cookie.
Why are my cookies crumbly?
If they’re falling apart, it’s usually one of two things. First, you might have over-measured your almond flour. It’s best to spoon it into your measuring cup and level it off, or better yet, use a scale. Second, you may have overbaked them slightly. Almond flour has a lot of natural oils, and overbaking can cause those oils to separate, leading to a crumbly texture. Next time, try taking them out a minute earlier.
Can I use this dough for cut-out cookies?
You can, but you’ll need to adjust the method slightly. Instead of forming logs, pat the dough into a disc, wrap it, and chill it. When rolling it out between two sheets of parchment paper, you might find it a bit more fragile than traditional dough, so handle it gently. Chill the cut-out shapes on the baking sheet for 10 minutes before baking to help them hold their shape perfectly.
How should I store these cookies?
Once completely cooled, store them in an airtight container at room temperature. They will stay fresh and delicious for up to 5 days. The sugar coating might lose a little of its sparkle over time, but the flavor and texture will remain wonderful. You can also freeze the baked cookies for up to 2 months.
My dough is too sticky to handle. What happened?
This usually means it wasn’t chilled for long enough. Almond flour dough is inherently a bit softer. Pop it back in the fridge for another 30-60 minutes until it’s firm. If you’re in a real rush, you can even pop the shaped logs in the freezer for 15-20 minutes to speed up the process.


Gluten-Free Almond Sugar Cookies: Easy Holiday Baking
Gluten Free Almond Sugar Cookies are a melt-in-your-mouth holiday treat. This easy gluten-free almond sugar cookies recipe is perfect for your Christmas baking ideas.
Ingredients
For the Ingredients
-
280 g blanched almond flour
-
45 g tapioca flour or arrowroot starch
-
1/4 tsp fine sea salt
-
1/2 tsp baking powder
-
115 g unsalted butter (softened)
-
100 g granulated sugar
-
1 large egg (at room temperature)
-
1 tsp pure vanilla extract
-
1/4 tsp almond extract (optional, but recommended)
-
50 g Extra sugar for rolling
Instructions
-
Start by whisking your dry ingredients. In a medium bowl, whisk together the almond flour, tapioca flour, salt, and baking powder. You’ll want to do this for a good 30 seconds to make sure the baking powder is evenly distributed—this ensures every cookie rises uniformly. Set this bowl aside for now.01
-
Now, let's cream the butter and sugar. In a separate, larger bowl, add the softened butter and granulated sugar. Using a hand mixer on medium speed (or a lot of elbow grease with a whisk), beat them together for about 2-3 minutes. You’re looking for the mixture to become pale, fluffy, and well-combined. This step is crucial for creating a light texture, so don't rush it!02
-
Incorporate the wet ingredients. Beat in the room-temperature egg, followed by the vanilla and almond extracts. Scrape down the sides of the bowl with a rubber spatula to make sure everything is fully incorporated. The mixture might look a little curdled at this point—that’s perfectly normal and will come together once you add the dry ingredients.03
-
Combine wet and dry. Gradually add the whisked dry ingredients to the wet mixture, mixing on low speed just until a soft dough forms. You’ll notice it will come together quickly. As soon as there are no more dry streaks of flour, stop mixing. Overworking the dough can make the cookies tough.04
-
Chill the dough. This is the most important step for perfect cookies! Divide the dough in half and shape each half into a log about 1.5 inches in diameter. Wrap each log tightly in plastic wrap and refrigerate for at least 2 hours, or ideally overnight. The dough needs to be firm to the touch. This chilling period solidifies the butter, which is what gives you cookies that hold their shape.05
-
Preheat and prepare. When you're ready to bake, preheat your oven to 175°C (350°F) and line a baking sheet with parchment paper. Place your extra sugar for rolling in a shallow bowl.06
-
Slice and sugar the cookies. Take one log of dough out of the fridge. Unwrap it and roll the entire log in the granulated sugar, pressing gently so the sugar adheres. Then, using a sharp knife, slice the log into 1/2-inch thick rounds. If the dough cracks, it might be too cold—let it sit for 5-10 minutes. Place the rounds about 2 inches apart on the prepared baking sheet.07
-
Bake to perfection. Bake for 10-12 minutes. You’ll know they’re done when the edges are just barely starting to turn a light golden brown. The centers should still look soft and slightly puffed. They will firm up a tremendous amount as they cool, so resist the urge to overbake them for a crispier cookie—that will lead to dryness.08
-
Cool completely. Let the cookies cool on the baking sheet for 5 minutes before transferring them to a wire rack to cool completely. This is the hardest part—waiting! But it’s essential for their texture to set properly.09
Not what you're looking for?


