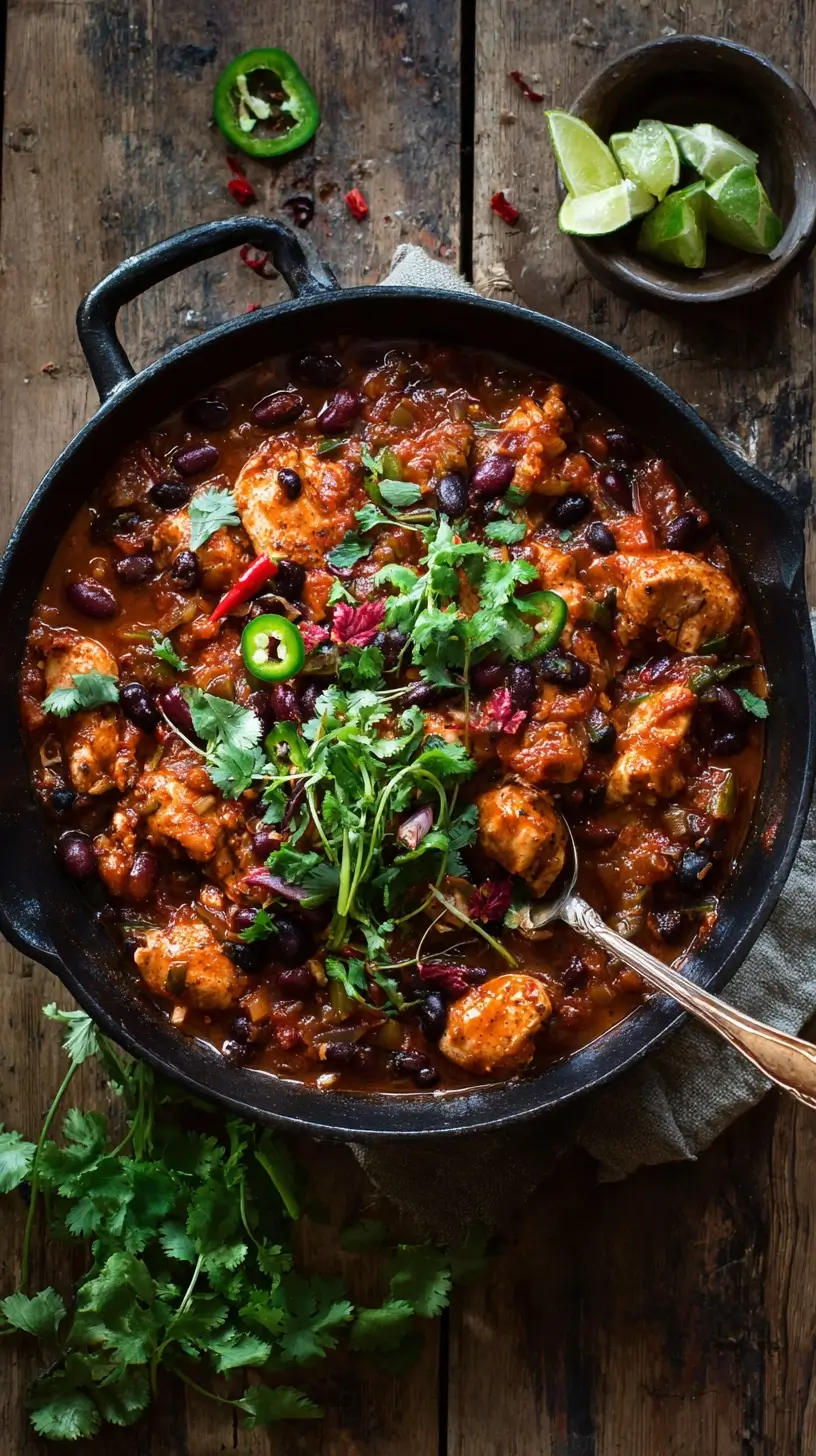
This Chicken Thigh Chili is a comforting one-pot wonder that transforms a classic with juicy, flavorful dark meat. It’s rich, hearty, and perfect for weeknights or meal prep. The aroma of simmering spices and tender chicken will make this a new favorite.
Nothing beats a great Chicken Thigh Chili. Whether you're a fan of Chicken Thigh Recipes or want to try something from our Breakfast & Brunch selection, keep scrolling!


Why You’ll Love This Chicken Thigh Chili
- Rich, deep flavor: Chicken thighs stay moist and shred into tender bites.
- Forgiving recipe: Hard to mess up, with adjustable spice and simmer time.
- Make-ahead friendly: Tastes even better the next day.
- Comfort with a twist: All the coziness of chili, with standout texture.
Ingredients & Tools
- 1.5 lbs (680 g) boneless, skinless chicken thighs
- 2 tbsp olive oil
- 1 large yellow onion, diced
- 1 red bell pepper, diced
- 4 cloves garlic, minced
- 2 tbsp tomato paste
- 2 tbsp chili powder
- 1 tbsp ground cumin
- 1 tsp smoked paprika
- 1/2 tsp dried oregano
- 1 (28 oz / 800 g) can crushed tomatoes
- 2 cups chicken broth
- 1 (15 oz / 425 g) can kidney beans, drained and rinsed
- 1 (15 oz / 425 g) can black beans, drained and rinsed
- Salt and black pepper to taste
- For serving: sour cream, shredded cheese, chopped cilantro, sliced jalapeños
Tools: A large Dutch oven or heavy-bottomed pot is ideal here.
Notes: Don’t swap for chicken breast—thighs are key for richness and texture. Smoked paprika adds a subtle smoky backbone.
Don’t be tempted to swap for chicken breast—the thighs are key. Their richness stands up to the long simmer and creates a much more luxurious texture. And that smoked paprika? It’s not just for color; it gives a subtle, smoky backbone that makes this chili taste like it’s been cooking for hours.
Nutrition (per serving)
| Calories: | 420 kcal |
| Protein: | 35 g |
| Fat: | 15 g |
| Carbs: | 38 g |
| Fiber: | 12 g |
Serves: 6 | Prep Time: 15 minutes | Cook Time: 1 hour 15 minutes | Total Time: 1 hour 30 minutes
Before You Start: Tips & Ingredient Notes
- Chicken thighs are non-negotiable. Seriously, they make the dish. Breast meat will dry out and become stringy during the long simmer, while thighs become more tender and flavorful.
- Don’t skip browning the chicken. This initial step isn’t just about cooking the meat; it’s about building a foundation of flavor with those delicious browned bits left in the pot—what the French call “fond.”
- Bloom your spices. Adding the chili powder and cumin directly to the sautéed onions and garlic for a minute before adding the liquid wakes up their oils and makes the flavor so much more vibrant and deep.
- Drain and rinse your beans. This simple step washes away the starchy, sometimes salty canning liquid, giving you better control over the final texture and seasoning of your chili.
How to Make Chicken Thigh Chili
Step 1: Pat the chicken thighs completely dry with paper towels and season them generously on both sides with salt and pepper. This is a crucial step for getting a good sear. Heat the olive oil in your large Dutch oven or pot over medium-high heat. Once the oil is shimmering, carefully add the chicken thighs in a single layer, working in batches if necessary to avoid crowding the pan. You’ll hear a satisfying sizzle. Cook for about 4-5 minutes per side, until they develop a beautiful golden-brown crust. They don’t need to be cooked through at this point. Transfer the seared chicken to a clean plate and set aside.
Step 2: Reduce the heat to medium. In the same pot, with all those wonderful chicken drippings and browned bits, add the diced onion and red bell pepper. Sauté for about 6-8 minutes, stirring occasionally, until the vegetables have softened and the onion turns translucent. You’ll notice the most amazing aroma starting to build. Now, add the minced garlic and cook for just one more minute until fragrant—be careful not to burn it!
Step 3: Push the vegetables to the side and add the tomato paste to the center of the pot. Let it cook for a minute, stirring, until it darkens slightly. This deepens its flavor. Now, sprinkle in the chili powder, cumin, smoked paprika, and oregano. Stir everything together, coating the vegetables in the spices, and cook for another minute. Your kitchen will smell incredible—this is the “blooming” stage that unlocks the spices’ full potential.
Step 4: Pour in the crushed tomatoes and chicken broth, using your spoon to scrape up any remaining browned bits from the bottom of the pot. This is where you’re building all the complex flavor. Return the seared chicken thighs (and any accumulated juices) back to the pot, nestling them into the liquid. Bring the chili to a lively simmer, then immediately reduce the heat to low, cover the pot, and let it gently bubble away for 45 minutes.
Step 5: After 45 minutes, the chicken should be incredibly tender and practically falling apart. Using two forks, carefully shred the chicken directly in the pot. It should pull apart with very little effort. Stir the shredded meat back into the chili.
Step 6: Now, stir in the drained and rinsed kidney beans and black beans. Let the chili continue to simmer, uncovered, for another 15-20 minutes. This allows the beans to heat through and the chili to thicken to your desired consistency. You’ll notice the color deepens and the texture becomes rich and hearty. Give it a final taste and adjust the seasoning with more salt and pepper if needed.
Step 7: Ladle the hot chili into bowls and let everyone top their own with a dollop of cool sour cream, a handful of shredded cheese, a sprinkle of fresh cilantro, or a few slices of spicy jalapeño. The contrast of the hot chili with the cool, creamy toppings is just perfect.
Storage & Freshness Guide
- Fridge: Cool completely, then store in an airtight container for 3–4 days.
- Freezer: Portion into airtight containers and freeze for up to 3 months.
- Reviving: Reheat gently on the stovetop, adding a splash of broth if needed.
Serving Suggestions
Complementary Dishes
- Skillet Cornbread — The sweet, crumbly texture is the perfect sponge for sopping up every last bit of chili from the bowl.
- Simple Green Salad with a Lime Vinaigrette — A bright, acidic salad cuts through the richness of the chili and provides a refreshing crunch.
- Buttery Garlic Toast — For a truly indulgent experience, a slice of crispy, garlicky toast is just the thing for dipping.
Drinks
- A Cold Mexican Lager — The crisp, clean bubbles and light profile of a beer like Corona or Modelo are a classic pairing that cools the palate.
- Spicy Margarita — The combination of sweet, sour, and heat from a tajín rim complements the smoky spices in the chili beautifully.
- Iced Hibiscus Tea (Agua de Jamaica) — Its tart, cranberry-like flavor is surprisingly fantastic with spicy food and is a wonderful non-alcoholic option.
Something Sweet
- Churros with Chocolate Sauce — The warm cinnamon sugar and rich chocolate are a festive and delicious way to end a chili feast.
- Orange and Cinnamon Flan — The creamy, cool custard with a hint of citrus is a lovely, light contrast after a hearty meal.
- Simple Vanilla Ice Cream — Sometimes, the simple, creamy coolness of vanilla ice cream is all you need to soothe your taste buds.
Top Mistakes to Avoid
- Mistake: Not browning the chicken properly. If you don’t get a good sear, you’re missing out on a ton of flavor. Be patient, make sure the pan is hot, and don’t crowd it. I’ve rushed this step before and the chili was noticeably less complex.
- Mistake: Adding raw spices directly to the liquid. This is a common one! Toasting the spices with the vegetables for a minute “blooms” them, releasing their essential oils and creating a much deeper, more rounded flavor profile in the final dish.
- Mistake: Using chicken breast instead of thighs. I know I sound like a broken record, but it really makes that much of a difference. Breast meat will be dry and chewy, while thighs become meltingly tender.
- Mistake: Skipping the final simmer after adding the beans. This uncovered simmering time is crucial for letting the chili thicken and for the beans to fully integrate into the flavor of the sauce. Don’t be tempted to serve it immediately.
Expert Tips
- Tip: Make a double batch and freeze half. This chili freezes exceptionally well for up to 3 months. Let it cool completely, then portion it into airtight containers for easy future meals. It’s a lifesaver on busy nights.
- Tip: For a thicker chili, use a potato masher. Once the beans are added, simply mash a small portion of them against the side of the pot. They’ll break down and naturally thicken the sauce without any extra ingredients.
- Tip: Amp up the umami with a secret ingredient. Stir in a tablespoon of soy sauce or Worcestershire sauce along with the tomatoes and broth. It sounds odd, but it adds a deep, savory note that people won’t be able to place but will absolutely love.
- Tip: Let it rest before serving. If you have the time, turn off the heat and let the chili sit, covered, for 15-20 minutes before serving. This allows the flavors to meld together even more harmoniously.
FAQs
Can I make this chili in a slow cooker?
Absolutely! Just follow the stovetop steps for browning the chicken and sautéing the vegetables and spices—this part is key for flavor. Then, transfer everything to your slow cooker, add the tomatoes, broth, and raw chicken thighs (no need to shred first). Cook on LOW for 6-7 hours or on HIGH for 3-4 hours. Shred the chicken about 30 minutes before serving and add the beans to heat through.
How can I make this spicier?
You have a few great options! Add a diced jalapeño or serrano pepper (seeds and all for maximum heat) when you sauté the onions. You could also include a pinch of cayenne pepper with the other spices. For a quick heat boost at the table, offer your favorite hot sauce or some sliced fresh chilies as a garnish.
Is it okay to use different types of beans?
Of course! Chili is very adaptable. Pinto beans, cannellini beans, or even a can of chili beans (just reduce the salt you add later) would all work wonderfully. The mix of kidney and black beans provides a nice variety in texture and color, but feel free to use what you have on hand.
How long will leftovers last in the fridge?
Stored in an airtight container, your chicken thigh chili will keep beautifully in the refrigerator for 3-4 days. In fact, many argue it tastes even better on day two or three as the flavors continue to develop. Just be sure to cool it completely before refrigerating.
Can I make this recipe gluten-free and/or dairy-free?
It’s naturally gluten-free as written—just double-check your chicken broth to ensure it’s a certified gluten-free brand. For dairy-free, it’s just as easy! Simply skip the sour cream and cheese toppings, or use your favorite dairy-free alternatives. The chili itself is completely dairy-free.


Chicken Thigh Chili
Make the best Chicken Thigh Chili with this easy one-pot recipe. Rich, hearty, and perfect for weeknights. Get the simple, step-by-step instructions now!
Ingredients
For the Ingredients
-
1.5 lbs boneless, skinless chicken thighs (680 g)
-
2 tbsp olive oil
-
1 large yellow onion, diced
-
1 red bell pepper, diced
-
4 cloves garlic, minced
-
2 tbsp tomato paste
-
2 tbsp chili powder
-
1 tbsp ground cumin
-
1 tsp smoked paprika
-
0.5 tsp dried oregano
-
1 can crushed tomatoes (28 oz / 800 g)
-
2 cups chicken broth
-
1 can kidney beans, drained and rinsed (15 oz / 425 g)
-
1 can black beans, drained and rinsed (15 oz / 425 g)
-
Salt and black pepper (to taste)
-
For serving: sour cream, shredded cheese, chopped cilantro, sliced jalapeños
Instructions
-
Pat the chicken thighs completely dry with paper towels and season them generously on both sides with salt and pepper. Heat the olive oil in your large Dutch oven or pot over medium-high heat. Once the oil is shimmering, carefully add the chicken thighs in a single layer, working in batches if necessary to avoid crowding the pan. Cook for about 4-5 minutes per side, until they develop a beautiful golden-brown crust. They don’t need to be cooked through at this point. Transfer the seared chicken to a clean plate and set aside.01
-
Reduce the heat to medium. In the same pot, with all those wonderful chicken drippings and browned bits, add the diced onion and red bell pepper. Sauté for about 6-8 minutes, stirring occasionally, until the vegetables have softened and the onion turns translucent. Now, add the minced garlic and cook for just one more minute until fragrant—be careful not to burn it!02
-
Push the vegetables to the side and add the tomato paste to the center of the pot. Let it cook for a minute, stirring, until it darkens slightly. Now, sprinkle in the chili powder, cumin, smoked paprika, and oregano. Stir everything together, coating the vegetables in the spices, and cook for another minute.03
-
Pour in the crushed tomatoes and chicken broth, using your spoon to scrape up any remaining browned bits from the bottom of the pot. Return the seared chicken thighs (and any accumulated juices) back to the pot, nestling them into the liquid. Bring the chili to a lively simmer, then immediately reduce the heat to low, cover the pot, and let it gently bubble away for 45 minutes.04
-
After 45 minutes, the chicken should be incredibly tender and practically falling apart. Using two forks, carefully shred the chicken directly in the pot. Stir the shredded meat back into the chili.05
-
Now, stir in the drained and rinsed kidney beans and black beans. Let the chili continue to simmer, uncovered, for another 15-20 minutes. This allows the beans to heat through and the chili to thicken to your desired consistency. Give it a final taste and adjust the seasoning with more salt and pepper if needed.06
-
Ladle the hot chili into bowls and let everyone top their own with a dollop of cool sour cream, a handful of shredded cheese, a sprinkle of fresh cilantro, or a few slices of spicy jalapeño.07
Not what you're looking for?


