There’s something truly magical about pulling a tray of Chocolate Crinkle Cookies from the oven. Seeing those fudgy centers peeking through a web of snowy cracks feels like a small holiday miracle every time. If you’re searching for stunning yet simple Christmas baking ideas, you’ve found them. This recipe is my go-to for creating unique Christmas cookies that never fail to impress, and it’s a cherished part of my collection of Christmas cookies recipes.
Honestly, this is the perfect project for bakers of any level. The cookies come together so easily, making them ideal for easy Christmas treats when time is short but you still crave something special. Whether you’re preparing for a cookie swap or just want your house to smell like celebration, this recipe is a cornerstone of holiday baking. Season after season, they remain my absolute favorite holiday cookies.
So if you’re dreaming up Christmas dessert ideas that deliver pure comfort, let these be your answer. They transform simple ingredients into a plate of joy, proving that the best holiday baking is often the most straightforward.
If you're looking for the perfect Chocolate Crinkle Cookies, you're in the right place. Whether you love Christmas Cookie or want to explore our Dessert Recipes collection, we've got you covered.


Why You’ll Love This Chocolate Crinkle Cookies
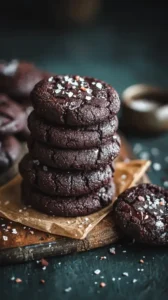
- Visual masterpiece: Stunning crackled look happens naturally.
- Perfect texture: Crisp exterior with a soft, fudgy center.
- Intensely chocolatey: Deep flavor from cocoa and melted chocolate.
- Surprisingly simple: Straightforward mixing with no fancy tools.
Ingredients & Tools
- 180 g all-purpose flour
- 50 g unsweetened cocoa powder (Dutch-processed is ideal)
- 1 tsp baking powder
- 1/4 tsp salt
- 200 g granulated sugar
- 60 ml vegetable or canola oil
- 2 large eggs
- 1 tsp pure vanilla extract
- 115 g semi-sweet or dark chocolate, melted and slightly cooled
- 120 g powdered sugar, for rolling
Tools: Two baking sheets, parchment paper, a medium bowl, a large mixing bowl, a whisk, a sifter or fine-mesh sieve
Notes: Dutch-processed cocoa gives a darker color and smoother flavor. Don’t skip the oil—it keeps the cookies moist and soft.
Nutrition (per serving)
| Calories: | 150 kcal |
| Protein: | 2 g |
| Fat: | 7 g |
| Carbs: | 22 g |
| Fiber: | 1 g |
Serves: 24 | Prep Time: 15 minutes + 3 hours chilling | Cook Time: 10 minutes | Total Time: 3 hours 25 minutes
Before You Start: Tips & Ingredient Notes
- Chilling is non-negotiable. This dough is very soft and sticky when first mixed. Chilling firms it up, making it rollable, and more importantly, it prevents the cookies from spreading into flat puddles in the oven.
- Choose your cocoa wisely. Dutch-processed cocoa is less acidic and results in a darker, richer-colored cookie. If you use natural cocoa powder, the color will be lighter and the flavor slightly more sharp.
- Don’t over-mix the flour. Once you add the dry ingredients, mix just until the flour disappears. Over-mixing develops gluten, which can make the cookies tough instead of tender.
- Be generous with the powdered sugar. When you roll the dough balls, you want a thick, snowy coat. A lot will be absorbed during baking, so a heavy hand here ensures a beautiful final crackle.
How to Make Chocolate Crinkle Cookies
Step 1: First, we’ll whisk together the dry ingredients. In your medium bowl, sift the flour, cocoa powder, baking powder, and salt. Sifting is key here—it breaks up any lumps in the cocoa and ensures the leavening is evenly distributed, which gives us a uniform, lovely texture. Give it a good whisk to combine everything thoroughly.
Step 2: In your large bowl, combine the granulated sugar and oil. Whisk them together for a good minute—you’ll notice the mixture will look a bit like wet sand. Now, add the eggs one at a time, whisking well after each addition until the mixture is smooth and slightly thickened. Stir in the vanilla extract and the melted, slightly cooled chocolate. The aroma at this stage is just incredible.
Step 3: Now, gently add the dry ingredients to the wet. Switch to a spatula for this part. Fold the mixture together just until no streaks of flour remain. You’ll have a very soft, sticky, and almost brownie-batter-like dough. This is exactly what you want! Don’t be tempted to add more flour.
Step 4: This is the most important step for success. Cover the bowl with plastic wrap and chill the dough for at least 3 hours, or ideally overnight. The dough needs to be firm enough to handle. You’ll know it’s ready when you can scoop it and it holds its shape without sticking to your hands excessively.
Step 5: When you’re ready to bake, preheat your oven to 350°F (175°C) and line your baking sheets with parchment paper. Place the powdered sugar in a small, shallow bowl. Using a cookie scoop or a tablespoon, portion out the dough and roll it into 1-inch balls. The dough might still be a bit sticky, but just work quickly.
Step 6: Generously roll each dough ball in the powdered sugar. You want a thick, white, snowy coating—don’t be shy! Place the balls about 2 inches apart on your prepared baking sheets. They need room to spread and create those beautiful cracks.
Step 7: Bake for 10-12 minutes. The cookies are done when the surfaces are crackled and the edges look set. The centers will still seem a little soft and underbaked if you press them—that’s perfect! This is what gives you that fudgy center. Let them cool on the baking sheet for 5 minutes before transferring them to a wire rack to cool completely.
Storage & Freshness Guide
- Fridge: Store dough (wrapped) up to 3 days; baked cookies in airtight container at room temp.
- Freezer: Freeze shaped dough balls; bake from frozen, adding 1–2 minutes.
- Reviving: Add a bread slice to the cookie container to keep them soft.
Serving Suggestions
Complementary Dishes
- A simple cheese board — The salty, sharp notes of an aged cheddar or gouda provide a fantastic contrast to the deep sweetness of the cookies.
- Vanilla bean ice cream — Sandwich a slightly warm cookie around a scoop for an incredible ice cream sandwich. The warm and cold contrast is divine.
- Fresh citrus salad — A light salad of orange and grapefruit segments cuts through the richness and cleanses the palate beautifully.
Drinks
- A cold glass of milk — It’s a classic for a reason. The creaminess is the perfect partner for the intense chocolate.
- Peppermint tea — The cool, refreshing mint complements the chocolate and makes the whole experience feel even more festive.
- Rich hot chocolate — Double down on the chocolate! A mug of rich, homemade hot cocoa turns this into the ultimate cozy treat.
Something Sweet
- Chewy gingerbread cookies — The warm spice of gingerbread creates a wonderful flavor pairing with the dark chocolate on a holiday dessert plate.
- Vanilla panna cotta — The silky, delicate vanilla flavor and creamy texture are a lovely, elegant counterpoint to the dense, chewy cookie.
- Candied orange peel — A few pieces of dark chocolate-dipped candied orange peel alongside the cookies enhances the citrus notes and adds a sophisticated touch.
Top Mistakes to Avoid
- Mistake: Skipping or shortening the chill time. This is the number one reason these cookies fail. Warm dough will spread too much, resulting in flat, greasy cookies instead of tall, crackled ones. Patience is key!
- Mistake: Using hot, freshly melted chocolate. If your melted chocolate is too hot when you add it to the egg mixture, you risk cooking the eggs. Always let it cool for a few minutes until it’s just warm to the touch.
- Mistake: Under-coating with powdered sugar. If you’re too light-handed, the sugar will absorb completely during baking and you’ll be left with a dull, matte finish instead of that iconic white crackle.
- Mistake: Overbaking. It’s tempting to leave them in until they look “done,” but that soft, fudgy center is the goal. Take them out when the edges are set but the centers are still soft.
Expert Tips
- Tip: Use a cookie scoop for uniformity. This ensures all your cookies are the same size, which means they’ll bake evenly. It also makes the process of rolling the sticky dough much, much easier and cleaner.
- Tip: Re-roll in powdered sugar for extra drama. For an even more intense snowy look, you can give the chilled dough balls a first light roll in powdered sugar, let them sit for 10 minutes, and then give them a second, heavier roll right before baking.
- Tip: Don’t crowd the baking sheet. These cookies need their space to spread and crack properly. Baking in batches is always better than cramming them all onto one sheet.
- Tip: Add a pinch of espresso powder. You won’t taste the coffee, but a teaspoon of instant espresso powder blended with the dry ingredients will deepen and enhance the chocolate flavor incredibly.
FAQs
Can I make the dough ahead of time?
Absolutely, and it’s actually encouraged! The dough can be kept, well-wrapped, in the refrigerator for up to 3 days. You can also freeze the shaped dough balls on a tray before transferring them to a freezer bag. Bake directly from frozen, adding a minute or two to the baking time. This makes having fresh, warm cookies a possibility anytime a craving strikes.
Why are my cookies not crackling?
This usually comes down to two things: the dough wasn’t chilled enough, or the powdered sugar coating was too thin. The dough needs to be cold so the exterior sets quickly in the oven, forcing the expanding interior to crack through the sugar shell. A thick layer of sugar provides the visual contrast for that crackle to really pop.
My dough is really sticky, even after chilling. What should I do?
Don’t panic! This can happen, especially on a humid day. Dust your hands lightly with powdered sugar (not flour, as that will dull the final look) to help you roll the balls. Work quickly and try to handle the dough as little as possible, as the heat from your hands will make it stickier.
Can I use butter instead of oil?
You can, but the texture will be different. Butter will create a cakier, more structured cookie, while oil gives that fudgy, dense, brownie-like texture that is classic for crinkles. If you do substitute, use melted and cooled butter, and be aware the flavor will be more buttery than purely chocolate-forward.
How should I store these cookies?
Once completely cool, store them in an airtight container at room temperature. They are best enjoyed within 3-4 days. You can place a piece of bread in the container with them—it sounds strange, but the bread will get stale while keeping the cookies beautifully soft and chewy.


Chocolate Crinkle Cookies: An Easy Holiday Baking Recipe
Chocolate Crinkle Cookies are the ultimate easy cookie recipe for the holidays. These fudgy, crackle-topped treats are a simple and festive Christmas baking idea everyone loves.
Ingredients
For the Ingredients
-
180 g all-purpose flour
-
50 g unsweetened cocoa powder (Dutch-processed is ideal)
-
1 tsp baking powder
-
0.25 tsp salt
-
200 g granulated sugar
-
60 ml vegetable or canola oil
-
2 large eggs
-
1 tsp pure vanilla extract
-
115 g semi-sweet or dark chocolate (melted and slightly cooled)
-
120 g powdered sugar (for rolling)
Instructions
-
First, we'll whisk together the dry ingredients. In your medium bowl, sift the flour, cocoa powder, baking powder, and salt. Sifting is key here—it breaks up any lumps in the cocoa and ensures the leavening is evenly distributed, which gives us a uniform, lovely texture. Give it a good whisk to combine everything thoroughly.01
-
In your large bowl, combine the granulated sugar and oil. Whisk them together for a good minute—you’ll notice the mixture will look a bit like wet sand. Now, add the eggs one at a time, whisking well after each addition until the mixture is smooth and slightly thickened. Stir in the vanilla extract and the melted, slightly cooled chocolate. The aroma at this stage is just incredible.02
-
Now, gently add the dry ingredients to the wet. Switch to a spatula for this part. Fold the mixture together just until no streaks of flour remain. You’ll have a very soft, sticky, and almost brownie-batter-like dough. This is exactly what you want! Don’t be tempted to add more flour.03
-
This is the most important step for success. Cover the bowl with plastic wrap and chill the dough for at least 3 hours, or ideally overnight. The dough needs to be firm enough to handle. You’ll know it's ready when you can scoop it and it holds its shape without sticking to your hands excessively.04
-
When you're ready to bake, preheat your oven to 350°F (175°C) and line your baking sheets with parchment paper. Place the powdered sugar in a small, shallow bowl. Using a cookie scoop or a tablespoon, portion out the dough and roll it into 1-inch balls. The dough might still be a bit sticky, but just work quickly.05
-
Generously roll each dough ball in the powdered sugar. You want a thick, white, snowy coating—don't be shy! Place the balls about 2 inches apart on your prepared baking sheets. They need room to spread and create those beautiful cracks.06
-
Bake for 10-12 minutes. The cookies are done when the surfaces are crackled and the edges look set. The centers will still seem a little soft and underbaked if you press them—that's perfect! This is what gives you that fudgy center. Let them cool on the baking sheet for 5 minutes before transferring them to a wire rack to cool completely.07
Not what you're looking for?


