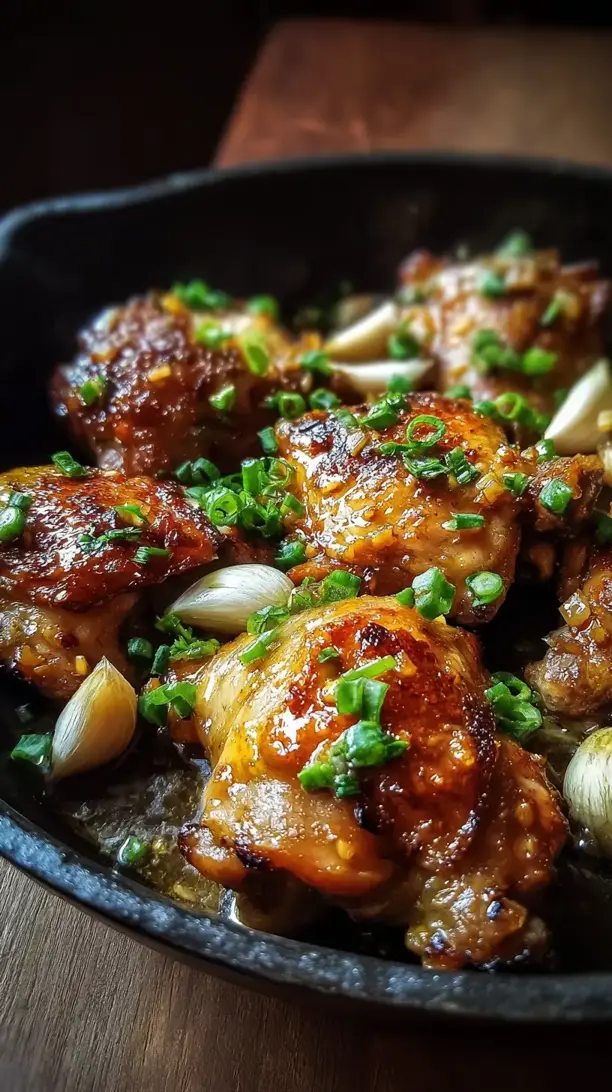
Garlic Soy Chicken combines savory soy sauce and aromatic garlic for a spectacular weeknight meal. This sticky, glossy dish delivers perfect salty-sweet balance with minimal effort. It’s a deeply satisfying recipe that fills your kitchen with incredible fragrance.
If you're looking for the perfect Garlic Soy Chicken, you're in the right place. Whether you love Chicken Recipes or want to explore our Burgers collection, we've got you covered.


Why You’ll Love This Garlic Soy Chicken
- Big flavor, few ingredients: Pantry staples create a magical umami sauce.
- Versatile & adaptable: Swap proteins or adjust spice to your taste.
- Perfect texture: Juicy chicken with a sticky, glossy glaze.
- Quick weeknight meal: Ready in under 30 minutes with minimal effort.
Ingredients & Tools
- 600 g boneless, skinless chicken thighs (or breasts, if you prefer)
- 8–10 cloves garlic, minced
- 60 ml soy sauce (use light soy sauce for best results)
- 2 tbsp honey or brown sugar
- 1 tbsp rice vinegar or lime juice
- 1 tsp sesame oil
- 1/2 tsp freshly ground black pepper
- 1/2 tsp red pepper flakes (optional, for heat)
- 2 tbsp vegetable or canola oil
- 2 spring onions, thinly sliced
- 1 tbsp toasted sesame seeds (for garnish)
Tools: A large skillet or frying pan, mixing bowl, measuring spoons, and tongs.
Notes: The quality of your soy sauce and garlic really makes a difference here—freshly minced garlic gives a brighter, more aromatic punch compared to pre-minced jars. And don’t skip the sesame oil at the end; it adds that nutty, finishing fragrance that ties everything together beautifully.
Nutrition (per serving)
| Calories: | 320 kcal |
| Protein: | 28 g |
| Fat: | 16 g |
| Carbs: | 12 g |
| Fiber: | 1 g |
Serves: 4 | Prep Time: 10 minutes | Cook Time: 15 minutes | Total Time: 25 minutes
Before You Start: Tips & Ingredient Notes
- Chicken cut matters. I highly recommend boneless, skinless chicken thighs for this recipe—they stay juicier and more forgiving during cooking. If you’re using chicken breasts, just be careful not to overcook them, as they can dry out faster.
- Fresh garlic is non-negotiable. Honestly, the pre-minced stuff in jars just doesn’t deliver the same aromatic punch. Take the extra minute to mince your own garlic—you’ll taste the difference, I promise.
- Don’t skip the acid. Whether you use rice vinegar or a squeeze of lime, that little hit of acidity balances the richness of the soy and garlic. It keeps the sauce from feeling too heavy and brightens up the whole dish.
- Adjust the sweetness to your taste. If you like a sweeter glaze, add an extra teaspoon of honey. Prefer it more savory? Scale it back slightly. The beauty of this recipe is how easily you can tweak it to suit your palate.
How to Make Garlic Soy Chicken
Step 1: Start by prepping your chicken. If you’re using chicken thighs, trim off any excess fat and cut them into bite-sized pieces—about 1.5-inch chunks work well. Pat them dry with a paper towel; this helps them sear nicely instead of steaming. If you’re using chicken breasts, slice them into similar-sized pieces for even cooking. Season the chicken lightly with black pepper—you won’t need extra salt since the soy sauce brings plenty of salinity.
Step 2: In a small bowl, whisk together the soy sauce, honey (or brown sugar), rice vinegar, sesame oil, and red pepper flakes if using. This is your flavor powerhouse—the sauce that will transform humble chicken into something unforgettable. Give it a quick taste and adjust if needed—maybe a touch more honey if you like it sweeter, or another pinch of pepper flakes for heat.
Step 3: Heat the vegetable oil in a large skillet over medium-high heat. Once the oil is shimmering—you can test it by adding a small piece of chicken; it should sizzle immediately—add the chicken in a single layer. Don’t overcrowd the pan; you might need to work in batches. Let the chicken cook undisturbed for 3–4 minutes, until you get a beautiful golden-brown sear on one side.
Step 4: Flip the chicken pieces and cook for another 2–3 minutes. They don’t need to be fully cooked through at this stage—you’re just building color and flavor. You’ll notice the chicken will release some juices; that’s totally normal. Once both sides are nicely browned, remove the chicken from the skillet and set it aside on a plate.
Step 5: Reduce the heat to medium and add the minced garlic to the same skillet. Sauté for about 30–60 seconds, stirring constantly, until the garlic becomes fragrant and lightly golden. Be careful not to burn it—burnt garlic turns bitter, and we want that sweet, toasty aroma. If the pan seems dry, you can add a tiny splash of oil.
Step 6: Return the chicken to the skillet, along with any accumulated juices. Pour the prepared sauce over everything, stirring to coat the chicken evenly. Let it simmer for 4–5 minutes, stirring occasionally, until the sauce thickens and reduces, clinging to the chicken in a glossy, sticky glaze. The chicken should be cooked through—check by slicing into a larger piece; no pink should remain.
Step 7: Once the sauce has thickened to your liking—it should coat the back of a spoon—turn off the heat. Stir in most of the sliced spring onions, reserving some for garnish. Give everything one final toss, then transfer to a serving plate. Sprinkle with the remaining spring onions and toasted sesame seeds for that finishing touch.
Storage & Freshness Guide
- Fridge: Cool completely, store in airtight container for up to 3 days.
- Freezer: Freeze in sealed bags or containers for up to 2 months.
- Reviving: Reheat gently on stovetop with a splash of water or broth to loosen sauce.
Serving Suggestions
Complementary Dishes
- Steamed jasmine rice — The fluffy, slightly fragrant grains are perfect for soaking up every last drop of that glorious garlic soy sauce.
- Stir-fried broccoli or bok choy — The crisp-tender greens add a fresh contrast to the rich, savory chicken and balance the meal beautifully.
- Quick-pickled cucumbers — Thinly sliced cucumbers tossed with rice vinegar, sugar, and salt provide a bright, crunchy counterpoint that cuts through the richness.
Drinks
- Cold lager or crisp pilsner — The light, effervescent beer cleanses the palate between bites and complements the umami notes without overpowering them.
- Iced green tea with lemon — Its subtle bitterness and citrusy lift enhance the savory-sweet profile of the dish, making each bite taste even more vibrant.
- Light-bodied red wine like Pinot Noir — If you prefer wine, choose something fruity and low-tannin that won’t clash with the garlic and soy—it’s a surprisingly harmonious pairing.
Something Sweet
- Mango sorbet — The tropical sweetness and icy texture provide a refreshing, palate-cleansing finish that feels light yet satisfying after the savory main.
- Matcha white chocolate cookies — Their delicate bitterness and creamy sweetness echo the complexity of the dish while offering a comforting, homemade treat.
- Lychee and lime granita — This floral, tangy frozen dessert is incredibly easy to make and leaves your taste buds feeling refreshed and uplifted.
Top Mistakes to Avoid
- Overcrowding the pan. If you add too much chicken at once, the temperature drops, and the chicken steams instead of searing. You’ll miss out on those beautiful browned bits that add so much flavor. I’ve messed this up before too—it’s worth taking the extra time to cook in batches.
- Burning the garlic. Garlic cooks quickly and can go from golden and fragrant to bitter and burnt in seconds. Keep the heat at medium when sautéing it, and stir constantly—it should sizzle gently, not aggressively.
- Overcooking the chicken. Especially if you’re using breast meat, it can turn dry and tough if left on the heat too long. The chicken only needs a few minutes to cook through once you add the sauce—use a thermometer if unsure; 165°F (74°C) is the safe internal temperature.
- Skipping the rest at the end. Letting the chicken sit for a couple of minutes off the heat before serving allows the sauce to thicken slightly and the flavors to meld together even more. Rushing this step can mean a saucier, less cohesive dish.
Expert Tips
- Tip: For an extra layer of flavor, marinate the chicken in half the sauce for 15–30 minutes before cooking. It doesn’t need long—just enough time for the soy and garlic to penetrate the meat slightly, resulting in even more flavorful, tender bites.
- Tip: If your sauce isn’t thickening as quickly as you’d like, mix 1 teaspoon of cornstarch with 1 tablespoon of water and stir it into the simmering sauce. It’ll thicken up almost instantly, giving you that glossy, restaurant-quality glaze.
- Tip: Double the sauce ingredients if you’re a saucy person—you’ll have plenty to drizzle over rice or veggies. The sauce is so good, you’ll want to bottle it up and put it on everything… and honestly, no one will judge you if you do.
- Tip: Toast your own sesame seeds for garnish—just heat them in a dry pan over medium heat for 2–3 minutes until golden and fragrant. It’s a tiny step, but it adds a nutty depth that elevates the whole dish.
FAQs
Can I make this Garlic Soy Chicken ahead of time?
Absolutely! This dish stores and reheats really well. Let it cool completely, then transfer it to an airtight container—it’ll keep in the fridge for up to 3 days. When reheating, do it gently over low heat on the stovetop with a splash of water or chicken broth to loosen the sauce. You can also microwave it, but stir it halfway through to ensure even heating. The flavors actually deepen overnight, making it a fantastic meal prep option.
What can I use instead of honey?
You’ve got options! Brown sugar, maple syrup, or even agave nectar work beautifully. Each brings a slightly different character—brown sugar adds a molasses-like depth, maple syrup offers a subtle earthy sweetness, and agave keeps things neutral. If you’re avoiding sweeteners altogether, you can reduce or omit the sweet element, but keep in mind the sauce will be saltier and less glossy.
Is this recipe gluten-free?
It can be! Just use tamari or a certified gluten-free soy sauce instead of regular soy sauce. All the other ingredients are naturally gluten-free, so that one simple swap makes this dish safe for those with gluten sensitivities. Always double-check labels if you’re using pre-made sauces or spice blends, just to be sure.
Can I use frozen chicken?
I don’t recommend cooking directly from frozen—the chicken will release too much water, preventing proper searing and resulting in a watery sauce. Thaw it completely in the fridge first, then pat it dry thoroughly before cooking. If you’re in a pinch, you can thaw it quickly by placing the sealed package in a bowl of cold water, changing the water every 30 minutes.
How can I make this spicier?
Easy! Increase the red pepper flakes, add a diced fresh chili (like bird’s eye or jalapeño) when you sauté the garlic, or stir in a teaspoon of sriracha or chili-garlic sauce along with the soy sauce. If you really love heat, a drizzle of chili oil at the end adds both spice and a lovely aromatic finish. Adjust gradually—you can always add more, but you can’t take it away!


Garlic Soy Chicken
Make this easy Garlic Soy Chicken recipe in under 30 minutes! A sticky, savory-sweet weeknight dinner with minimal ingredients. Get the full recipe here!
Ingredients
For the Garlic Soy Chicken
-
600 g boneless, skinless chicken thighs (or breasts, if you prefer)
-
8–10 cloves garlic (minced)
-
60 ml soy sauce (use light soy sauce for best results)
-
2 tbsp honey or brown sugar
-
1 tbsp rice vinegar or lime juice
-
1 tsp sesame oil
-
1/2 tsp freshly ground black pepper
-
1/2 tsp red pepper flakes (optional, for heat)
-
2 tbsp vegetable or canola oil
-
2 spring onions (thinly sliced)
-
1 tbsp toasted sesame seeds (for garnish)
Instructions
-
Start by prepping your chicken. If you’re using chicken thighs, trim off any excess fat and cut them into bite-sized pieces—about 1.5-inch chunks work well. Pat them dry with a paper towel; this helps them sear nicely instead of steaming. If you’re using chicken breasts, slice them into similar-sized pieces for even cooking. Season the chicken lightly with black pepper—you won’t need extra salt since the soy sauce brings plenty of salinity.01
-
In a small bowl, whisk together the soy sauce, honey (or brown sugar), rice vinegar, sesame oil, and red pepper flakes if using. This is your flavor powerhouse—the sauce that will transform humble chicken into something unforgettable. Give it a quick taste and adjust if needed—maybe a touch more honey if you like it sweeter, or another pinch of pepper flakes for heat.02
-
Heat the vegetable oil in a large skillet over medium-high heat. Once the oil is shimmering—you can test it by adding a small piece of chicken; it should sizzle immediately—add the chicken in a single layer. Don’t overcrowd the pan; you might need to work in batches. Let the chicken cook undisturbed for 3–4 minutes, until you get a beautiful golden-brown sear on one side.03
-
Flip the chicken pieces and cook for another 2–3 minutes. They don’t need to be fully cooked through at this stage—you’re just building color and flavor. You’ll notice the chicken will release some juices; that’s totally normal. Once both sides are nicely browned, remove the chicken from the skillet and set it aside on a plate.04
-
Reduce the heat to medium and add the minced garlic to the same skillet. Sauté for about 30–60 seconds, stirring constantly, until the garlic becomes fragrant and lightly golden. Be careful not to burn it—burnt garlic turns bitter, and we want that sweet, toasty aroma. If the pan seems dry, you can add a tiny splash of oil.05
-
Return the chicken to the skillet, along with any accumulated juices. Pour the prepared sauce over everything, stirring to coat the chicken evenly. Let it simmer for 4–5 minutes, stirring occasionally, until the sauce thickens and reduces, clinging to the chicken in a glossy, sticky glaze. The chicken should be cooked through—check by slicing into a larger piece; no pink should remain.06
-
Once the sauce has thickened to your liking—it should coat the back of a spoon—turn off the heat. Stir in most of the sliced spring onions, reserving some for garnish. Give everything one final toss, then transfer to a serving plate. Sprinkle with the remaining spring onions and toasted sesame seeds for that finishing touch.07
Not what you're looking for?


