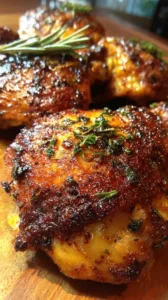
Honey Garlic Chicken Thighs deliver a sticky, savory-sweet glaze over juicy, crispy-skinned chicken. This simple weeknight meal uses pantry staples for restaurant-worthy flavor in under an hour. It’s a back-pocket recipe you’ll make again and again.
Nothing beats a great Honey Garlic Chicken Thighs. Whether you're a fan of Chicken Thigh Recipes or want to try something from our Crockpot Recipes selection, keep scrolling!


Why You’ll Love This Honey Garlic Chicken Thighs
- Sweet & savory balance: Honey and garlic create a perfectly caramelized, aromatic sauce.
- Forgiving & easy: Chicken thighs stay juicy even if slightly overcooked.
- Liquid gold sauce: Glossy, reduced glaze clings to every bite.
- Fancy without effort: Impressive presentation with minimal work.
Ingredients & Tools
- 6 bone-in, skin-on chicken thighs
- 1/2 cup honey
- 6 large garlic cloves, minced
- 1/3 cup soy sauce (or tamari for gluten-free)
- 2 tbsp rice vinegar (or apple cider vinegar)
- 1 tbsp fresh ginger, grated
- 1 tbsp olive oil or avocado oil
- 1 tsp sesame oil
- 1/2 tsp black pepper
- 2 green onions, thinly sliced (for garnish)
- 1 tsp sesame seeds (for garnish)
Tools: A large, oven-safe skillet is key here, along with a microplane for the ginger and a small whisk for the sauce.
Notes: Don’t swap thighs for breasts—thigh fat keeps meat succulent. Use fresh garlic and ginger for best flavor.
Nutrition (per serving)
| Calories: | 420 kcal |
| Protein: | 28 g |
| Fat: | 18 g |
| Carbs: | 36 g |
| Fiber: | 0.5 g |
Serves: 4 | Prep Time: 10 minutes | Cook Time: 25 minutes | Total Time: 35 minutes
Before You Start: Tips & Ingredient Notes
- Pat your chicken thighs completely dry. This is the single most important step for getting crispy skin. Any moisture on the surface will steam the skin instead of browning it. Use paper towels and really press down to soak up all that moisture.
- Don’t skip the fresh aromatics. I know it’s tempting to use garlic and ginger from a jar, but for a sauce with so few ingredients, the quality of each one really shines through. Fresh garlic and ginger provide a brighter, more complex flavor that powder or puree can’t match.
- Use an oven-safe skillet. We start this recipe on the stovetop to crisp the skin and finish it in the oven to cook the chicken through gently. If you don’t have an oven-safe skillet, you can carefully transfer everything to a baking dish, but using one pan makes cleanup a breeze.
- Taste your honey. Different honeys have different flavor profiles. A wildflower or clover honey will be milder, while a buckwheat honey will be much stronger and darker. Use one you enjoy the taste of on its own, as it will be a dominant flavor.
How to Make Honey Garlic Chicken Thighs
Step 1: First, preheat your oven to 400°F (200°C). Take your chicken thighs and use several paper towels to pat the skin and both sides completely dry. This is non-negotiable for crispy skin! Season both sides generously with the black pepper. There’s no need for salt here, as the soy sauce in the glaze will provide plenty.
Step 2: Now, place your large oven-safe skillet over medium-high heat and add the tablespoon of olive or avocado oil. Once the oil is shimmering hot, carefully add the chicken thighs, skin-side down. You should hear a satisfying sizzle. Resist the urge to move them! Let them cook undisturbed for 6-8 minutes to render the fat and develop a deep golden-brown, crispy crust.
Step 3: While the chicken is browning, whisk together the sauce. In a medium bowl, combine the honey, minced garlic, soy sauce, rice vinegar, grated ginger, and sesame oil. Whisk it until it’s completely smooth and emulsified. You’ll notice the aroma is already incredible—sweet, salty, and pungent all at once.
Step 4: After the chicken skin is beautifully browned, flip the thighs over using tongs. Cook for just another 2-3 minutes on the flesh side to give it a little color. Then, pour the prepared honey garlic sauce all over and around the chicken thighs. It will bubble up enthusiastically, which is exactly what you want.
Step 5: Carefully transfer the entire skillet to your preheated oven. Bake for 15-18 minutes, or until the chicken is cooked through and registers 165°F (74°C) on an instant-read thermometer inserted into the thickest part without touching the bone. The sauce will have thickened and reduced, glazing the chicken perfectly.
Step 6: Remove the skillet from the oven—remember, the handle will be extremely hot! Let the chicken rest in the pan for about 5 minutes. This allows the juices to redistribute, ensuring every bite is moist. During this time, the sauce will thicken up just a little bit more.
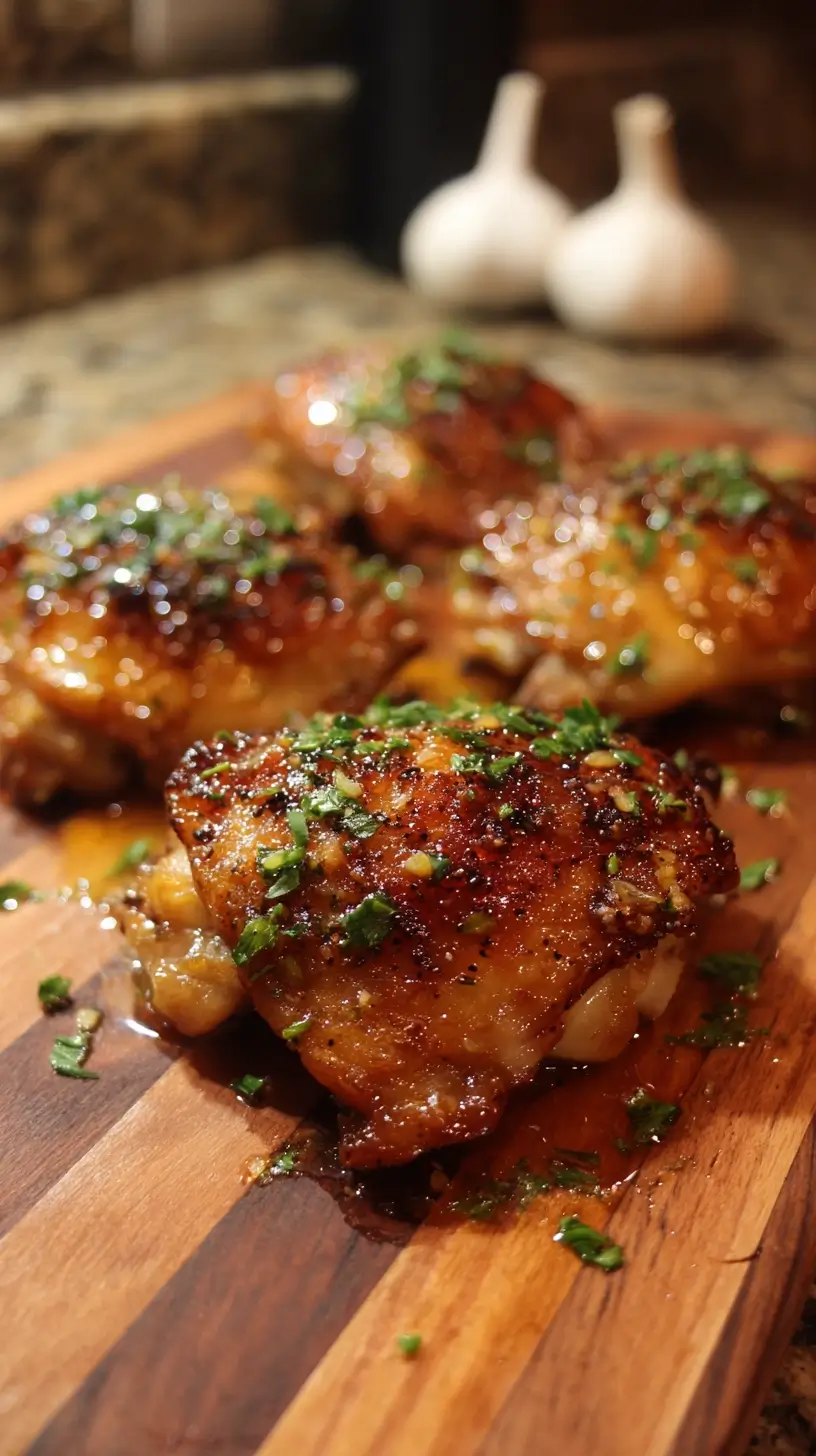
Step 7: To serve, spoon that gorgeous glossy sauce from the bottom of the pan over each chicken thigh. Garnish generously with the sliced green onions and a sprinkle of sesame seeds for a pop of color and a nice little textural crunch. Serve immediately and watch it disappear.
Storage & Freshness Guide
- Fridge: Store in an airtight container for up to 3 days.
- Freezer: Freeze in a sealed container for up to 2 months.
- Reviving: Reheat gently in a skillet with a splash of water to loosen sauce.
Serving Suggestions
Complementary Dishes
- Fluffy jasmine rice — The perfect neutral base to soak up every last drop of that incredible honey garlic sauce. Its delicate floral scent is a lovely backdrop.
- Simple steamed broccoli or bok choy — The bright, clean flavor and crisp texture of green veggies provide a refreshing contrast to the rich, sticky chicken.
- A crisp cucumber salad — Toss thinly sliced cucumbers with a little rice vinegar, salt, and sesame seeds for a cool, acidic side that cuts through the sweetness.
Drinks
- A cold, crisp lager or pilsner — The carbonation and mild bitterness of a light beer work wonders to cleanse the palate between bites of the savory-sweet glaze.
- An off-dry Riesling — A wine with a touch of sweetness and high acidity balances the garlic and complements the honey without overpowering the dish.
- Sparkling water with lemon — For a non-alcoholic option, the bubbles and citrus are incredibly refreshing and help reset your taste buds.
Something Sweet
- Fresh mango slices with a lime squeeze — The tropical sweetness and acidity of mango is a light, healthy way to end the meal on a bright note.
- A scoop of green tea ice cream — The slightly bitter, earthy notes of matcha are a sophisticated and delicious contrast to the meal you just enjoyed.
- Fortune cookies — A fun, thematic finish that adds a little crunch and a bit of whimsy to your dinner table.
Top Mistakes to Avoid
- Mistake: Moving the chicken too soon. When you first place the chicken in the hot skillet, you must let it sit to develop a proper sear. If you try to peek or move it early, the skin will tear and stick to the pan, and it won’t get crispy.
- Mistake: Using low-quality honey or substitutes. Maple syrup or agave will work in a pinch, but they have distinct flavors that will change the profile of the dish. And using a very dark, strong honey can make the sauce taste bitter when reduced. Stick with a good-quality, mild honey.
- Mistake> Burning the garlic. Because the sauce goes into the oven, the garlic has a long cooking time. If you try to cook this entirely on the stovetop over high heat, the sugars in the honey can cause the garlic to burn very quickly, creating a bitter taste. The gentle oven heat is your friend.
- Mistake: Skipping the rest time. Slicing into the chicken straight from the oven will cause all those precious juices to run out onto the plate instead of staying in the meat. A brief 5-minute rest makes a world of difference in juiciness.
Expert Tips
- Tip: Get ahead by marinating. For even more flavor, you can combine the chicken thighs with half of the sauce in a zip-top bag and let it marinate in the refrigerator for up to 4 hours. Just be sure to pat the thighs dry again before searing, and use the other half of the sauce to pour over in the pan.
- Tip: Create a sauce reservoir. When you pour the sauce into the skillet, try to pour most of it around the chicken, not directly on top of the skin. This helps keep that beautifully crisped skin intact while still allowing the sauce to reduce and glaze the chicken from the sides and bottom.
- Tip: Thicken the sauce further if you like. If you prefer an even thicker, syrupy glaze, you can remove the cooked chicken to a plate, place the skillet back on the stovetop, and simmer the sauce for another 2-3 minutes until it reaches your desired consistency.
- Tip: Use the broiler for extra crispiness. For the crispiest skin imaginable, for the last 2 minutes of cooking, switch your oven to a high broil. Watch it like a hawk! The intense top heat will bubble and caramelize the sauce and crisp the skin to perfection.
FAQs
Can I use boneless, skinless chicken thighs?
You absolutely can, but the method changes slightly. Boneless thighs will cook much faster. Sear them for 3-4 minutes per side, then add the sauce and simmer on the stovetop for another 5-7 minutes until cooked through, instead of transferring to the oven. You’ll miss out on the crispy skin, but you’ll still get all the amazing flavor in the sauce and the juicy meat.
How do I store and reheat leftovers?
Store any leftover chicken and sauce in an airtight container in the refrigerator for up to 3 days. The best way to reheat it is gently in a covered skillet over low heat with a tablespoon of water added to loosen the sauce. Microwaving can make the chicken rubbery and cause the sauce to separate.
Is this recipe gluten-free?
It can be, very easily! Just make sure to use tamari or a certified gluten-free soy sauce instead of regular soy sauce. All the other ingredients are naturally gluten-free, so it’s a simple swap that makes this dish accessible to everyone.
My sauce is too thin. What did I do wrong?
This usually happens if the chicken wasn’t browned properly first, as the sauce relies on reducing with the chicken in the oven. Don’t worry, it’s an easy fix! Just remove the cooked chicken, put the skillet back on the stove, and simmer the sauce over medium heat for a few extra minutes until it thickens to your liking.
Can I double this recipe for a crowd?
Yes, but you’ll need to work in batches. Crowding the pan when searing the chicken will cause them to steam instead of brown. Sear the chicken in two separate batches, then you can combine them all in a larger baking dish to finish in the oven with the sauce. Just be sure to increase the sauce ingredients proportionally.


Honey Garlic Chicken Thighs
Make the best Honey Garlic Chicken Thighs with this easy recipe. Crispy skin, sticky glaze, and ready in 35 minutes. Get the foolproof method now!
Ingredients
For the Chicken & Sauce:
-
6 bone-in, skin-on chicken thighs
-
1/2 cup honey
-
6 large cloves garlic (minced)
-
1/3 cup soy sauce (or tamari for gluten-free)
-
2 tbsp rice vinegar (or apple cider vinegar)
-
1 tbsp fresh ginger (grated)
-
1 tbsp olive oil or avocado oil
-
1 tsp sesame oil
-
1/2 tsp black pepper
For the Garnish:
-
2 green onions (thinly sliced, for garnish)
-
1 tsp sesame seeds (for garnish)
Instructions
-
First, preheat your oven to 400°F (200°C). Take your chicken thighs and use several paper towels to pat the skin and both sides completely dry. This is non-negotiable for crispy skin! Season both sides generously with the black pepper. There’s no need for salt here, as the soy sauce in the glaze will provide plenty.01
-
Now, place your large oven-safe skillet over medium-high heat and add the tablespoon of olive or avocado oil. Once the oil is shimmering hot, carefully add the chicken thighs, skin-side down. You should hear a satisfying sizzle. Resist the urge to move them! Let them cook undisturbed for 6-8 minutes to render the fat and develop a deep golden-brown, crispy crust.02
-
While the chicken is browning, whisk together the sauce. In a medium bowl, combine the honey, minced garlic, soy sauce, rice vinegar, grated ginger, and sesame oil. Whisk it until it’s completely smooth and emulsified. You’ll notice the aroma is already incredible—sweet, salty, and pungent all at once.03
-
After the chicken skin is beautifully browned, flip the thighs over using tongs. Cook for just another 2-3 minutes on the flesh side to give it a little color. Then, pour the prepared honey garlic sauce all over and around the chicken thighs. It will bubble up enthusiastically, which is exactly what you want.04
-
Carefully transfer the entire skillet to your preheated oven. Bake for 15-18 minutes, or until the chicken is cooked through and registers 165°F (74°C) on an instant-read thermometer inserted into the thickest part without touching the bone. The sauce will have thickened and reduced, glazing the chicken perfectly.05
-
Remove the skillet from the oven—remember, the handle will be extremely hot! Let the chicken rest in the pan for about 5 minutes. This allows the juices to redistribute, ensuring every bite is moist. During this time, the sauce will thicken up just a little bit more.06
-
To serve, spoon that gorgeous glossy sauce from the bottom of the pan over each chicken thigh. Garnish generously with the sliced green onions and a sprinkle of sesame seeds for a pop of color and a nice little textural crunch. Serve immediately and watch it disappear.07
Not what you're looking for?


