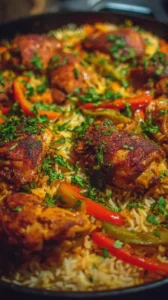
This One-Pan Spanish Rice with Chicken is a complete, deeply flavorful meal that comes together in a single skillet. It’s perfect for busy weeknights when you want something hearty and impressive without a pile of dishes. The tender chicken, smoky spiced rice, and sweet peas create a comforting, aromatic dish everyone will love.
Nothing beats a great One-Pan Spanish Rice with Chicken. Whether you're a fan of Dinner Ideas or want to try something from our Appetizer Recipes selection, keep scrolling!


Why You’ll Love This One-Pan Spanish Rice with Chicken
- One-pan wonder: Maximum flavor with minimal cleanup.
- Deep, complex flavor: Toasted rice and spices create a rich base.
- Incredibly adaptable: Easy to swap proteins or vegetables.
- Fantastic leftovers: Flavors meld overnight for even better next-day meals.
Ingredients & Tools
- 4 bone-in, skin-on chicken thighs
- 1 tbsp olive oil
- 1 large yellow onion, finely chopped
- 4 cloves garlic, minced
- 1 ½ cups long-grain white rice (like jasmine or basmati)
- 1 (15 oz) can crushed tomatoes
- 2 ½ cups chicken broth
- 1 tsp smoked paprika
- 1 tsp ground cumin
- ½ tsp dried oregano
- 1 cup frozen peas
- Salt and black pepper to taste
- Fresh parsley or cilantro for garnish
Tools: A large, oven-safe skillet (at least 12 inches in diameter) with a lid is essential here.
Notes: Don’t skip toasting the rice—it prevents gumminess and builds flavor. Bone-in, skin-on chicken thighs stay juicy and render flavorful fat.
Nutrition (per serving)
| Calories: | 520 kcal |
| Protein: | 28 g |
| Fat: | 18 g |
| Carbs: | 58 g |
| Fiber: | 4 g |
Serves: 4 | Prep Time: 15 minutes | Cook Time: 35 minutes | Total Time: 50 minutes
Before You Start: Tips & Ingredient Notes
- Why bone-in, skin-on chicken thighs? They are far more forgiving and flavorful than breasts. The bone keeps the meat succulent, and the crispy skin adds incredible texture and richness to the entire dish. Trust me on this one.
- Can I use a different type of rice? Long-grain white rice is ideal because it stays separate and fluffy. Avoid short-grain or risotto rice, as they release too much starch and will turn the dish mushy. Brown rice will require more liquid and a longer cooking time.
- Is smoked paprika really that important? Yes, it is! Smoked paprika (pimentón) provides that signature Spanish-style smokiness. Sweet paprika just won’t deliver the same depth. If you can find it, the bittersweet (agridulce) variety is even more authentic.
- Don’t have an oven-safe skillet? No problem! After browning the chicken and sautéing the aromatics, you can simply transfer everything to a baking dish, cover tightly with foil, and bake as directed. The results will be very similar.
How to Make One-Pan Spanish Rice with Chicken
Step 1: Preheat your oven to 375°F (190°C). Pat the chicken thighs completely dry with paper towels—this is the secret to getting that skin super crispy. Season them generously on both sides with salt and pepper. Heat the olive oil in your large oven-safe skillet over medium-high heat. Once the oil is shimmering, place the chicken in the pan skin-side down. You’ll hear a satisfying sizzle. Resist the urge to move them! Let them cook for 6-8 minutes until the skin is golden brown and crisp.
Step 2: Flip the chicken and cook for another 2-3 minutes on the other side just to sear it. You don’t need to cook it through at this stage. Transfer the chicken to a clean plate; it will finish cooking in the oven. You should have a beautiful layer of rendered chicken fat and browned bits in the pan—that’s pure flavor gold! Reduce the heat to medium and add the chopped onion. Sauté for about 5 minutes, scraping up those browned bits, until the onion is soft and translucent.
Step 3: Add the minced garlic and cook for just 30 seconds until fragrant. You’ll notice the aroma change dramatically. Now, add the dry rice to the skillet. Stir it constantly for about 2 minutes. The rice will turn from translucent to a more opaque white and may start to smell a little nutty. This toasting step is non-negotiable for fluffy, separate grains later.
Step 4: Sprinkle in the smoked paprika, cumin, and oregano. Stir for another 30 seconds to toast the spices—this wakes up their oils and makes the entire kitchen smell incredible. Now, pour in the crushed tomatoes and chicken broth. Give everything a really good stir, making sure to scrape the bottom of the pan to incorporate all those flavorful bits. Bring the liquid to a lively simmer.
Step 5: Once it’s simmering, nestle the seared chicken thighs back into the skillet, skin-side up, pressing them down slightly into the rice mixture. The liquid should come about halfway up the sides of the chicken. Cover the skillet tightly with its lid (or with heavy-duty foil) and carefully transfer it to the preheated oven.
Step 6: Bake for 20-25 minutes. The rice should have absorbed most of the liquid and be tender. To check if the chicken is done, an instant-read thermometer inserted into the thickest part (avoiding the bone) should read 165°F (74°C). Carefully remove the skillet from the oven—remember, the handle will be extremely hot! Scatter the frozen peas over the top, re-cover the pan, and let it rest off the heat for 5-10 minutes. This resting time allows the peas to heat through and the rice to steam to perfect fluffiness.
Step 7: Finally, fluff the rice around the chicken with a fork. Garnish with a generous handful of fresh, chopped parsley or cilantro for a burst of color and freshness. Serve directly from the skillet for a beautiful, rustic presentation.
Storage & Freshness Guide
- Fridge: Store leftovers in an airtight container for up to 4 days.
- Freezer: Freeze in sealed containers for up to 3 months; thaw in fridge before reheating.
- Reviving: Reheat gently in a skillet with a splash of broth, covered, to restore texture.
Serving Suggestions
Complementary Dishes
- A simple green salad with a sharp vinaigrette — The crisp, acidic greens cut through the richness of the chicken and rice beautifully, balancing the entire meal.
- Pan-fried chorizo slices — For an extra meaty, smoky kick, fry up some Spanish chorizo and serve it on the side or mixed right in.
- Grilled asparagus or zucchini — A simple, charred vegetable adds a lovely smoky note and a different texture that complements the soft rice.
Drinks
- A dry Spanish rosé or a light red like Garnacha — These wines have enough acidity to stand up to the tomatoes and spices without overpowering the dish.
- A citrus-forward pale ale or a crisp lager — The hoppy bitterness and carbonation are fantastic for cleansing the palate between bites of the savory rice.
- Sparkling water with lemon and mint — A non-alcoholic option that provides a refreshing, fizzy contrast to the hearty, spiced flavors.
Something Sweet
- Orange and cinnamon flan — The creamy, cool custard with a hint of citrus is the classic, perfect ending to a Spanish-inspired meal.
- Churros with a thick, dark chocolate dipping sauce — For a truly indulgent finish, the warm, cinnamony dough paired with bitter chocolate is pure joy.
- Almond and olive oil cake — This dense, moist cake is not too sweet and has a wonderful nutty flavor that echoes the toasted notes in the rice.
Top Mistakes to Avoid
- Mistake: Not patting the chicken dry. Moisture is the enemy of crispy skin. If you skip this step, the chicken will steam instead of sear, resulting in rubbery, pale skin.
- Mistake: Skipping the rice toasting step. I’ve messed this up before too, thinking it was an extra hassle. Untoasted rice can become gummy and starchy as it cooks, ruining the texture of the whole dish.
- Mistake: Using the wrong size pan. If your skillet is too small, the rice layer will be too thick and won’t cook evenly. If it’s too large, the liquid will evaporate too quickly and the rice will burn.
- Mistake: Peeking while it’s in the oven. I know it’s tempting, but lifting the lid lets out all the essential steam that the rice needs to cook properly. Trust the process and wait until the timer goes off.
Expert Tips
- Tip: For an extra layer of flavor, use a wooden spoon to scrape up the browned bits (the fond) from the pan after searing the chicken. Those little stuck-on pieces are packed with savory, caramelized flavor that will dissolve into your sauce.
- Tip: If you find your rice is still a bit too wet after the resting period, place the uncovered skillet back over low heat on the stovetop for a few minutes, stirring gently, to evaporate the excess liquid.
- Tip: Let the skillet rest for a full 10 minutes after baking. This allows the starches in the rice to relax, resulting in a much fluffier final product rather than a sticky one. It also gives the chicken time to reabsorb its juices.
- Tip: For a restaurant-style finish, you can pop the skillet under the broiler for the last 1-2 minutes of cooking (with the lid off) to make the chicken skin extra crackly and blistered. Just keep a very close eye on it!
FAQs
Can I make this with chicken breasts instead?
Absolutely! I’d recommend using boneless, skinless breasts and reducing the initial searing time to about 4-5 minutes per side, just to get some color on them. Since they cook faster than thighs, you might want to add them back to the pan later in the baking process—maybe for the last 15 minutes—to prevent them from drying out. The result will be leaner but still delicious.
My rice is still hard after baking. What happened?
This usually means there wasn’t quite enough liquid, the heat was too low, or the rice was old. Old rice takes longer to absorb water. If you encounter this, simply add another 1/4 to 1/2 cup of warm broth, stir gently, cover, and return it to the oven for another 10-15 minutes. Check the liquid level next time—all skillets and stoves are a little different.
Can I prepare this dish ahead of time?
You can do all the prep ahead—chop the onion and garlic, measure the rice and spices. You can even sear the chicken and store it separately. But for the best texture, I’d recommend assembling and baking it fresh. The rice can become a bit mushy if it sits in the liquid for too long before cooking.
Is it possible to make this vegetarian?
Of course! It’s a fantastic vegetarian meal. Simply omit the chicken and use vegetable broth. You can add a can of drained and rinsed chickpeas or black beans when you add the frozen peas for protein. The cooking time remains the same, and you’ll still get that wonderful, smoky Spanish rice.
How should I store and reheat leftovers?
Store any leftovers in an airtight container in the refrigerator for up to 4 days. The best way to reheat is in a skillet over low heat with a tiny splash of water or broth, covered, stirring occasionally until warmed through. You can also use the microwave, but the stovetop method will help restore the texture of the rice much better.


One Pan Spanish Rice With Chicken
Make this easy One-Pan Spanish Rice with Chicken for a complete, flavorful meal with minimal cleanup. Perfect for busy weeknights. Get the recipe now!
Ingredients
For the Ingredients
-
4 bone-in, skin-on chicken thighs
-
1 tbsp olive oil
-
1 large yellow onion (finely chopped)
-
4 cloves garlic (minced)
-
1 ½ cups long-grain white rice (like jasmine or basmati)
-
1 can crushed tomatoes (15 oz)
-
2 ½ cups chicken broth
-
1 tsp smoked paprika
-
1 tsp ground cumin
-
½ tsp dried oregano
-
1 cup frozen peas
-
Salt and black pepper (to taste)
-
Fresh parsley or cilantro (for garnish)
Instructions
-
Preheat your oven to 375°F (190°C). Pat the chicken thighs completely dry with paper towels—this is the secret to getting that skin super crispy. Season them generously on both sides with salt and pepper. Heat the olive oil in your large oven-safe skillet over medium-high heat. Once the oil is shimmering, place the chicken in the pan skin-side down. You’ll hear a satisfying sizzle. Resist the urge to move them! Let them cook for 6-8 minutes until the skin is golden brown and crisp.01
-
Flip the chicken and cook for another 2-3 minutes on the other side just to sear it. You don’t need to cook it through at this stage. Transfer the chicken to a clean plate; it will finish cooking in the oven. You should have a beautiful layer of rendered chicken fat and browned bits in the pan—that’s pure flavor gold! Reduce the heat to medium and add the chopped onion. Sauté for about 5 minutes, scraping up those browned bits, until the onion is soft and translucent.02
-
Add the minced garlic and cook for just 30 seconds until fragrant. You’ll notice the aroma change dramatically. Now, add the dry rice to the skillet. Stir it constantly for about 2 minutes. The rice will turn from translucent to a more opaque white and may start to smell a little nutty. This toasting step is non-negotiable for fluffy, separate grains later.03
-
Sprinkle in the smoked paprika, cumin, and oregano. Stir for another 30 seconds to toast the spices—this wakes up their oils and makes the entire kitchen smell incredible. Now, pour in the crushed tomatoes and chicken broth. Give everything a really good stir, making sure to scrape the bottom of the pan to incorporate all those flavorful bits. Bring the liquid to a lively simmer.04
-
Once it's simmering, nestle the seared chicken thighs back into the skillet, skin-side up, pressing them down slightly into the rice mixture. The liquid should come about halfway up the sides of the chicken. Cover the skillet tightly with its lid (or with heavy-duty foil) and carefully transfer it to the preheated oven.05
-
Bake for 20-25 minutes. The rice should have absorbed most of the liquid and be tender. To check if the chicken is done, an instant-read thermometer inserted into the thickest part (avoiding the bone) should read 165°F (74°C). Carefully remove the skillet from the oven—remember, the handle will be extremely hot! Scatter the frozen peas over the top, re-cover the pan, and let it rest off the heat for 5-10 minutes. This resting time allows the peas to heat through and the rice to steam to perfect fluffiness.06
-
Finally, fluff the rice around the chicken with a fork. Garnish with a generous handful of fresh, chopped parsley or cilantro for a burst of color and freshness. Serve directly from the skillet for a beautiful, rustic presentation.07
Not what you're looking for?


