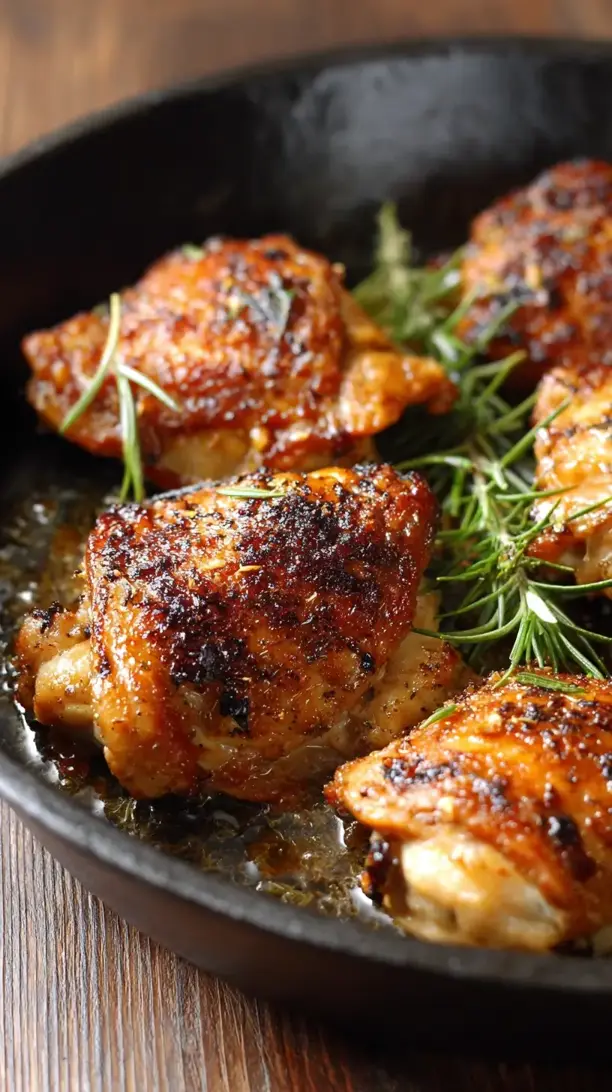
Perfectly pan-seared chicken thighs deliver a crisp, golden-brown skin and impossibly juicy meat beneath. The magic lies in technique—rendering fat slowly, managing heat, and letting the chicken rest. This Pan Seared Chicken Thighs recipe is a guaranteed weeknight hero with minimal fuss.
Looking for Pan Seared Chicken Thighs inspiration? You'll love what we have! Explore more Chicken Thigh Recipes recipes or discover our Dessert Recipes favorites.


Why You’ll Love This Pan Seared Chicken Thighs
- Unbeatable Texture: Crisp skin and tender, juicy meat from a high-heat sear.
- Incredibly Forgiving: Higher fat content keeps thighs moist even if slightly overcooked.
- Maximum Flavor: Simple seasoning lets the rich, savory skin do the work.
- Your Go-To Meal Base: Slice over salads, chop into pasta, or stuff into tacos.
Ingredients & Tools
- 4-6 bone-in, skin-on chicken thighs (about 1.5 lbs / 680 g)
- 1 ½ tbsp olive oil or avocado oil
- 1 tsp kosher salt
- ½ tsp freshly ground black pepper
- ½ tsp garlic powder (optional, but recommended)
- ¼ tsp smoked paprika (optional, for color and a hint of smokiness)
- 2-3 sprigs of fresh thyme or rosemary (optional)
- 2 cloves garlic, lightly smashed (optional)
Tools: A large, heavy-bottomed skillet (cast iron is ideal), tongs, an instant-read thermometer.
Notes: The quality of your chicken matters here—look for thighs with plump, evenly colored skin. The bone-in, skin-on cut is non-negotiable for this recipe; it’s the key to that incredible juiciness and crispy exterior. As for the oil, choose one with a high smoke point so it can handle the heat without burning.
Nutrition (per serving)
| Calories: | 310 kcal |
| Protein: | 25 g |
| Fat: | 23 g |
| Carbs: | 1 g |
| Fiber: | 0 g |
Serves: 4 | Prep Time: 5 minutes | Cook Time: 15-20 minutes | Total Time: 25 minutes
Before You Start: Tips & Ingredient Notes
- Patience is your secret weapon. The single most important step is patting the chicken skin completely dry with paper towels. Any moisture on the surface will steam the skin instead of letting it crisp up beautifully. Be thorough here—it makes all the difference.
- Why bone-in, skin-on? The bone acts as a heat conductor, cooking the meat more evenly from the inside out and preventing it from tightening up too much. The skin protects the meat from direct heat and, of course, provides that glorious, crispy layer we’re after. Don’t be tempted to use boneless, skinless thighs for this particular method.
- Season generously and early. Don’t be shy with the salt and pepper! Season the chicken thighs at least 15 minutes before cooking, if you have time. This allows the salt to penetrate the meat, seasoning it from the inside out and helping the skin dry out even further for optimal crispiness.
- Your pan matters. A heavy-bottomed skillet, like cast iron or stainless steel, is crucial. It retains and distributes heat evenly, preventing hot spots that can burn the skin before the inside is cooked through. A thin, lightweight pan just won’t give you the same results.
How to Make Pan Seared Chicken Thighs
Step 1: Start by preparing your chicken. Use paper towels to pat the chicken thighs completely dry on both sides, paying extra attention to the skin. This is the non-negotiable first step for crispy skin. In a small bowl, mix together the salt, black pepper, garlic powder, and smoked paprika. Sprinkle this seasoning blend evenly over both sides of the chicken thighs, rubbing it gently into the skin. Let them sit at room temperature for about 15 minutes while you preheat your pan.
Step 2: Place your heavy-bottomed skillet over medium heat and let it get properly hot for a couple of minutes. Add the oil and swirl it around to coat the bottom of the pan. You’ll know the oil is ready when it shimmers and moves fluidly—if it smokes, it’s too hot. Carefully place the chicken thighs in the pan, skin-side down. Arrange them so they aren’t crowded; you want good contact with the pan. They should sizzle the moment they hit the oil.
Step 3: Now, this is the hardest part: don’t touch them! Resist the urge to move or peek at the chicken for a solid 10-12 minutes. Let the skin render its fat and develop a deep, golden-brown crust. You can gently lift a corner to check the color after about 8 minutes. It should be a beautiful, crispy brown. If the skin is splattering a lot, you can reduce the heat to medium-low.
Step 4: Once the skin is deeply golden and crisp, use your tongs to flip the thighs over. They should release from the pan easily if the sear is good. Add the optional smashed garlic cloves and herb sprigs to the pan around the chicken. The fat will fry the garlic and herbs, infusing the oil with incredible aroma. Cook the chicken on this second side for another 5-8 minutes.
Step 5: To ensure they’re perfectly cooked, use an instant-read thermometer. Insert it into the thickest part of the thigh, avoiding the bone. You’re looking for an internal temperature of 165°F (74°C). The juices should also run clear. Once they hit that temperature, transfer the chicken to a clean plate or cutting board. Do not slice into them yet!
Step 6: Let the chicken rest for at least 5-10 minutes. This is another critical step. Resting allows the muscle fibers to relax and reabsorb all the juices that have been driven to the center during cooking. If you cut in right away, those precious juices will end up on your cutting board instead of in your mouth. You’ll notice the chicken is much more tender and moist after this short wait.
Storage & Freshness Guide
- Fridge: Cool completely, store in an airtight container for up to 3 days.
- Freezer: Wrap tightly and freeze for up to 3 months; thaw in fridge before reheating.
- Reviving: Reheat in a 375°F oven or dry skillet to re-crisp skin; avoid microwaving.
Serving Suggestions
Complementary Dishes
- Creamy Parmesan Polenta — The rich, crispy chicken thighs are a dream when paired with the soft, cheesy, and comforting texture of polenta. The polenta acts as a wonderful base to catch any pan juices.
- Garlic Sautéed Greens — Something like kale, spinach, or Swiss chard quickly wilted with a little garlic in the same pan you cooked the chicken adds a fresh, vibrant, and healthy counterpoint to the dish.
- Buttery Mashed Potatoes — A classic for a reason. The fluffy, buttery potatoes are the perfect vehicle for the savory drippings left in the pan after cooking the chicken.
Drinks
- A Crisp Chardonnay — A lightly oaked Chardonnay has enough body to stand up to the richness of the chicken skin, while its acidity cuts through the fat beautifully.
- A Pale Ale or Lager — The carbonation and slight bitterness of a good beer are fantastic for cleansing the palate between bites of this savory, fatty dish.
- Sparkling Water with Lemon — For a non-alcoholic option, the bubbles and citrus are incredibly refreshing and help balance the meal’s richness.
Something Sweet
- Lemon Sorbet — The bright, clean, and tart flavor of a lemon sorbet is the perfect palate-cleansing finish after a rich and savory main course.
- Simple Berry Crumble — The sweet-tart berries and buttery, oat-y topping feel homey and satisfying without being too heavy, making it an ideal follow


Pan Seared Chicken Thighs
Learn how to make perfect Pan Seared Chicken Thighs with crispy skin and juicy meat. This easy recipe is your new go-to weeknight dinner. Get cooking now!
Ingredients
For the Ingredients
-
4-6 bone-in, skin-on chicken thighs (about 1.5 lbs / 680 g)
-
1 ½ tbsp olive oil or avocado oil
-
1 tsp kosher salt
-
½ tsp freshly ground black pepper
-
½ tsp garlic powder (optional, but recommended)
-
¼ tsp smoked paprika (optional, for color and a hint of smokiness)
-
2-3 sprigs fresh thyme or rosemary (optional)
-
2 cloves garlic (lightly smashed, optional)
Instructions
-
Start by preparing your chicken. Use paper towels to pat the chicken thighs completely dry on both sides, paying extra attention to the skin. This is the non-negotiable first step for crispy skin. In a small bowl, mix together the salt, black pepper, garlic powder, and smoked paprika. Sprinkle this seasoning blend evenly over both sides of the chicken thighs, rubbing it gently into the skin. Let them sit at room temperature for about 15 minutes while you preheat your pan.01
-
Place your heavy-bottomed skillet over medium heat and let it get properly hot for a couple of minutes. Add the oil and swirl it around to coat the bottom of the pan. You’ll know the oil is ready when it shimmers and moves fluidly—if it smokes, it’s too hot. Carefully place the chicken thighs in the pan, skin-side down. Arrange them so they aren’t crowded; you want good contact with the pan. They should sizzle the moment they hit the oil.02
-
Now, this is the hardest part: don’t touch them! Resist the urge to move or peek at the chicken for a solid 10-12 minutes. Let the skin render its fat and develop a deep, golden-brown crust. You can gently lift a corner to check the color after about 8 minutes. It should be a beautiful, crispy brown. If the skin is splattering a lot, you can reduce the heat to medium-low.03
-
Once the skin is deeply golden and crisp, use your tongs to flip the thighs over. They should release from the pan easily if the sear is good. Add the optional smashed garlic cloves and herb sprigs to the pan around the chicken. The fat will fry the garlic and herbs, infusing the oil with incredible aroma. Cook the chicken on this second side for another 5-8 minutes.04
-
To ensure they’re perfectly cooked, use an instant-read thermometer. Insert it into the thickest part of the thigh, avoiding the bone. You’re looking for an internal temperature of 165°F (74°C). The juices should also run clear. Once they hit that temperature, transfer the chicken to a clean plate or cutting board. Do not slice into them yet!05
-
Let the chicken rest for at least 5-10 minutes. This is another critical step. Resting allows the muscle fibers to relax and reabsorb all the juices that have been driven to the center during cooking. If you cut in right away, those precious juices will end up on your cutting board instead of in your mouth. You’ll notice the chicken is much more tender and moist after this short wait.06
Not what you're looking for?


