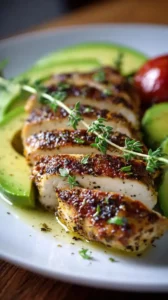
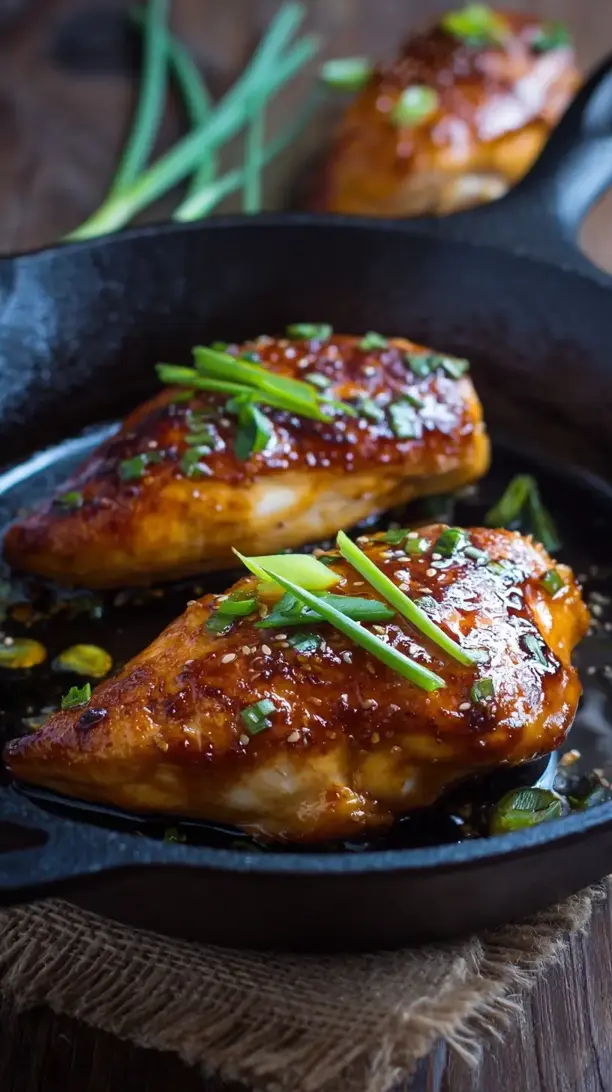
This Seared Honey Chicken delivers the perfect sweet-savory balance in under 30 minutes. The chicken gets a golden sear before being glazed in a sticky honey sauce with garlic and ginger. It’s a simple yet impressive meal that’s sure to become a weeknight favorite.
Looking for Seared Honey Chicken inspiration? You'll love what we have! Explore more Chicken Breast Recipes recipes or discover our Christmas Cookie favorites.

Why You’ll Love This Seared Honey Chicken
- Quick & easy: Ready in about 30 minutes with minimal steps.
- Perfectly balanced: Sweet honey, salty soy, and tangy vinegar create a crave-worthy glaze.
- Versatile pairing: Great with rice, roasted veggies, or salads.
- Ideal texture: Juicy, seared chicken coated in a glossy, sticky sauce.
Ingredients & Tools
- 4 boneless, skinless chicken breasts (about 1.5 lbs or 680 g)
- 3 tbsp honey
- 3 tbsp soy sauce (or tamari for gluten-free)
- 2 tbsp olive oil or avocado oil
- 4 cloves garlic, minced
- 1 tbsp rice vinegar or apple cider vinegar
- 1 tsp freshly grated ginger
- 1/2 tsp black pepper
- 1/4 tsp salt (optional, to taste)
- 1 tbsp chopped fresh parsley or green onions for garnish
Tools: A large skillet (preferably stainless steel or cast iron), tongs, a small bowl for the sauce, and a microplane or fine grater for the ginger and garlic.
Notes: Fresh garlic and ginger add bright, pungent notes that balance the honey’s sweetness. Don’t skip the vinegar—it prevents the glaze from being overly sweet.
Nutrition (per serving)
| Calories: | 320 kcal |
| Protein: | 35 g |
| Fat: | 10 g |
| Carbs: | 18 g |
| Fiber: | 0.5 g |
Serves: 4 | Prep Time: 10 minutes | Cook Time: 15 minutes | Total Time: 25 minutes
Before You Start: Tips & Ingredient Notes
- Pound your chicken breasts to an even thickness. This is the single most important step for perfectly cooked chicken. If the breasts are uneven, the thinner parts will overcook and dry out while the thicker parts remain underdone. Just place them between two pieces of plastic wrap and gently pound them to about 3/4-inch thickness.
- Use a high-heat oil. Olive oil is fine, but if you have avocado oil, it’s even better for searing. You want an oil with a high smoke point so it doesn’t burn while you’re getting that beautiful golden crust on the chicken.
- Don’t substitute the vinegar. That little bit of acidity is crucial for balancing the sweetness of the honey. Rice vinegar is mild and slightly sweet itself, but apple cider vinegar works beautifully too. Balsamic would be too overpowering here.
- Have all your ingredients measured and ready. This recipe moves quickly once you start cooking. Having your sauce mixed and your aromatics prepped means you won’t be scrambling while the chicken is in the pan. It’s the key to a stress-free, seamless cooking process.
How to Make Seared Honey Chicken
Step 1: Start by preparing your chicken. If your chicken breasts are particularly thick or uneven, place them between two sheets of plastic wrap and gently pound them to an even thickness of about 3/4-inch. This ensures they cook evenly and stay juicy. Pat them completely dry with paper towels—this is non-negotiable for a good sear. Season both sides generously with black pepper and a light sprinkle of salt if using.
Step 2: In a small bowl, whisk together the honey, soy sauce, minced garlic, grated ginger, and vinegar. Whisk it until the honey is fully dissolved and the mixture is smooth. This is your magic glaze. Set it aside near the stove so it’s ready to go. The aroma from the fresh ginger and garlic will already be incredible.
Step 3: Heat a large skillet over medium-high heat. Add the oil and let it heat up until it shimmers—you should be able to feel the heat when you hold your hand a few inches above the pan. Carefully add the chicken breasts, laying them away from you to avoid oil splatter. You should hear a satisfying sizzle immediately.
Step 4: Sear the chicken for 5-7 minutes on the first side, without moving it. You’re looking for a deep golden-brown crust. Resist the urge to peek or move it around! A good sear needs uninterrupted contact with the hot pan. Use your tongs to flip the chicken. It should release easily from the pan if a proper crust has formed.
Step 5: Cook on the second side for another 5-7 minutes. The exact time will depend on the thickness of your chicken. You’re aiming for an internal temperature of 165°F (74°C). The chicken should feel firm to the touch but still have a little give. Once cooked through, transfer the chicken to a clean plate to rest. Don’t slice into it yet!
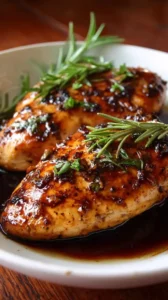
Step 6: Reduce the heat to medium-low. Pour your prepared honey sauce into the hot skillet. It will bubble and sizzle furiously—that’s good! Use a whisk or a wooden spoon to scrape up all the delicious browned bits from the bottom of the pan. This is called deglazing, and it adds a ton of flavor to your sauce.
Step 7: Let the sauce simmer for 2-3 minutes, stirring frequently. You’ll notice it will start to thicken and become glossy as it reduces. It should coat the back of a spoon nicely. Be careful not to overcook it at this stage, as the honey can burn. The sauce is ready when it’s slightly thickened and richly aromatic.
Step 8: Return the chicken and any accumulated juices on the plate back to the skillet. Spoon the glossy sauce over the chicken, turning each piece to coat it thoroughly. Let it warm through for about a minute. Garnish with chopped fresh parsley or green onions for a pop of color and freshness. Serve immediately while it’s hot and the sauce is wonderfully sticky.
Storage & Freshness Guide
- Fridge: Store in an airtight container for up to 3 days.
- Freezer: Freeze (without garnish) for up to 2 months; thaw in fridge before reheating.
- Reviving: Reheat gently in a skillet with a splash of water to restore sauciness.
Serving Suggestions
Complementary Dishes
- Fluffy jasmine rice — The plain, slightly sticky rice is the perfect canvas for soaking up every last drop of that incredible honey glaze.
- Simple roasted broccoli — The slight char and earthy flavor of the broccoli provides a wonderful textural and flavor contrast to the sweet, sticky chicken.
- Quick-pickled cucumber salad — A bright, acidic salad cuts through the richness of the dish and cleanses the palate beautifully between bites.
Drinks
- A crisp, dry Riesling — The wine’s natural acidity and slight sweetness will mirror the flavors in the chicken and create a really harmonious pairing.
- Ginger beer mocktail — The spicy kick of ginger echoes the fresh ginger in the recipe, making for a refreshing non-alcoholic option.
Something Sweet
- Lemon sorbet — Its bright, clean, and citrusy finish is the perfect way to end the meal without feeling too heavy after a savory-sweet main course.
- Almond biscotti — The nutty, crunchy cookies are fantastic for dipping and offer a simple, not-too-sweet finale.
Top Mistakes to Avoid
- Mistake: Not drying the chicken before searing. Any surface moisture will steam the chicken instead of allowing a crust to form. You’ll end up with pale, rubbery chicken instead of that beautiful golden sear. Always pat it thoroughly with paper towels.
- Mistake: Moving the chicken too soon. I’ve messed this up before too… you get impatient and flip it early. But if it sticks, it’s not ready. A proper sear means the chicken will release from the pan naturally when a crust has formed. Trust the process.
- Mistake: Burning the garlic. If you add the garlic directly to the hot pan at the start, it will burn and turn bitter. By incorporating it into the sauce and adding it only during the final simmer, you preserve its aromatic flavor without any acrid notes.
- Mistake: Slicing the chicken immediately after cooking. Let it rest for a few minutes after you’ve coated it in the sauce. This allows the juices to redistribute throughout the meat. If you cut into it right away, all those precious juices will run out onto the cutting board, leaving you with drier chicken.
Expert Tips
- Tip: Use a thermometer for perfect doneness. It takes the guesswork out completely. Pull the chicken at 165°F (74°C) for food safety and optimal juiciness. An instant-read thermometer is one of the best investments you can make for your kitchen.
- Tip: Double the sauce if you’re a dipper. The recipe makes enough glaze to coat the chicken beautifully, but if you love extra sauce for your rice or veggies, simply double the honey, soy sauce, vinegar, garlic, and ginger. It’s a foolproof way to make it even more indulgent.
- Tip: Add a pinch of red pepper flakes. For a subtle kick of heat that plays wonderfully with the sweet honey, add 1/4 to 1/2 teaspoon of red pepper flakes to the sauce mixture. It adds another layer of complexity that’s really special.
- Tip: Let the sauce reduce properly. Don’t rush the simmering stage. Letting the sauce bubble away for those few minutes allows it to thicken and intensify in flavor. A properly reduced sauce will cling to the chicken instead of sliding right off.
FAQs
Can I use chicken thighs instead of breasts?
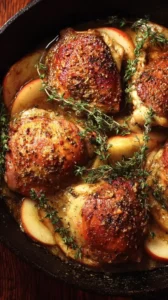
Absolutely! Bone-in, skin-on thighs would be fantastic—just adjust the cooking time. You’ll want to render the fat from the skin by cooking it skin-side down for a bit longer to get it super crispy. The cooking time might extend to 10-12 minutes per side. The rich, dark meat pairs wonderfully with the sweet glaze.
How should I store and reheat leftovers?
Store any leftover chicken and sauce in an airtight container in the fridge for up to 3 days. To reheat, I strongly recommend using a skillet over low heat with a tiny splash of water. The microwave can make the chicken rubbery and overhear the sauce. Gently warming it on the stove will help it retain its texture and sauciness.
My sauce is too thin. What did I do wrong?
It likely just needs a little more reduction time. Simmer it for another minute or two, and it should thicken up as the water evaporates. If you’re really in a hurry, you can make a quick slurry with 1 teaspoon of cornstarch and 1 tablespoon of cold water, then whisk it into the simmering sauce. It will thicken almost instantly.
Can I make this recipe gluten-free?
Easily! Just ensure you’re using tamari or a certified gluten-free soy sauce instead of regular soy sauce. All the other core ingredients are naturally gluten-free, so it’s a very simple swap that doesn’t alter the flavor profile at all.
Is the ginger absolutely necessary?
It adds a wonderful warm, spicy note that really complements the honey, but in a pinch, you can substitute 1/4 teaspoon of ground ginger. The flavor will be slightly different—less bright and more earthy—but it will still be delicious. Fresh is always best if you can manage it!


Seared Honey Chicken
Make this easy Seared Honey Chicken in under 30 minutes! A sweet-savory glaze coats juicy, golden chicken for a perfect weeknight meal. Get the recipe now!
Ingredients
For the chicken and sauce:
-
4 boneless, skinless chicken breasts (about 1.5 lbs or 680 g)
-
3 tbsp honey
-
3 tbsp soy sauce (or tamari for gluten-free)
-
2 tbsp olive oil or avocado oil
-
4 cloves garlic (minced)
-
1 tbsp rice vinegar or apple cider vinegar
-
1 tsp freshly grated ginger
-
1/2 tsp black pepper
-
1/4 tsp salt (optional, to taste)
-
1 tbsp chopped fresh parsley or green onions (for garnish)
Instructions
-
Start by preparing your chicken. If your chicken breasts are particularly thick or uneven, place them between two sheets of plastic wrap and gently pound them to an even thickness of about 3/4-inch. This ensures they cook evenly and stay juicy. Pat them completely dry with paper towels—this is non-negotiable for a good sear. Season both sides generously with black pepper and a light sprinkle of salt if using.01
-
In a small bowl, whisk together the honey, soy sauce, minced garlic, grated ginger, and vinegar. Whisk it until the honey is fully dissolved and the mixture is smooth. This is your magic glaze. Set it aside near the stove so it’s ready to go. The aroma from the fresh ginger and garlic will already be incredible.02
-
Heat a large skillet over medium-high heat. Add the oil and let it heat up until it shimmers—you should be able to feel the heat when you hold your hand a few inches above the pan. Carefully add the chicken breasts, laying them away from you to avoid oil splatter. You should hear a satisfying sizzle immediately.03
-
Sear the chicken for 5-7 minutes on the first side, without moving it. You’re looking for a deep golden-brown crust. Resist the urge to peek or move it around! A good sear needs uninterrupted contact with the hot pan. Use your tongs to flip the chicken. It should release easily from the pan if a proper crust has formed.04
-
Cook on the second side for another 5-7 minutes. The exact time will depend on the thickness of your chicken. You’re aiming for an internal temperature of 165°F (74°C). The chicken should feel firm to the touch but still have a little give. Once cooked through, transfer the chicken to a clean plate to rest. Don’t slice into it yet!05
-
Reduce the heat to medium-low. Pour your prepared honey sauce into the hot skillet. It will bubble and sizzle furiously—that’s good! Use a whisk or a wooden spoon to scrape up all the delicious browned bits from the bottom of the pan. This is called deglazing, and it adds a ton of flavor to your sauce.06
-
Let the sauce simmer for 2-3 minutes, stirring frequently. You’ll notice it will start to thicken and become glossy as it reduces. It should coat the back of a spoon nicely. Be careful not to overcook it at this stage, as the honey can burn. The sauce is ready when it’s slightly thickened and richly aromatic.07
-
Return the chicken and any accumulated juices on the plate back to the skillet. Spoon the glossy sauce over the chicken, turning each piece to coat it thoroughly. Let it warm through for about a minute. Garnish with chopped fresh parsley or green onions for a pop of color and freshness. Serve immediately while it’s hot and the sauce is wonderfully sticky.08
Not what you're looking for?


