There’s a special kind of magic in a recipe that feels like a hug, and for me, these simple almond butter cookies are exactly that. They’re my go-to when I want a chewy, nutty treat that comes together in one bowl with minimal fuss. Honestly, nothing makes a kitchen feel more like home than the smell of them baking, and I think you’ll find they’re the perfect little piece of comfort.
I especially love making these during the busy festive season. If you’re like me and your list of christmas baking ideas is long, these cookies are a lifesaver. They’re a wonderful addition to your holiday baking lineup and some of the easiest christmas cookies recipes you’ll try. When you need easy christmas treats that are both delicious and simple, this is your answer. They make for fantastic holiday cookies christmas guests always seem to adore.
So whether you’re filling a cookie tin for friends or just need a moment of sweet comfort for yourself, these flourless cookies are a guaranteed hit. I consider them one of the best christmas dessert ideas made simple—pure, nutty bliss in every soft and chewy bite.
Looking for Simple Almond Butter Cookies inspiration? You'll love what we have! Explore more Christmas Cookie recipes or discover our Drinks favorites.


Why You’ll Love This Simple Almond Butter Cookies
- Unbelievably Easy: One bowl, no chilling, and ready in minutes.
- Deep, Toasty Flavor: Almond butter shines with sophisticated nuttiness.
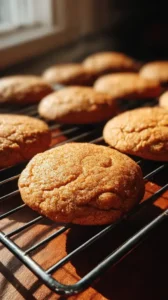
- Perfect Texture: Crisp edges with a soft, fudgy, chewy center.
- Naturally Gluten-Free: Flourless and fantastic for dietary needs.
Ingredients & Tools
- 1 cup smooth, unsweetened almond butter
- 2/3 cup light brown sugar, packed
- 1 large egg, at room temperature
- 1 tsp vanilla extract
- 1/2 tsp baking soda
- 1/4 tsp fine sea salt
- Coarse sugar for rolling (optional, but lovely)
Tools: A medium mixing bowl, a sturdy spoon or spatula, a baking sheet, parchment paper, and a fork.
Notes: Use natural, runny almond butter where oil separates for best texture and flavor. Brown sugar adds depth that white sugar can’t provide.
Nutrition (per serving)
| Calories: | 142 kcal |
| Protein: | 4 g |
| Fat: | 10 g |
| Carbs: | 11 g |
| Fiber: | 1 g |
Serves: 18 | Prep Time: 8 minutes | Cook Time: 10 minutes | Total Time: 18 minutes
Before You Start: Tips & Ingredient Notes
- Almond Butter is Key. For the best results, use a natural almond butter that you have to stir. The oilier consistency blends more smoothly into the dough, preventing a dry or crumbly cookie. Avoid brands with added sugars or hydrogenated oils.
- Room Temperature Egg is Non-Negotiable. A cold egg can cause the almond butter to seize up and become clumpy, making it difficult to mix into a smooth, cohesive dough. Taking the egg out 30 minutes before you bake makes all the difference.
- Don’t Overmix. Once you add the dry ingredients, mix just until everything is combined and no dry streaks remain. Overmixing can lead to cookies that spread too much and become greasy.
- Trust the Fork. Flattening the dough balls with a fork isn’t just tradition—it’s functional. It creates those lovely ridges that get slightly crisp and ensures the cookies bake evenly all the way through.
How to Make Simple Almond Butter Cookies
Step 1: Start by preheating your oven to 350°F (175°C) and lining a baking sheet with parchment paper. This is a fast-moving recipe, so you want your oven ready to go. In your medium mixing bowl, combine the almond butter, packed brown sugar, room temperature egg, and vanilla extract. Stir everything together with a sturdy spoon or spatula. You’ll notice the mixture might look a bit separated at first, but just keep stirring—it will come together into a thick, glossy, and homogenous dough.
Step 2: Sprinkle the baking soda and salt over the dough. Now, mix these in until they are fully incorporated. Be careful not to overdo it here; just mix until you no longer see any white specks. The dough will be quite soft and sticky, which is exactly what you want. This is the point where you can let the dough rest for a minute or two if it feels too loose, but honestly, I usually just power right through.
Step 3: Now, portion the dough. Using a tablespoon or a small cookie scoop, portion out heaping tablespoons of dough and roll them into smooth balls between your palms. If you’re using the coarse sugar for rolling, now is the time. Place the sugar in a small bowl and roll each dough ball in it until lightly coated. This adds a delightful crunch and a bit of sparkle.
Step 4: Place the dough balls on your prepared baking sheet, leaving about 2 inches of space between them as they will spread. Take a fork and gently press down on each ball to flatten it to about a 1/2-inch thickness. Then, for the classic look, press the fork down again in the opposite direction to create a criss-cross pattern. If the fork starts sticking, just dip it in a little water or the leftover coarse sugar between presses.
Step 5: It’s time to bake! Slide the baking sheet into your preheated oven and bake for 9-11 minutes. The trick is to pull them out when the edges look set and are just starting to turn a light golden brown, but the centers still appear soft and puffy. They will not look fully done, and that is perfect. This is the secret to that wonderfully chewy center.
Step 6: This is the hardest part: let the cookies cool on the baking sheet for a full 10 minutes. They are extremely fragile straight out of the oven and need this time to firm up. After 10 minutes, you can transfer them to a wire rack to cool completely. They will deflate slightly and develop those lovely cracks as they cool. Try to resist eating one until they’ve set—the flavor and texture are worth the wait.
Storage & Freshness Guide
- Fridge: Not recommended; store at room temperature in an airtight container.
- Freezer: Freeze baked cookies for up to 3 months, or freeze dough balls and bake from frozen (+1-2 min).
- Reviving: Warm in a 300°F oven for 5 minutes to crisp edges.
Serving Suggestions
Complementary Dishes
- A simple fruit platter — The fresh, bright acidity of berries or sliced apples cuts through the rich, nutty density of the cookies beautifully, creating a lovely balance on a dessert plate.
- A sharp cheese board — Serve these alongside a slice of aged cheddar or manchego; the salty, savory cheese creates a surprisingly sophisticated and delicious contrast with the sweet cookie.
- Vanilla bean ice cream — Crumble a warm cookie over a scoop of high-quality vanilla ice cream for an instant, decadent sundae that feels both rustic and elegant.
Drinks
- Cold glass of milk — It’s a classic for a reason. The creaminess of the milk is the perfect partner to the nutty, chewy cookie, making for the ultimate comforting bite.
- Earl Grey tea — The bergamot notes in a warm cup of Earl Grey complement the toasty almond flavor exquisitely, turning your snack into a moment of pure tranquility.
- Dark roast coffee — A strong, bitter cup of coffee provides a robust counterpoint that makes the sweetness of the cookie pop and cleanses the palate between bites.
Something Sweet
- Dark chocolate-dipped strawberries — For a more elaborate dessert spread, these offer a different kind of fruit-and-nut combination that feels celebratory and luxurious alongside the humble cookies.
- Lemon sorbet — The intense, clean citrus flavor of a good sorbet is a brilliant palate-cleanser that highlights the deep, roasted notes of the almond butter in the most refreshing way.
- Drizzled honey and flaky salt — For a minimalist upgrade, simply drizzle a tiny bit of high-quality honey over a cookie and finish with a pinch of flaky sea salt to elevate all the existing flavors.
Top Mistakes to Avoid
- Using the wrong almond butter. If you use a thick, stabilized almond butter (the kind that doesn’t need stirring), your dough will be dry and crumbly, and the cookies won’t spread properly. I’ve messed this up before too, and the difference is night and day.
- Overbaking. It’s so tempting to leave them in until they look “done,” but that will give you a hard, crisp cookie all the way through. Pull them out when the centers still look soft for that perfect chew.
- Not measuring the brown sugar correctly. When a recipe says “packed,” it means it. Press the brown sugar firmly into your measuring cup. A loosely measured cup will result in a less sweet, flatter cookie that lacks moisture.
- Skipping the cooling time on the pan. If you try to move them immediately, they will fall apart. They need those few minutes on the hot baking sheet to set their structure and become stable enough to handle.
Expert Tips
- Tip: For an extra flavor boost, toast your almond butter. Gently warm the required amount in a saucepan for a few minutes until it becomes fragrant. Let it cool slightly before adding the other ingredients. This deepens the nutty flavor immensely.
- Tip: If your dough is too sticky to handle, pop the whole bowl into the refrigerator for 10-15 minutes. This will firm it up just enough to make rolling the balls much easier, without requiring a full chilling period.
- Tip: Create a flavor variation by adding a handful of mix-ins. A 1/4 cup of dark chocolate chips, chopped toasted almonds, or even a teaspoon of orange zest folded into the dough at the end can create a whole new cookie experience.
- Tip: Make them uniformly perfect by using a cookie scoop. Not only is it less messy, but it ensures all your cookies are the same size and will bake at the same rate, giving you a perfectly consistent batch every single time.
FAQs
Can I use a different nut butter?
You absolutely can, but the results will vary. Natural peanut butter will work very well and give you a more classic peanut butter cookie. Cashew butter will yield a milder, creamier cookie. Just be sure to use a natural, drippy style for the best texture. Avoid sunflower seed butter unless you’re okay with the cookies turning a greenish-grey color—a harmless chemical reaction that can happen with baking soda.
Why did my cookies turn out flat and greasy?
This usually points to two potential issues. First, your almond butter might have been too oily. If you notice a huge pool of oil on top of your jar, try stirring it in thoroughly but also pouring off a tiny bit of the excess. Second, you may have overmixed the dough after adding the baking soda, which can overwork the fats and lead to excessive spreading.
Can I make these without sugar?
It’s tricky, as the sugar provides both sweetness and structure. You could try using a granulated monk fruit or erythritol blend that measures 1:1 like sugar, but the texture will be slightly different—often more cakey and less chewy. I wouldn’t recommend liquid sweeteners like maple syrup, as they will make the cookies spread far too much.
How should I store these cookies?
Once completely cool, store them in an airtight container at room temperature. They will stay soft and delicious for up to 5 days. If you find they’ve softened a bit too much, a quick 5-minute warm-up in a 300°F oven will crisp the edges right back up.
Can I freeze the dough?
Yes, and it works wonderfully! Simply roll the dough into balls, place them on a parchment-lined tray, and freeze until solid. Then, transfer the frozen dough balls to a zip-top bag. You can bake them straight from frozen, just add 1-2 minutes to the baking time. This is perfect for having fresh, warm cookies on demand.


Simple Almond Butter Cookies: An Easy, One-Bowl Dessert
Simple Almond Butter Cookies are an easy almond butter cookies recipe, perfect for holiday baking. These one-bowl, chewy treats are a comforting and festive dessert ready in minutes.
Ingredients
For the Ingredients
-
1 cup smooth, unsweetened almond butter
-
2/3 cup light brown sugar (packed)
-
1 large egg (at room temperature)
-
1 tsp vanilla extract
-
1/2 tsp baking soda
-
1/4 tsp fine sea salt
-
Coarse sugar (for rolling (optional, but lovely))
Instructions
-
Start by preheating your oven to 350°F (175°C) and lining a baking sheet with parchment paper. This is a fast-moving recipe, so you want your oven ready to go. In your medium mixing bowl, combine the almond butter, packed brown sugar, room temperature egg, and vanilla extract. Stir everything together with a sturdy spoon or spatula. You’ll notice the mixture might look a bit separated at first, but just keep stirring—it will come together into a thick, glossy, and homogenous dough.01
-
Sprinkle the baking soda and salt over the dough. Now, mix these in until they are fully incorporated. Be careful not to overdo it here; just mix until you no longer see any white specks. The dough will be quite soft and sticky, which is exactly what you want. This is the point where you can let the dough rest for a minute or two if it feels too loose, but honestly, I usually just power right through.02
-
Now, portion the dough. Using a tablespoon or a small cookie scoop, portion out heaping tablespoons of dough and roll them into smooth balls between your palms. If you're using the coarse sugar for rolling, now is the time. Place the sugar in a small bowl and roll each dough ball in it until lightly coated. This adds a delightful crunch and a bit of sparkle.03
-
Place the dough balls on your prepared baking sheet, leaving about 2 inches of space between them as they will spread. Take a fork and gently press down on each ball to flatten it to about a 1/2-inch thickness. Then, for the classic look, press the fork down again in the opposite direction to create a criss-cross pattern. If the fork starts sticking, just dip it in a little water or the leftover coarse sugar between presses.04
-
It’s time to bake! Slide the baking sheet into your preheated oven and bake for 9-11 minutes. The trick is to pull them out when the edges look set and are just starting to turn a light golden brown, but the centers still appear soft and puffy. They will not look fully done, and that is perfect. This is the secret to that wonderfully chewy center.05
-
This is the hardest part: let the cookies cool on the baking sheet for a full 10 minutes. They are extremely fragile straight out of the oven and need this time to firm up. After 10 minutes, you can transfer them to a wire rack to cool completely. They will deflate slightly and develop those lovely cracks as they cool. Try to resist eating one until they’ve set—the flavor and texture are worth the wait.06
Not what you're looking for?


