These Sticky Chicken Thighs deliver crispy skin, juicy meat, and a glossy sweet-salty glaze with minimal effort. Using pantry staples like soy sauce, honey, and fresh aromatics, this dish is perfect for any occasion. The irresistible aroma and incredible flavor make it a guaranteed crowd-pleaser.
Craving a delicious Sticky Chicken Thighs? You've come to the right spot! From Chicken Thigh Recipes favorites to amazing Christmas Cookie recipes, there's something here for everyone.


Why You’ll Love This Sticky Chicken Thighs
- Insanely flavorful & juicy: Bone-in, skin-on thighs guarantee moist meat and crispy skin.
- Effortless pantry meal: Simple ingredients create a complex, restaurant-quality glaze.
- Perfect for any occasion: Fancy enough for guests, easy enough for weeknights.
- Amazing leftovers: Flavors intensify overnight for salads, bowls, or snacking.
Ingredients & Tools
- 8 bone-in, skin-on chicken thighs (about 1.2 kg / 2.5 lbs)
- 3 tbsp soy sauce (or tamari for gluten-free)
- 3 tbsp honey (or maple syrup)
- 2 tbsp ketchup
- 1 tbsp rice vinegar (or apple cider vinegar)
- 4 cloves garlic, minced
- 1 tbsp fresh ginger, grated
- 1 tsp sesame oil
- 1/2 tsp black pepper
- 1 tbsp vegetable oil
- 1 tbsp sesame seeds (for garnish)
- 2 spring onions, thinly sliced (for garnish)
Tools: A large oven-safe skillet or baking dish, a small saucepan, a whisk, and tongs.
Notes: The quality of your chicken really matters here—look for good, plump thighs with crispy-looking skin. And don’t skip the fresh garlic and ginger; they provide a fragrant backbone that powdered versions just can’t match.
Nutrition (per serving)
| Calories: | 420 kcal |
| Protein: | 35 g |
| Fat: | 22 g |
| Carbs: | 18 g |
| Fiber: | 0.5 g |
Serves: 4 | Prep Time: 10 minutes | Cook Time: 40 minutes | Total Time: 50 minutes
Before You Start: Tips & Ingredient Notes
- Pat your chicken completely dry. This is the single most important step for getting crispy skin. Any moisture on the surface will steam the skin instead of letting it crisp up beautifully. Use paper towels and really get in there.
- Don’t be shy with the seasoning. Season the chicken thighs generously with salt and pepper on both sides, even under the skin if you can manage it. This builds a foundation of flavor right from the start.
- Use a hot pan to start. Searing the chicken skin-side down in a hot oven-safe skillet is non-negotiable. It renders the fat, creates a gorgeous golden crust, and adds a ton of flavor to the pan drippings that will later become part of your sauce.
- Adjust the sweetness to your taste. The honey provides a lovely caramelization, but if you prefer a less sweet glaze, you can reduce it by a tablespoon and add a splash more soy sauce or a teaspoon of Dijon mustard for complexity.
How to Make Sticky Chicken Thighs
Step 1: Preheat your oven to 200°C (400°F). While it’s heating up, pat the chicken thighs completely dry with paper towels. This is crucial for that perfect crispy skin. Season both sides generously with salt and the black pepper. Let them sit at room temperature for about 10 minutes while you make the sauce—this helps them cook more evenly.
Step 2: In a small saucepan, combine the soy sauce, honey, ketchup, rice vinegar, minced garlic, grated ginger, and sesame oil. Whisk everything together over medium-low heat until it’s smooth and just begins to simmer. Let it bubble gently for about 2-3 minutes until it slightly thickens. You’ll notice the aroma becoming incredible—savory, sweet, and deeply fragrant. Remove it from the heat and set aside.
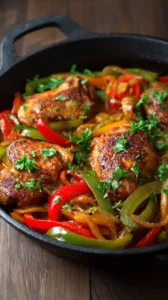
Step 3: Now, heat the vegetable oil in a large oven-safe skillet over medium-high heat. Once the oil is shimmering, carefully place the chicken thighs in the pan, skin-side down. You should hear a satisfying sizzle. Resist the urge to move them! Let them cook for 6-8 minutes until the skin is golden brown and crispy. You can peek to check the color—it should be a deep, appetizing amber.
Step 4: Flip the chicken thighs so they are skin-side up. At this point, you can pour off most of the rendered fat from the pan, leaving just a tablespoon or so for extra flavor. Carefully brush about half of your prepared sticky sauce all over the tops of the chicken thighs, making sure to get every bit coated.
Step 5: Transfer the entire skillet to the preheated oven. Roast for 20-25 minutes, or until the chicken is cooked through and registers 75°C (165°F) on an instant-read thermometer inserted into the thickest part without touching the bone. The sauce will be bubbling around the edges beautifully.
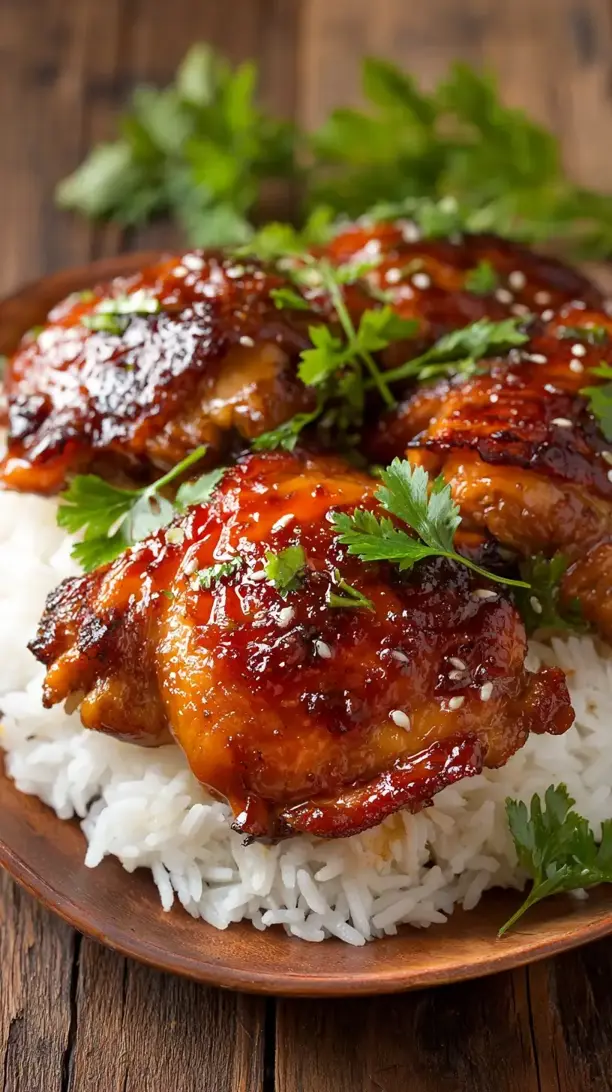
Step 6: Remove the skillet from the oven—be careful, the handle will be extremely hot! Brush the chicken with the remaining sauce. For extra stickiness and color, you can pop it under the broiler for the last 1-2 minutes, but watch it like a hawk so it doesn’t burn. The glaze should look thick, glossy, and perfectly caramelized.
Step 7: Let the chicken rest in the pan for about 5 minutes before serving. This allows the juices to redistribute, ensuring every bite is succulent. Sprinkle generously with sesame seeds and sliced spring onions right before serving for a fresh, colorful finish.
Storage & Freshness Guide
- Fridge: Store in an airtight container for up to 3 days.
- Freezer: Freeze in a sealed bag for up to 2 months; thaw in fridge before reheating.
- Reviving: Reheat in a 180°C (350°F) oven for 10–15 minutes to restore crispiness.
Serving Suggestions
Complementary Dishes
- Steamed jasmine rice — The fluffy, fragrant rice is the perfect canvas for soaking up every last drop of that incredible sticky sauce. It’s a non-negotiable pairing in my book.
- Simple cucumber salad — A quick salad of thinly sliced cucumbers with a light rice vinegar dressing provides a cool, crisp contrast that cuts through the richness of the chicken beautifully.
- Stir-fried greens — Bok choy or broccoli stir-fried with a little garlic and soy sauce adds a healthy, vibrant green element that completes the meal.
Drinks
- A crisp lager or pilsner — The clean, effervescent quality of a cold beer helps cleanse the palate between bites of the rich, sticky chicken.
- Off-dry Riesling — A slightly sweet white wine with bright acidity balances the sweetness of the glaze and complements the savory notes perfectly.
- Iced green tea with lemon — A refreshing, non-alcoholic option that’s light and palate-cleansing, making each bite of chicken taste like the first.
Something Sweet
- Mango sorbet — The bright, tropical fruitiness of mango is a fantastic, light way to finish the meal and refresh your taste buds after all that savory goodness.
- Fortune cookies — A fun, thematic ending that adds a little whimsy and a sweet, crunchy bite without being too heavy.
- Lychee jelly — These delicate, floral, and refreshing jellies are a classic and elegant way to end an Asian-inspired feast on a light note.
Top Mistakes to Avoid
- Mistake: Not drying the chicken skin. I’ve messed this up before too, and you end up with rubbery, pale skin instead of that crackling-crisp texture we’re after. The paper towel step is your best friend here.
- Mistake: Moving the chicken too soon during searing. Let it form a crust! If you try to lift it and it sticks, it’s not ready. A properly seared thigh will release from the pan naturally when it’s done.
- Mistake> Using a baking dish that’s too small. Crowding the thighs will cause them to steam instead of roast, and the skin will get soggy. Give them some space for the hot air to circulate.
- Mistake: Skipping the rest time. Slicing into the chicken straight from the oven will cause all those precious juices to run out onto the cutting board, leaving you with drier meat. A brief rest is essential.
Expert Tips
- Tip: Make a double batch of the sauce. It’s so good you’ll want extra for drizzling over your rice or vegetables. Just store any leftover sauce in a jar in the fridge for up to a week—it’s great on grilled fish or tofu, too.
- Tip> Get the sauce under the skin. For an extra flavor bomb, after searing, gently lift the skin and brush a little sauce directly onto the meat before the final bake. It infuses the chicken from the inside out.
- Tip: Use the broiler for a final blast. If your glaze isn’t as dark and sticky as you’d like after baking, a minute or two under a hot broiler will work wonders. Just don’t walk away—it can go from perfect to burnt in seconds.
- Tip: Let the fat be your guide. When searing, the chicken is ready to flip when the fat has rendered and the skin has shrunk back from the sides of the pan, looking golden and crisp.
FAQs
Can I make this with boneless, skinless chicken thighs?
You absolutely can, but the method changes a bit. You’ll miss out on the crispy skin, of course. Skip the initial stovetop sear and just bake them in the sauce at 200°C (400°F) for 20-25 minutes, or until cooked through. The cook time will be shorter, so keep an eye on them. The result will still be deliciously tender and flavorful, just without the textural contrast.
How can I tell when the chicken is fully cooked?
The best and most reliable way is to use an instant-read meat thermometer. Insert it into the thickest part of the thigh, avoiding the bone, and it should read 75°C (165°F). If you don’t have a thermometer, pierce the meat with a knife; the juices should run completely clear, with no trace of pink.
My sauce is too thin. How can I thicken it?
If your sauce hasn’t reduced enough, you can pour the pan juices back into your saucepan after the chicken is cooked and simmer it over medium heat for a few more minutes until it reaches your desired consistency. For a quick fix, you can also mix a teaspoon of cornstarch with a tablespoon of cold water and whisk it into the simmering sauce until it thickens.
Can I prepare this dish ahead of time?
Yes, for sure! You can make the sauce up to 3 days in advance and store it in the fridge. You can also season the chicken thighs and keep them covered in the fridge for a day before cooking. For the best texture, I’d recommend doing the actual searing and baking on the day you plan to serve it.
What’s the best way to store and reheat leftovers?
Store any leftover chicken in an airtight container in the refrigerator for up to 3 days. To reheat, place it on a baking sheet in a 180°C (350°F) oven for 10-15 minutes until warmed through. This will help keep the skin from getting soggy. Microwaving will work in a pinch but will soften the skin.


Sticky Chicken Thighs
Make the best Sticky Chicken Thighs with crispy skin and a sweet-savory glaze. This easy recipe uses pantry staples for a perfect weeknight meal. Get the recipe now!
Ingredients
For the chicken and glaze:
-
8 bone-in, skin-on chicken thighs (about 1.2 kg / 2.5 lbs)
-
3 tbsp soy sauce (or tamari for gluten-free)
-
3 tbsp honey (or maple syrup)
-
2 tbsp ketchup
-
1 tbsp rice vinegar (or apple cider vinegar)
-
4 cloves garlic (minced)
-
1 tbsp fresh ginger (grated)
-
1 tsp sesame oil
-
1/2 tsp black pepper
-
1 tbsp vegetable oil
For the garnish:
-
1 tbsp sesame seeds (for garnish)
-
2 spring onions (thinly sliced, for garnish)
Instructions
-
Preheat your oven to 200°C (400°F). While it’s heating up, pat the chicken thighs completely dry with paper towels. This is crucial for that perfect crispy skin. Season both sides generously with salt and the black pepper. Let them sit at room temperature for about 10 minutes while you make the sauce—this helps them cook more evenly.01
-
In a small saucepan, combine the soy sauce, honey, ketchup, rice vinegar, minced garlic, grated ginger, and sesame oil. Whisk everything together over medium-low heat until it’s smooth and just begins to simmer. Let it bubble gently for about 2-3 minutes until it slightly thickens. You’ll notice the aroma becoming incredible—savory, sweet, and deeply fragrant. Remove it from the heat and set aside.02
-
Now, heat the vegetable oil in a large oven-safe skillet over medium-high heat. Once the oil is shimmering, carefully place the chicken thighs in the pan, skin-side down. You should hear a satisfying sizzle. Resist the urge to move them! Let them cook for 6-8 minutes until the skin is golden brown and crispy. You can peek to check the color—it should be a deep, appetizing amber.03
-
Flip the chicken thighs so they are skin-side up. At this point, you can pour off most of the rendered fat from the pan, leaving just a tablespoon or so for extra flavor. Carefully brush about half of your prepared sticky sauce all over the tops of the chicken thighs, making sure to get every bit coated.04
-
Transfer the entire skillet to the preheated oven. Roast for 20-25 minutes, or until the chicken is cooked through and registers 75°C (165°F) on an instant-read thermometer inserted into the thickest part without touching the bone. The sauce will be bubbling around the edges beautifully.05
-
Remove the skillet from the oven—be careful, the handle will be extremely hot! Brush the chicken with the remaining sauce. For extra stickiness and color, you can pop it under the broiler for the last 1-2 minutes, but watch it like a hawk so it doesn’t burn. The glaze should look thick, glossy, and perfectly caramelized.06
-
Let the chicken rest in the pan for about 5 minutes before serving. This allows the juices to redistribute, ensuring every bite is succulent. Sprinkle generously with sesame seeds and sliced spring onions right before serving for a fresh, colorful finish.07
Not what you're looking for?


